ragamuffin
Hero Member
- Messages
- 1,711
Or you could just solder to the pot and be careful about it 


Sorry to be a bit dumb here but I don't understand how this works. I imagine the large hole goes between the pot and the control plate? But I don't understand the tag. Do you solder ground wires onto it like you would solder them onto the pot? If so, doesn't the tag move around in the control plate cavity?Exactly this.
Another way to pull this off is with these guys. You can just bend the tab up a little for clearance.
View attachment 66370

McMaster-Carr
McMaster-Carr is the complete source for your plant with over 595,000 products. 98% of products ordered ship from stock and deliver same or next day.www.mcmaster.com
The StewMac parts are less expensive, and can be ordered individually, but I'll say this - McMaster Carr often deliver overnight without charging a premium if you're in reasonable proximity to one of their distro centers.
It's never a burden to address an earnest effort to understand.Sorry to be a bit dumb here but I don't understand how this works. I imagine the large hole goes between the pot and the control plate? But I don't understand the tag. Do you solder ground wires onto it like you would solder them onto the pot? If so, doesn't the tag move around in the control plate cavity?
Thanks for being patient and understanding. I truly appreciate the help.It's never a burden to address an earnest effort to understand.
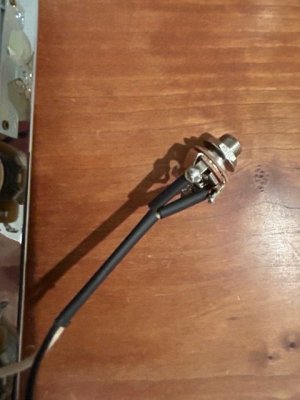
After first making sure you have long enough ground wire to span the distance between your components once they are installed in the guitar's cavity, you solder your ground to the lug on the washer, not the pot. You run your slim ground wire through the small hole and give it a crimp to establish your initial connection, and supplement with solder to close the deal. Then, yes, the pot shaft goes through the large hole. When you install the pot, the grounding washer is sandwiched between the pot and the body, establishing the contact for the ground.
The tag is superfluous - it's just what the image from McMaster happened to contain. They market this washer as a way to identify stuff.
It is necessary for a volume pot to work, that one of the outer lugs, usully the right one, is connected to ground. How you do that is your decision.For that method some diagrams show the right volume pot lug bent to the back of the pot and grounded to the bottom of the pot. Is this necessary? I am wondering why it would be as with the standard telecaster wiring the right lug on the tone pot is left open, not grounded or bent back.
Interesting. So is that possibly why my original attempt failed. I didn't ground that third volume pot lug. I mentioned above that when I tested it the guitar made a sound for a split second then no more. Could the volume pot not being grounded cause that, or was it due to the volume pot being fried. Or did the lack of volume pot grounding cause the pot to fry?It is necessary for a volume pot to work, that one of the outer lugs, usully the right one, is connected to ground. How you do that is your decision.
On the tone pot the third lug isn't needed. I even once clipped it off on a friends bass because it kept getting in the way.
The pot didn't "fry" due to lack of ground.Interesting. So is that possibly why my original attempt failed. I didn't ground that third volume pot lug. I mentioned above that when I tested it the guitar made a sound for a split second then no more. Could the volume pot not being grounded cause that, or was it due to the volume pot being fried. Or did the lack of volume pot grounding cause the pot to fry?
It is maddening if one doesn't understand the concepts well as there are so many different "standard 3 way wiring" telecaster wiring schemes. Some show running a ground wire from the back of the tone pot to the back of the volume pot, many don't. Fralin advises not to do that as they say it is over grounding.The pot didn't "fry" due to lack of ground.
What Spud said.The pot didn't "fry" due to lack of ground.

Thanks. Likely the issue I had was the tip not being hot enough to support quick heat transfer, and as a result I think the volume pot left lug got fried.What Spud said.
And a lack of ground on the volume pot would still give a signal, even with the volume on 0, so it would be impossible to mute the signal.
Had that problem not long ago, took a me while to figure out the connection to ground had come loose


I think I need to call Fralin and ask them as your wiring shows the ground from the tone pot to the volume pot, but Fralin's wiring diagram doesn't show that.Here's a picture from the shop were I got my telly wiring kit from, along with a 3-way diagram.
View attachment 66373
View attachment 66374
And this is how the result looked like (note: volume and tone are reversed):
View attachment 66375
It's not strictly necessary, more important is that all that is ground is securely connected to each other.I think I need to call Fralin and ask them as your wiring shows the ground from the tone pot to the volume pot, but Fralin's wiring diagram doesn't show that.
I went ahead and sent them an email which they generally answer the next morning. Since it is their pickups it is worth asking their opinion.It's not strictly necessary, more important is that all that is ground is securely connected to each other.
It is just a different way of achieving the same result electrically.One other question: Some people wire the capacitor from the middle tone pot lug to the right volume pot lug and then through the lug and grounded. Others ground the cap to the tone pot and don't wire to the volume pot and ground. I did the grounding on the tone pot. For that method some diagrams show the right volume pot lug bent to the back of the pot and grounded to the bottom of the pot. Is this necessary? I am wondering why it would be as with the standard telecaster wiring the right lug on the tone pot is left open, not grounded or bent back.
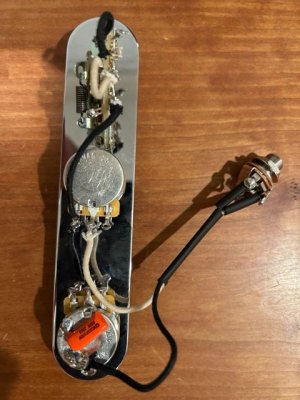
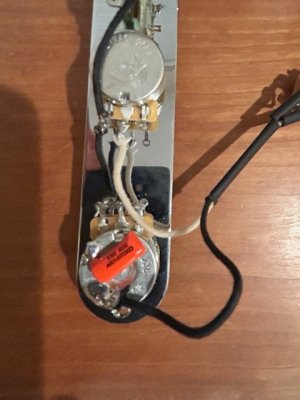
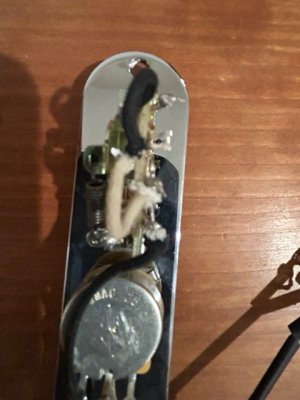
Here is where I am at now:It is just a different way of achieving the same result electrically.
Per your photos, once you have the new tip, I think it is just a case of working diligently and taking your time.