Leaderboard

Using Spray cans for a finish

Cletus

Hero Member
Messages
546
Anyone got any experience with this?

I'm thinking of a build (W neck only, body but too $ to buy from them) and I want to have it a kind of pumpkin orange. Now, as it's nigh on impossible to get reranch type products in Australia, I'm thinking of buying maybe grafitti paint (because of the huge range of colours) and then doing minwax poly over the top. Can someone either praise my genius or shoot this idea down before I spend money?

Cheers crew.
 
You might want to have a look at the color options for automotive paint.
Dupli-color is the one that some here are using in the USA from what I've read.

 
Steve_Karl said:
You might want to have a look at the color options for automotive paint.
Dupli-color is the one that some here are using in the USA from what I've read.

Cheers Steve. I've read that, but then you have people saying no don't use that. Confusion!  :sad1: :sad1: :sad1:
 
I painted 5 guitars with dulicolor, it's as good as it gets from a spray can. Dries quick, sands easy, buffs awesome.

Many on here have used it, and I don't recall a bad review yet.  Theres many good rattle can paints out there that are good, just make sure you use a laquer based paint and not an enamel.

If the directions on the can say "sandable" it's probably ok, that means it dries fast, and hard. That's what you want
 
Hey, something I know a little about! Using spray paint in cans!
I don't know about using the Minwax Poly over spray paint. If it's a water based poly, there should be no problem. If you plan to use a solvent-based poly, I would try the spray paint on a scrap piece of wood first, let it dry completely, then apply the poly. Let it dry and see if there's a reaction or not.
When using spray paint there are some tips to help make a very nice final product. Assuming you are painting a solid color and desire a glossy final finish, you may need to fill the grain of the wood first, spray a primer and wet sand it smooth. This may take several coats, depending on how well you filled and sanded. Your primer serves several functions: it fills, it reveals the flaws that require more filling, and it provides an even,  slightly "toothy" surface for your color coats.
Assuming you now have a beautifully smooth and primered body. Let that primer get fully dry. Even dry-to-the-touch paint needs to fully outgas.
Your spraypaint works much better warm and in a low humidity environment. Don't paint when it's raining or humid. You're just asking for frustration. Shake those rattle cans for a full minute. When I paint, I will hold the can under hot running tap water for a few seconds, then shake the can, warm, shake, warm shake, until my arm gets tired. Get ALL of that paint shaken off the bottom of the can.
Your first coat or two should be light "mist" coats. Barely any color at all. This helps your "toothy" primer coats to grab the color coats. The old rule still holds: Many light coats are better than one or two heavy coats of paint.
When you're ready for your color coats, make sure you hold your can upright, and make even, slightly overlapping passes over the project. You will be able to watch the wet coat flow as you move the can. Make sure to maintain an equal distance from the project. Don't "arc" your passes, but make them even and smooth. Start your paint before you actually hit the project and continue each pass until you're clear of the body. Don't start spraying at the front of the project and stop at the end. This will cause more paint at the beginning and end nad not as much in the middle.
Let your wet coat dry and paint more. I turn my project so the paint goes on front to back, then side to side. Perpendicular coats ensure even color coverage.
Let that paint dry. Depending on relative humidity, it may take a week or two to fully outgas. Let it dry. Then a wet sanding with fine sandpaper will reveal all the "orangepeel" that your smooth paint really looks like. If you sand through to your primer layers, spray on some more color coats, let them dry and wet sand again. Let that dry and you're ready for your poly coats.
Apply those as recommended by the manufacturer.
As with any finish, the better your preparation and sanding, the better the finished product. Take your time and do the job right.
Can't wait to see pictures! Best of luck, mate!
 
anorakDan said:
Hey, something I know a little about! Using spray paint in cans!
I don't know about using the Minwax Poly over spray paint. If it's a water based poly, there should be no problem. If you plan to use a solvent-based poly, I would try the spray paint on a scrap piece of wood first, let it dry completely, then apply the poly. Let it dry and see if there's a reaction or not.
When using spray paint there are some tips to help make a very nice final product. Assuming you are painting a solid color and desire a glossy final finish, you may need to fill the grain of the wood first, spray a primer and wet sand it smooth. This may take several coats, depending on how well you filled and sanded. Your primer serves several functions: it fills, it reveals the flaws that require more filling, and it provides an even,  slightly "toothy" surface for your color coats.
Assuming you now have a beautifully smooth and primered body. Let that primer get fully dry. Even dry-to-the-touch paint needs to fully outgas.
Your spraypaint works much better warm and in a low humidity environment. Don't paint when it's raining or humid. You're just asking for frustration. Shake those rattle cans for a full minute. When I paint, I will hold the can under hot running tap water for a few seconds, then shake the can, warm, shake, warm shake, until my arm gets tired. Get ALL of that paint shaken off the bottom of the can.
Your first coat or two should be light "mist" coats. Barely any color at all. This helps your "toothy" primer coats to grab the color coats. The old rule still holds: Many light coats are better than one or two heavy coats of paint.
When you're ready for your color coats, make sure you hold your can upright, and make even, slightly overlapping passes over the project. You will be able to watch the wet coat flow as you move the can. Make sure to maintain an equal distance from the project. Don't "arc" your passes, but make them even and smooth. Start your paint before you actually hit the project and continue each pass until you're clear of the body. Don't start spraying at the front of the project and stop at the end. This will cause more paint at the beginning and end nad not as much in the middle.
Let your wet coat dry and paint more. I turn my project so the paint goes on front to back, then side to side. Perpendicular coats ensure even color coverage.
Let that paint dry. Depending on relative humidity, it may take a week or two to fully outgas. Let it dry. Then a wet sanding with fine sandpaper will reveal all the "orangepeel" that your smooth paint really looks like. If you sand through to your primer layers, spray on some more color coats, let them dry and wet sand again. Let that dry and you're ready for your poly coats.
Apply those as recommended by the manufacturer.
As with any finish, the better your preparation and sanding, the better the finished product. Take your time and do the job right.
Can't wait to see pictures! Best of luck, mate!

Dan that is a fantastic post! you have my thanks!

You'll have to satisfy yourself with my current build, http://www.unofficialwarmoth.com/index.php?topic=15384.0

but I will be sure to post pics on this one  when I begin.

Cheers.

 
I love your BK SG build. I've been a loyal follower of that thread.
When I get a better job, my first Warmoth project is going to be a BK Iceman. That korina is such a lovely wood!
 
Dan:

Excellent post, thx for the detailed advice.

I will soon attempt a "candy tangerine" finish by (after filling, sealing &priming) doing a krylon silver, then 5-6 soats of reranch orange.

And advice for that project? Particularly how the orange will go on top of or adhere to the silver? Thanks!
 
Test your combination on a scrap piece of wood first. Make sure the orange paint won't react badly to the silver.
You might want to consider a metallic gold base, rather than silver. It will provide a warmer base than the silver. Maybe try both gold and silver on your test piece, side-by-side, then apply your color coats to both. Then you can see what, if any difference the base color imparts to the final product.

One very important item I neglected in my first post: Always, always, always use proper breathing protection and adequate ventilation. Paint fumes build up, and solvent based ones can be dangerous. By proper breathing protection I don't mean a paper filter mask, but a respirator with replaceable filters. A well-stocked hardware store should carry them. Make sure the filters are rated for painting and replacements are readily available. Read the directions and make sure the respirator straps are properly adjusted. When wearing it you should only breath filtered air. No gaps around your mouth and nose. The investment in a quality respirator now means happier lungs later one, believe me.

As with anything, a satisfying end result in using spray paint is patience and practice. Any mistake can be sanded out and re sprayed. If you think you've sprayed enough paint, stop. Let the project dry and spray more paint until it looks like you want.

Finally, you will be tempted to touch your painted project to see if the paint is dry. Fight this urge. There will be overspray on something, probably whatever is holding your body. Touch that instead of your project body. It got the same paint at the same time, but you won't care if it gets a fingerprint in soft paint. You will care if your body does.
 
Great advice here guys. I just duplicolored a top and headstock today. The body is mahogany that has been truoiled and dusted with some satin Deft. I plan on hitting the top and headstock with the Deft and then buffing and polishing them out to a shine. I didnt grainfill the back so I think/hope this will give me a better transition than just hitting the top with gloss. We'll see.
 
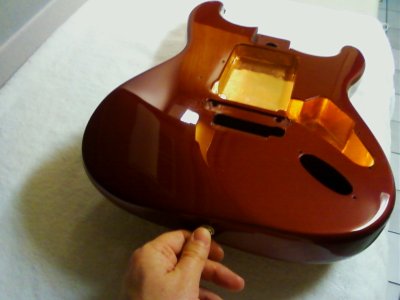
I did a cherry red strat with duplicolor and it turned out awesome. I can save you the experimentation with the clear coats. Spray on poly does not adhere. I tried wice and both times it bubbled up and peeled off on me. Ended up using Minwax spray on laquer. My one recommendation is to make sure you give it plenty of time to cure before you buff. At least 2 weeks.
 

Attachments

  • 0727091957b.jpg
    0727091957b.jpg
    133.8 KB · Views: 397
http://www.unofficialwarmoth.com/index.php?topic=15394.0

The soloist there was done using some generic "Rust Paint" from Canadian Tire, with a semi gloss clear from the same company. Turned out pretty good, especially considering how rushed the process was.
 
Back
Top