Leaderboard

Tuner washers won't fit with headstock veneer

PumpinIron

Junior Member
Messages
136
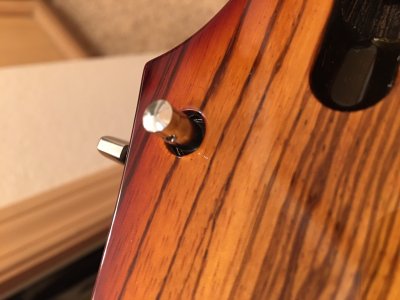
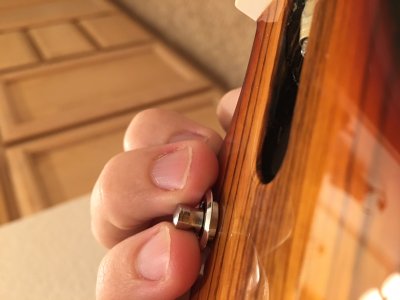
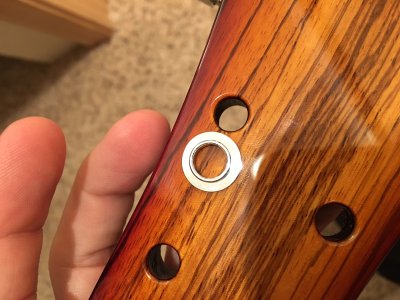
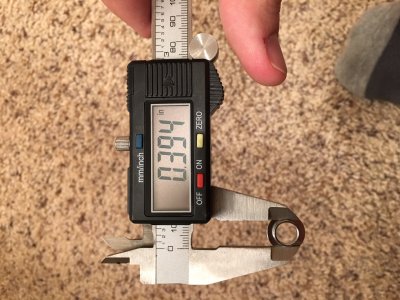
So, I'm in the process of assembling my Warmoth body and neck. When I made my way to the neck to install the tuners, I discovered that the little washers with the lip on them (not sure if there's a proper name for them) don't even come close to fitting in the holes. At first I thought it was the headstock veneer causing this, but even trying to put the washers on the backside of the neck won't work, as the holes are still too small even without the veneer.

The tuners themselves fit in the hole perfectly fine without any struggle at all.

I'm not sure what to do in this situation. If I enlarge the entire tuner hole, the tuner will be loose (not snug) in the hole. I could use a drill and just try to enlarge the first few millimeters of the top of the hole, but then I worry that drill will cause the clear coat on the headstock veneer to crack, which could be bad.

I'm really stuck on this one, so any input would be appreciated.
 

Attachments

  • IMG_0252.JPG
    IMG_0252.JPG
    666.1 KB · Views: 328
  • IMG_0253.JPG
    IMG_0253.JPG
    590.1 KB · Views: 319
  • IMG_0254.JPG
    IMG_0254.JPG
    864.2 KB · Views: 338
  • IMG_0255.JPG
    IMG_0255.JPG
    759.1 KB · Views: 331
Could you please detail the following:-

  • What tuner holes were ordered on the neck, so we know exactly what they are
  • What the make and model of tuners are you are trying to fit

Also some sort of measurement with calipers ideally so the difference is known might help to inform providing an answer.

It could be as simple as wrapping some sandpaper around a pencil and cleaning up the finish at the holes or you may need to get a reamer.  You will also likely need a way to press or clamp them in as they should not be too lose in any case. But if the holes are too tight you could crack the headstock.

Don't use a drill it will wander in any case and cause possibly more problems than cracked finish.

Have you checked your thread on who can do a wiring harness as a few replied but no reply from yourself.

 
If you live near a Harbor Freight store, they sell a T-handle reamer for $3.

31YD7J3UfML._SY463_.jpg
 
The tuners are Schaller M6 locking tuners, which I also got from Warmoth. The headstock was reamed for Schaller tuners as well. Like I said, they do indeed fit, it's just that top washer doesn't fit due to the lip on it being too big to fit in the hole.

I'll go take a measurement with my calipers momentarily.

Thanks for reminding me about that wiring harness thread. I actually ended up finding a guy on eBay to do it fortunately!
 
There are a few M6 models. So they probably look similar to this. At least in terms of the fixing.

M6-Bundscheibe_V1.jpg


So, fortunately, they are more like washers than vintage bushings. Probably some sandpaper wrapped around a pencil or similar will handle cleaning the finish so the washer type parts will fit and then the part with the thread goes in and will snug it up.

Good you got your wiring sorted out.
 
Warmoth got back to me in regards to this, here is their response:

Hi, Chris. Looks like this your orders were going down during the nebulous transition Schaller forced on us when they redesigned their tuners. At some point this past Summer, they changed from using a stepped ream (the 25/64” back, 11/32” front; how did our Schaller ream for years) to using a straight 25/64” ream all the way through. If your neck made it out of here with the old stepped ream, the newer style of tuners will require opening that front section. Many customers have found success using a stepped drill bit.

If it has the current/new Schaller ream, then it’s likely the finish and clear coat building up around and inside the holes. This is more common for headstocks with exotic wood veneers, too, as the exotic wood requires an isolator first, for the rest of the finish to adhere properly. In this case, you can go more slowly and use some coarse sandpaper wrapped around a screwdriver shaft (or something similar) to gradually sand open the holes; or the fast route and try the stepped drill bit.


So it looks like I need to buy one of these tapered reamers such as this: https://www.harborfreight.com/t-handle-reamer-66936.html

If I do that, I should be able to remove .082 of material from the headstock veneer and get the bushings in. The question is, would you use a reamer or just a sandpaper around a pencil? If it's the latter, what grit would you suggest as to not damage anything too bad?
 
Here's some photos I took BTW:


Attachments

  • IMG_0256.JPG
    IMG_0256.JPG
    889 KB · Views: 310
  • IMG_0257.jpg
    IMG_0257.jpg
    600 KB · Views: 333
Ok, do the holes in the headstock have a step, in other words, two different dimensions or just one?

If it just needs some paint removing sandpaper around a pencil, perhaps some 120 would do it. If the hole needs enlarging the stepped drill bit Warmoth mention would be useful.


Nope, there is no step inside the hole. It’s one size all the way through, except for the veneer, which obviously has a slightly smaller hole.
 
PumpinIron said:
Nope, there is no step inside the hole. It’s one size all the way through, except for the veneer, which obviously has a slightly smaller hole.
That slightly smaller diameter hole in the veneer is the step. Last neck I bought with "Schaller" holes, the step was maybe .0625" deep, just enough to center the reach nut. I usually use Hipshot tuners which still fit wonderfully in the old stepped holes, but that's because they use a flat trim washer.

FWIW, I'd use the sandpaper or a reamer before a step drill. Just go gently with what ever you decide to use, and do it by hand, you don't want to take a chance of messing up that beautiful veneer!

And thanks for posting Warmoth's response to your inquiry. I finally have an answer as to why Warmoth changed the "Schaller" holes. (There was never an explanation from them that I saw or heard.) The stepped holes are still available by request, but with the popularity of Hipshot tuners, maybe they should be listed as a standard option.

Good luck, keep us posted!
:icon_thumright:
 
Do the reach nuts go through the holes as they are? If so, you could use some other washers. I can't see any very good reason for Schaller for changing the design like that. Seems like bloody-mindedness.
 
Fat Pete said:
Do the reach nuts go through the holes as they are? If so, you could use some other washers. I can't see any very good reason for Schaller for changing the design like that. Seems like bloody-mindedness.

Actually yes, the reach nuts go through the holes just fine. This thought had crossed my mind as well... Technically all I need are some new washers and that would solve the problem 100%. Maybe I'll hit up ACE Hardware and see if they have any chrome washers. Problem is, they've have to be a very specific size, as I don't want the washers to have any slop in them.
 
PumpinIron said:
Fat Pete said:
Do the reach nuts go through the holes as they are? If so, you could use some other washers. I can't see any very good reason for Schaller for changing the design like that. Seems like bloody-mindedness.

Actually yes, the reach nuts go through the holes just fine. This thought had crossed my mind as well... Technically all I need are some new washers and that would solve the problem 100%. Maybe I'll hit up ACE Hardware and see if they have any chrome washers. Problem is, they've have to be a very specific size, as I don't want the washers to have any slop in them.

I think using this method will allow for some play with the peg shaft.  It all depend on how much extra material is there.  I would tray to make it work with the rasp of sandpaper.
 
Time zone differences.

I would also go with a sandpaper around a suitable object or if you have it a reamer based on the additional information.

As BigSteve22 mentioned also that two-step hole we need Warmoth to keep as an option for Hipshot users like him and myself.
 
Back
Top