Leaderboard

Telerauder Build

rgand

Epic Member
Messages
5,934
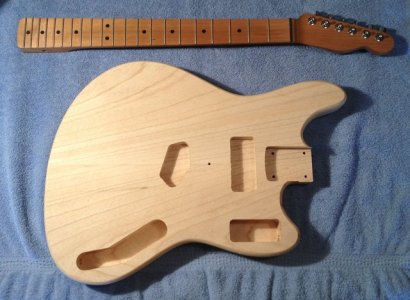
OK, then. I spent a good portion of today making shavings and sawdust. I was careful to set things right and everything went smoothly. I didn't burn it too badly and finally got the hang of running the router. The new router table worked great. I routed the body except for the comfort contours and one connecting groove between the neck pickup and the switch cavity. I was a little surprised that the roundover bit (The biggest one at 7/16") actually cut much better than the other bits. It was almost anti-climactic.

Since I'm new at this, I welcome any suggestions from you experienced builders.

The wiring holes need to be drilled between things, too. Then, it's a matter of sanding and getting it ready for paint.

As it is, the body weighs 4 lbs 1 oz. I expect it to drop below 4 lbs when I finish whittling on it.

The neck is a Warnoth roasted maple/roasted maple with SS6150 frets and a 10-16 contour. Fender staggered, locking tuners.

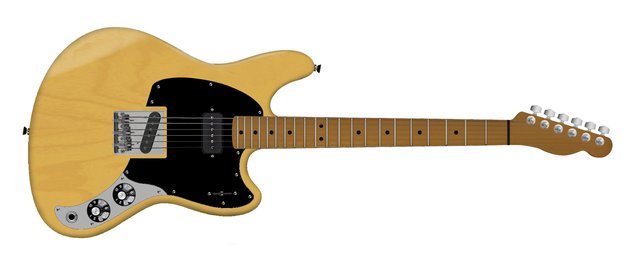
Here's what it looks like at this time, along with the neck. Oh, yeah, and an image of the build concept.
 

Attachments

  • MarauderHybrid3sm.jpg
    MarauderHybrid3sm.jpg
    19.5 KB · Views: 80
  • IMG_1359sm.JPG
    IMG_1359sm.JPG
    74.6 KB · Views: 90
Very nice! And no animals were harmed in the making of this body? :icon_biggrin:

Wire runs between cavities are most easily done with "aircraft" bits. They're just twist drills, but they're longer - usually 12". They're designed for drilling through hollow bulkheads, but for our purposes the length lets you lay down the drill motor and drill more closely to parallel to the body without the motor's chuck or body getting in the way. Plus, they let you drill longer/deeper holes.

 
Cagey said:
Very nice! And no animals were harmed in the making of this body? :icon_biggrin:

Wire runs between cavities are most easily done with "aircraft" bits. They're just twist drills, but they're longer - usually 12". They're designed for drilling through hollow bulkheads, but for our purposes the length lets you lay down the drill motor and drill more closely to parallel to the body without the motor's chuck or body getting in the way. Plus, they let you drill longer/deeper holes.
Thanks, I have several sizes of them. I used them for working on aircraft. :icon_biggrin: I figure I'll go right down through the neck pocket to connect the pickups and from the control route to the bridge pickup. I'll trench across between the neck pickup and the switch route because that will be covered with the pickguard without any seams.
 
Sorry - didn't know you knew about them. It's a question that comes up from time to time.

The trenching move is a good one. I've done it on Jaguars and Jazzmasters because I like to use shielded cable rather than shielding the cavities, and those are often thicker and won't all fit through the typical holes.
 
Cagey said:
Sorry - didn't know you knew about them. It's a question that comes up from time to time.
I'm open to all help. There may be something new I need to know about.

Cagey said:
The trenching move is a good one. I've done it on Jaguars and Jazzmasters because I like to use shielded cable rather than shielding the cavities, and those are often thicker and won't all fit through the typical holes.
What is the best bit to use for this? The same 1/2" one I cut the cavities with? I'll need to make a template with a groove cut into it to make the cut. It's all under the pickguard so I can make a fairly wide cut.
 
Awesome, Rgand, simply awesome! It looks killer!

A question - What about the control plate? Is that something you'll be able to get/buy, or will you have Doug make one?
 
Rgand said:
What is the best bit to use for this? The same 1/2" one I cut the cavities with? I'll need to make a template with a groove cut into it to make the cut. It's all under the pickguard so I can make a fairly wide cut.

You're only running a couple/few wires through it, so it doesn't need to be much. 1/4" is probably generous, but I can't see where it matters if you go larger. I don't think you can get pattern follower bits any smaller than that without going down to a Dremel tool.
 
Logrinn said:
Awesome, Rgand, simply awesome! It looks killer!

A question - What about the control plate? Is that something you'll be able to get/buy, or will you have Doug make one?
Thanks, Logrinn. I can get a control plate from Faction Guitars if I want the original layout. Since I'm not going to have the rocker switch in it, I'll just make one out of 14 ga stainless and polish it.
17A_01_large.png


Cagey said:
Rgand said:
What is the best bit to use for this? The same 1/2" one I cut the cavities with? I'll need to make a template with a groove cut into it to make the cut. It's all under the pickguard so I can make a fairly wide cut.

You're only running a couple/few wires through it, so it doesn't need to be much. 1/4" is probably generous, but I can't see where it matters if you go larger. I don't think you can get pattern follower bits any smaller than that without going down to a Dremel tool.
That makes sense. I'll probably cut it a little wider then since I already have the bits for that. Besides, it won't hurt to carve out another ounce of wood. :laughing7:
 
Logrinn said:
Right! I didn't realise that Faction made that particular control plate.
I think he offers plates for all the patterns he sells.
 
That's really nice work Rgand! I've been doing wood work for a LONG time, and I'd be proud to say I made something that nice. Going to enjoy watching this build, keep them pix a'coming!  :icon_thumright:
 
BigSteve22 said:
That's really nice work Rgand! I've been doing wood work for a LONG time, and I'd be proud to say I made something that nice. Going to enjoy watching this build, keep them pix a'coming!  :icon_thumright:
Thanks, Steve. It's a fun project, for sure. I'm not all that familiar with this kind of woodworking so it's nice to get positive feedback like that.

I need to make a Home Depot run for a couple things but otherwise it's almost ready to prep for a finish. So now I have to really decide what kind of finish to put on it. Although my concept image is blonde, that's not set in stone. I've treated a couple scraps with vinegaroon (ebonizing, in woodworking terms) and experimented with a couple finishes. I've done clear, clear over vinegaroon, clear on amber dye, clear on amber dye over vinegaroon. So far, nothing really excites me once the clear coat goes on. It's either too bright or too boring. I'll slice up the existing scraps so I have more test pieces and keep experimenting. I'll see what colors/whatever I can find in Home Depot while I'm there.
 
Thanks, VB.

Cagey said:
Wire runs between cavities are most easily done with "aircraft" bits. They're just twist drills, but they're longer - usually 12". They're designed for drilling through hollow bulkheads, but for our purposes the length lets you lay down the drill motor and drill more closely to parallel to the body without the motor's chuck or body getting in the way. Plus, they let you drill longer/deeper holes.
I was thinking of a 5/16" hole between the cavities. That way I might be able to use some quick disconnects in case I have to take it apart in the future without de-soldering anything (speaking of which, what disconnects have any of you used for this?). Would 3/8" be overkill, like swatting a fly with a Buick?
 
I'm sure 5/16" is plenty generous. Probably doesn't even need to be that big - they usually aren't - but it's not just a matter of whether the wires will fit, it's whether you can get a wire through when there are already wires in the run. In longer runs they have a tendency to tangle and drive you nuts until you finally decide to sacrifice a coat hanger to use as a fish line and pull the wire instead of feeding it. With a larger hole, that's less of an issue.

As for preferred connectors, I don't really have a preference as I've used them so rarely in guitars I had to stop and think if I ever have. The only example that comes to mind is is on piezo installations, and you're not usually given a choice with those - they come with whatever the manufacturer decides to use.

The problem with most small connectors is they require some kind of special crimping tool that costs a surprising amount of money, so if you're not going to use those connectors a lot it makes little sense to buy one. Production quantities of such specialized tools are too small for there to be any economies of scale. Besides, I've found that for as often as connections need to be broken, the amount of work added by the desoldering/resoldering requirement pales in comparison to the amount of work needed to even get to that point. Not to mention how often connectors are fail points.
 
Thanks for that, Kevin. I do have Molex connectors that I used in my airplane.
71m73J5z6XL._SL1283_.jpg


Although these are crimp-on connectors, I used to solder them as well as crimp them. They are a snug press fit and might survive the vibrations in a guitar. They could be fairly effective if used without the housings and are covered with some tubing that won't permanently shrink on them. They do take a bit of room in length but they'd fit through just about any reasonably sized hole. Obviously, multiples would be a bit more of a hassle.

I'm not sure and will think this over some.
 
Those Molex connectors are a good choice for modular assembly and simplified repair, but they have a very low recycling count. In other words, they're only meant to be used a small number of times before they start losing tension and become intermittent. There's a fine line between an alloy that will crimp tightly, but have enough spring to it to tolerate repeated reinsertions. Of course, people get away with exceeding spec all the time with those things, but I suppose it depends on how fault tolerant you can be in a given situation. Still, if you already have the parts and crimping tool, how often are you gonna break those connections? Probably somewhere between never and rarely, so you could get away with it.
 
Yeah, rarely if at all sounds about right. I measured one of the single connector housings and it would need a huge hole to go through so the ends without any housing at all will be best if I decide to try them. I have used them extensively with a stack of radios that went in and out quite often and they never failed. What is dicey is to get them out of the housing blocks intact after they're installed. No housing, no issue, there.
 
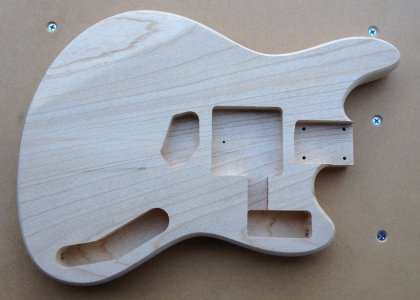
Today I cut between the pickup cavity and the switch cavity. I already had a Tele control route pattern on hand so I just used that. LOL, it's wide enough I could run Romex to the switch and have room to spare.

As long as I had the router set for the proper depth, I made room for a middle pickup in case I ever want one. I just enlarged the neck cavity until it was big enough to take another pickup.  It's like a swimming pool route but since it only encompasses two pickup positions, it's maybe a hottub route or a wading pool route. :icon_biggrin:

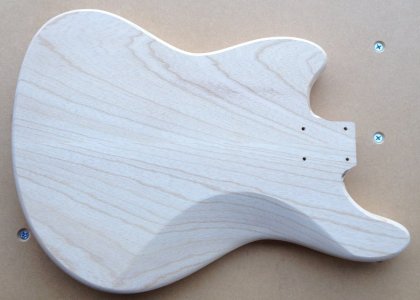
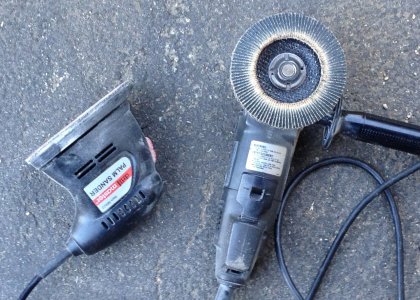
I then cut the arm and belly contours. I used a peanut grinder with an 80 grit paddle wheel to rough in the belly contour and cleaned it up with a palm sander (also 80 grit at this time).

When I went to cut the arm contour, I was going to use my belt sander and make very short easy work out of it. BUT, the darn thing wouldn't work. The motor runs but the safety clutch won't grab the drive roller. I guess I'll have to take it apart one of these days and fix it. Meanwhile I wanted to get the job done so I used the peanut grinder and palm sander again.

The body now weighs 3 lbs 12 oz. This body is much the same size as a JM so that's quite a nice light piece of wood. I still have to drill the connecting holes and sand the whole thing. The holes will be easy but the sanding will take a bit of time. I'll change out the pad on my palm sander to 220 and go at it for an afternoon. There's going to be quite a bit of hand shaping to happen on both sides of the neck pocket so I expect the better part of a day just to get it finish sanded. I guess 220 is fine enough for that. Question here: is it wise to fit all the parts on before the finish or after it's applied?

Now I really have to get down and decide on a finish. I have experimented some with dyes and clear coats but so far the results are sucko at best. Got some learning to do there. Is anyone here familiar with the Wudtone finishes? I like the look and the idea of no spraying but are the finishes something one can do successfully with no experience?
 

Attachments

  • IMG_1373sm.JPG
    IMG_1373sm.JPG
    196.4 KB · Views: 52
  • IMG_1374sm.JPG
    IMG_1374sm.JPG
    166 KB · Views: 44
  • IMG_1379sm.JPG
    IMG_1379sm.JPG
    320.3 KB · Views: 17
That's looking very nice. I love it!
Some light yellow dye to get a color similar to your mockup would look great I think.
On the other hand - probably any color would look good on that body.
 
Back
Top