Tapped threads and Machine screws.

stratamania

Mythical Status
Messages
11,035
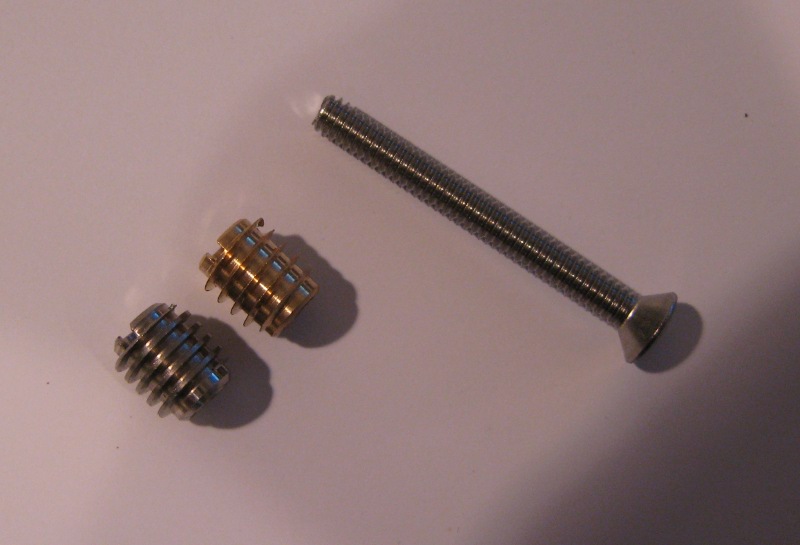
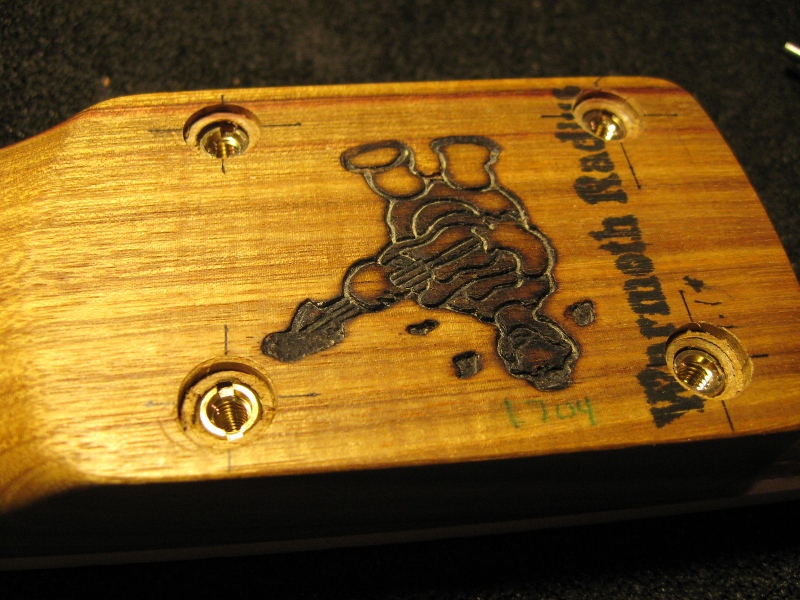
I had planned on using threaded inserts and machine screws for attaching the neck on the guitar I am currently doing. But am falling back to traditional neck screws to "bolt" the neck on.

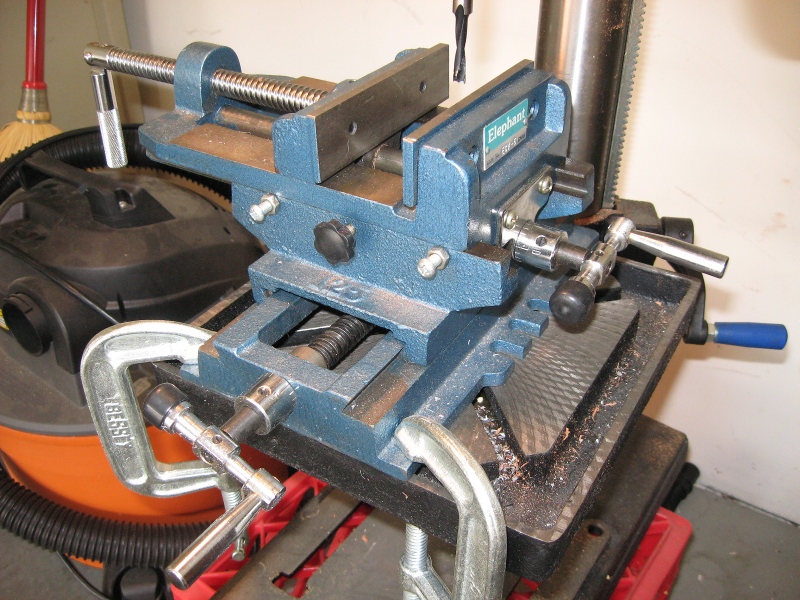
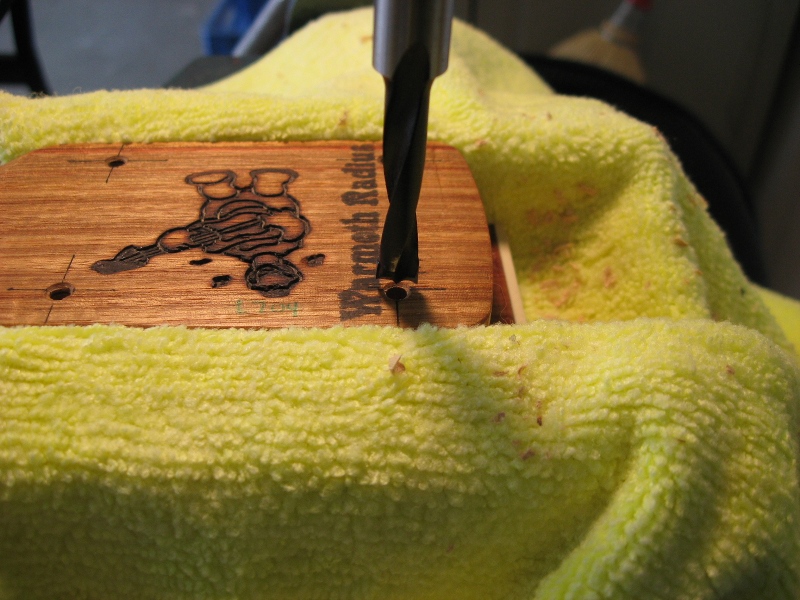
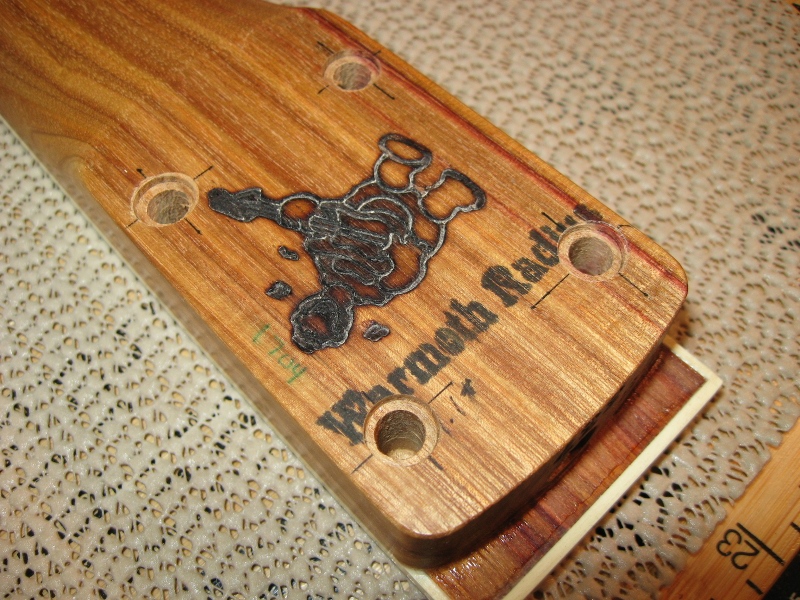
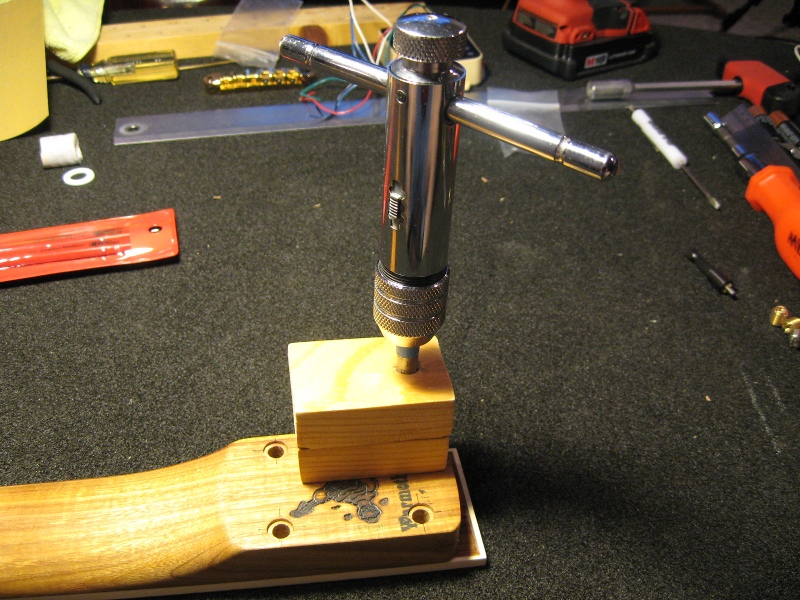
However my neighbours drill press wasn't up to the job of accurate enough holes and so on. I experimented on an old Squier Tele neck so nothing was at stake.

Even though the inserts were stainless steel and supposed to self thread the maple on this old Squier neck was tough and showing no quarter. Perhaps a tap for the outer threads of the insert would help.

I then came across a video linked here. http://youtu.be/gEBNd8FzJyA

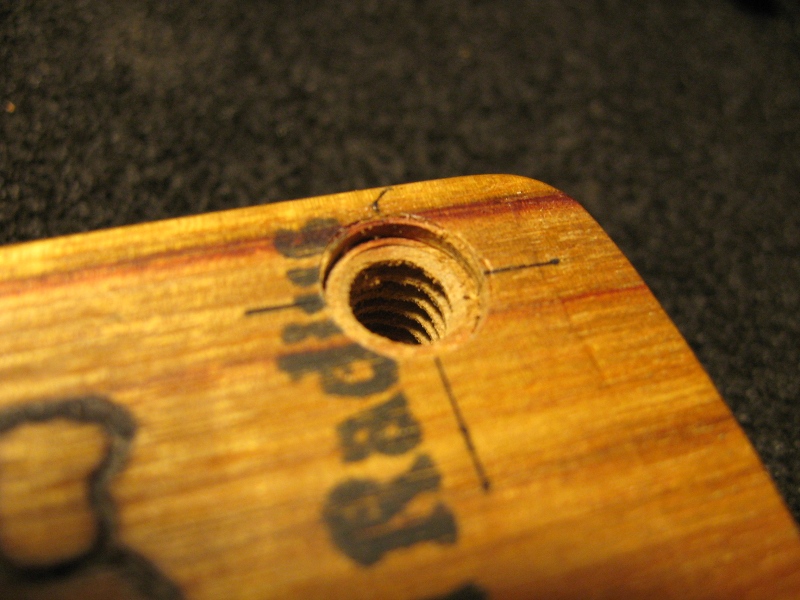
It's too late for the neck I am going to be using but I thought why not tap the neck mounting screws directly for a machine screw rather than the insert as it probably is more durable than a wood screw and eliminates the need for an insert.

Has anyone tried this ?

 
I think the external threads on the inserts are quite deep, so they hold better than a regular machine screw thread might.  And if you are someone who attaches and then reinstalls the neck fairly frequently, the threads in the wood will wear more rapidly and unpredictably than the metal insert.
 
Hi Bagman67, fortunately I don't take necks on and off that often if at all. My Malmsteen strat has inserts which got me to thinking about them to begin with.

I think personally the machine screw direct into threaded wood, for a #8 or 4mm may be a little fine. Perfectly ok on the large bolts shown in the video of course.  Just wondering more if anyone has tried this and what results they got.

 
I would never try that. It is as Bagman said and you intuited, the machine screw threads are too fine on the scale a neck needs if you were to thread the wood itself. You'd actually end up with a less sturdy mount that would wear faster, and might even let go prematurely. You're better off with wood screws if you're not going to install inserts. I honestly think the guy in that video is fooling himself about what he's accomplishing. He'd be better off with lag bolts if he has something against inserts, but inserts would be the way to do what he's trying to do.

As for the stainless vs. brass inserts, I've given up on the stainless. They're appropriate if you have an application where corrosion could be an issue (say, on a boat), but that's not usually the case with guitar necks. The brass works better, and while I may be buying my inserts wrong, this is something I've seen...

ScrewInsertCompare.JPG

You'll notice that the threads on the stainless insert aren't sharp, so they don't want to thread into a bare hole and make their own threads. The brass inserts have sort of a knife edge to them, so they cut better. Both are advertised as "self-threading", but it depends heavily on what you're trying to thread into. Guitar necks are always made of very hard woods, so the insert needs all the help it can get. The stainless part obviously isn't helping itself in that category.

In either case, you're better off tapping the hole, due to the hardness of the wood. The parts pictured above want a 1/4" hole, but you tap for 5/16" at whatever thread pitch your insert happens to be.

You mentioned holding the neck to drill the holes, which was a mistake. You want the holes to be at 90° to the heel, and trying to hold to that by hand is an exercise in futility. You need a drill press, and almost any one will do, but you also need something to hold the neck that isn't as squishy as your hands. Something like this...

IMG_2851_Sm.JPG

...is in order, along with something to protect the neck when you clamp it...

ClampWithPadAndNeck.JPG

Make sure your bit is at 90° to the neck, and drill the 1/4" holes, then countersink them a bit...

IMG_2854_Sm.JPG

So the inserts end up lower than the surface of the heel. Make yourself a little jig to hold the tap to 90°, and cut some threads...

IMG_2858_Sm.JPG

...and it ends up looking like this...

IMG_2859_Sm.JPG

and then you can install the inserts...

InsertsIN.JPG

Works like a charm. Neck joint will be tighter than dammit, which is good for sustain and high-end response, and you can take it off and put it back on as often as you'd like with no concern about wear.

 
Cagey, excellent information and confirms some thoughts I was having on what would be needed for a good result.

Unfortunately I don't have the tools or access to them. I am sticking with the normal screws for now. Still if I get some more tools in the future this is great info. Thanks. 
 
Which 5/32 tap are you using there Cagey?  I am guessing that those are these guys right here that are the inserts.  Also, how deep do you drill the 1/4" hole?  Thanks in advance for the info.
Patrick

 
Patrick from Davis said:
Which 5/32 tap are you using there Cagey?  I am guessing that those are these guys right here that are the inserts.  Also, how deep do you drill the 1/4" hole?  Thanks in advance for the info.

It's not a 5/32" tap, it's a 5/16"-16 bottoming tap. 5/16" is the depth of the thread cut, 16 is the number of threads per inch. It needs no larger than a 1/4"hole, and I set the depth of cut to just short of the fretboard. I've never measured that dimension, as it's not critical. As long as you don't hit the fretboard, you're good.

The internal dimension is different. You want an 8-32.

A "bottoming" tap will cut threads almost completely to the depth you run it in. There are other tap types, but they're designed more for metal. In this case, you want a "bottoming" tap.

The number of threads per inch is critical, so you have to know what the thread pitch is of the insert you're using. Oddly enough, you rarely get that dimension. I don't know why. Perhaps because they're "self-tapping", so it doesn't matter. Theoretically, the insert will cut the threads. But, you can always put a caliper on them and figure it out. Measure the distance between threads and divide that into 1, and you're there.

 
My bad, typed 32 instead of 16, the 32 was for the 8-32.  So it is a 5/16"-16.  That is what I wanted to know.  I have a bottoming one of those, eBay came through again for a cheap one.  Just curious about the tap and how deep you went.
Patrick

 
I suppose it depends where you get the tapped metal inserts from, the stainless steel inserts I used had a nice sharp thread-cutting edge to them.
I used a drill press to drill the holes, and used extra virgin olive oil (yes the same stuff you use for cooking!) as a lubricant when I screwed the inserts into the Chinese maple neck of my cheap Chinese Tele copy.
I used stainless machine screws with allen heads to bolt the neck on.

I did some before and after recordings.
The metal inserts increased sustain and increased the amount of higher fequencies. A good result as far as I was concerned.
 
Thanks for the info and pics. I'm embarassed to admit - I started to put inserts in my wenge shortscale neck... umm a while back. And got frustrated and panicked when the threads started to pull up the wenge and split it. I've been too scared to continue, but my holes are drilled. I did figure out thought that the issue is likely with the SELF threading part, and that I need the block to keep it from pulling up as it goes in.

Use a tap, don't let the sharp knife edges sucker you in.
 
DaveT said:
I did some before and after recordings.
The metal inserts increased sustain and increased the amount of higher fequencies. A good result as far as I was concerned.

It really is a Good Thing. For as little as it costs, you'd think OEMs would do it as a matter of course. Kinda like treble bleeds on volume pots. Such a Good Thing, you wonder why they try to save the 35 cents it costs to do.
 
swarfrat said:
Thanks for the info and pics. I'm embarassed to admit - I started to put inserts in my wenge shortscale neck... umm a while back. And got frustrated and panicked when the threads started to pull up the wenge and split it. I've been too scared to continue, but my holes are drilled. I did figure out thought that the issue is likely with the SELF threading part, and that I need the block to keep it from pulling up as it goes in.

Use a tap, don't let the sharp knife edges sucker you in.

I used to run them in without threading the hole and didn't have too much trouble, but I learned early on to over-drill the holes just a tad. Used an 17/64" bit versus the 1/4" called for. Gives the wood someplace to go as the insert's threads displaces it. But, I'd still get a slight amount of blistering on some types of wood, so I'd just sand that back in order to get a firm contact between the neck heel and pocket.

On the plus side, it made the installation tighter than dammit, which was the object of the exercise. Downside was the amount of effort it took to get the little rascals installed nearly destroyed them. I didn't really worry about it because there's never any reason to remove them, but it wasn't pretty. Fortunately, they're not visible once the neck is installed.

Now I countersink and thread the holes, so it's not only much prettier, there's less risk of splitting the wood due to over-pressure. I used to sweat bullets thinking I was going to wreck a neck that cost anywhere between $200 and $700.
 
Cagey, it's probably a typo but when you mention over drilling the holes above a 1/4" it then says 11/64", should this say 17/64" ?
 
Holy dimensional dementia, Batman! You're absolutely right! Sorry about that. I've corrected the post.
 
This:

http://www.philtone.com/inserts.html

Except I use EZLok 5/16 - 18 with the 10-24 internal screws, #319-3 here:

http://www.catalogds.com/db/service?domain=ezlok&command=locate&category=thin_crbn_unc

Somehow I got them at Amazon, really cheap. Carbon steel. A regular 5/16-18 tap to start and a bottoming tap to get the sides straight. I wire-brush off the pink stuff and use regular ol' epoxy for, ahem, a firm grip. Irreversible, yes. No one is going to follow me around till death do us part so they can set about reversing my neck attachments?  :icon_scratch: One great joy of the low resale value of "parts guitars" is that you can fix the damn things and change stuff to make it better, unlike the vintage and even new "collectables" where you have to tiptoe around - "don't breathe on it you monster!" A vintage guitar that doesn't work at all because the soldering came apart, is worth more than a vintage guitar that has been repaired to work, at, like, playing music.
 
Reviving an old thread here....

A question or two to Cagey's great "tutorial"

How do you establish the 90 degree angle?

Why a 90 degree angle?

Not all necks are mounted in a pitched neck pocket.

Thanks
 
Pillar drills like the one Cagey shows in the photos have a table that can tilt. They can be adjusted so the drilling angle to the work is at the required angle for the job.

Most will have a built in scale to show you what angle the table is at. But it needs to be checked with a square especially that the drill is at the correct angle to the piece to be drilled more importantly.

Why 90 degrees ?

The body holes generally are pre drilled at 90 degrees in the body, so you want to maintain that angle so that all four screws can align through the length of travel. Even if one of them is off by much it can skew the correct fitting and alignment of the neck.

90 degrees is also known as a right angle. Which is the right one for this job on a F type neck pocket.

If the holes were at another angle and especially if the four were at differing angles the distance between the top of the hole and its bottom would be different. It would be at least difficult to fit and a pain to align the neck.

Most f type neck pockets are not pitched and the above applies. Even if they are pitched by a couple of degrees or less you would still do this in the same way. The holes in the body have some space or tolerance for the screws to pass through. It's only the neck that the threads screw into.


As long as this 'uns rebarfin' once in a while, I figure I'll add/amend a chunk or two, too. Too, to the 2 hero/guide articles and pips: Cagey of course, and then - between the two there's NOTHING left over not to know - this Philtone guy:

http://www.philtone.com/inserts.html

One quirk of his I don't repeat - he wants to be able to reverse them, so he doesn't glue? I don't get it - so he can dowel them, then drill for screws?
"Yhezz - she izz virginz - many tymz!!"
Following a bit down Cagey's path, I overdrill slightly, at least nothing's going to be splitting anything. But this is with the knowledge that some five-ton epoxy will be helping here and there, and that I know it'll be in line while the glue hardens because it's jigged that way. It can't NOT be in line, in fact it's going to be MORE in line because the final, braced-up glue-set fit can be made more accurate than a squeaky-tight tension-only version (by me anyway). If you don't slobber glue all over, the guitar itself can be the jig which holds itself in place! (Another one of those nifters where mass production inserts a potential shade towards imperfection in process, blow me Henry).

I use EZLok 5/16"-18 with the 10-24 internal screws, #319-3 - just a bit more wood left than the EZ Lok 3/8"-16 10-24 steel inserts = part #329-3. With the glue, we're so overkilling what's the diffie? Zoro, Rakuten, Amazon, ORDER THROUGH YOUR LOCAL HARDWARE STORE (Yes they can, GOOD Idea, just DO it) etc.; 10 for $8-$9. Yes steel is technically overkill no brass isn't overkill yes stainless is "better" (for god's sakes what are you planning to do to your guitar, Norfbender?) norf norf norf. There's a half-dozen just perfect sizes and shapes of these things that all work the same, you can't really get morerer or lesserer perfect than perfect, just different. Er. Jes'm work.

And on the subject of "hanging onto stuff" this is just about the best thing I ever bought.

http://www.grizzly.com/products/Parrot-Vise/D3125


Swivels sideways too, I have like six or eight different sets of holes to mount it to most furniture in the joint, including RIGHT BY this here computer, & wingnuts galore.... if a/the little woman doesn't want "tools in the living room" she must want to live in the garage, because that's sure not where the tools are! :icon_thumright: (i keep trying to write a song with the word "domestical" but I can't find nothin' that rhymes.... :sad1:)

It is much easier to get through stuff if it's absolutely rigid & non-absorbing. And while I admire & practice whatever improvisational methods I can find, particularly related to solving money and I have cut whammy slots in a guitar body "clamped" into a dresser drawer with my hip; etc.; etc.... The thrill is gone. Get'r done. I like the intellectual challenge of saving money and I PREFER the feel of hand tools but when I start making direct tradeoffs between hand fatigue & playing ability, bag it. I have a few* little things like this -


*(gaah)

and  dedication towards sanding blocks, little chunks of rubber, sticks & bits instead of munching my own flesh.

ABOVE ALL:


I mean, Duh.
 
Yeah, just not working hard enough. There's a dozen places you could put "domestical" and "testicle" in Robert Palmer's "Simply Irresistible" and it would fit like an old shoe  :icon_biggrin:
 
Back
Top