Leaderboard

Swamp Ash P-Bass Project, Questions

HockeyPop29

Newbie
Messages
9
I just received my P-Bass body from Warmoth, my first build using swamp ash as well as my first Warmoth project. I've built and kept or sold 6 guitars before this one, mostly using alder and maple, either hand rubbing the finish or lacquer.

This project is going to have a stained black body with a coat or two of lacquer, then I am filling the pores with opalescent mica powder, sealing it under a glass-smooth nitro lacquer top. I'm finishing the neck rickenbacker-style, sealing the rosewood under lacquer as well. It is 70% there and beautiful, with deep flowing grain.

The body came with a warning to not get it wet. Does this mean I can't raise the grain with a damp cloth and sand it off? Can I apply the black stain to the bare wood, or am I forced to first use wood sealer before I begin the staining process? I don't want to redo everything due to my starting out wrong, and would love any help I can get!

I will be posting pics as I go. The bridge I'll be using is a 2TEK 4-string, I use nickel-silver for all my instruments (unless the buyer has a preference), Hipshot ultralite tuning pegs with an extender on the E. We have not decided on any inlays at this point, but that may change.

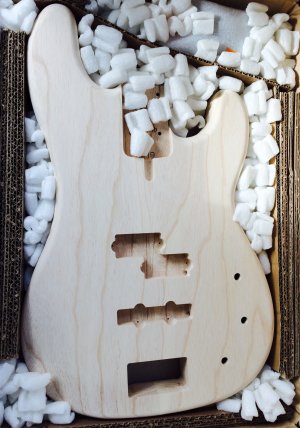
The image below is my blank slate...
 

Attachments

  • image.jpg
    image.jpg
    1.3 MB · Views: 333
HockeyPop29 said:
The body came with a warning to not get it wet. Does this mean I can't raise the grain with a damp cloth and sand it off? Can I apply the black stain to the bare wood, or am I forced to first use wood sealer before I begin the staining process? I don't want to redo everything due to my starting out wrong, and would love any help I can get!

No, it means don't go boogie-boarding with the thing, or use it as a floatation device.

You can stain Ash directly without issue. Some woods (for example - Maple, Alder) won't accept stain evenly, so you want to seal them to get an even result, but Ash isn't one of them.
 
Wetting the body to raise the grain is different than pouring water on it.  One trick I've used & seen used is to use rubbing alcohol.  It's only about 30% water, and most of it evaporates within a few minutes.  That will raise the grain without needing to worry about warping or absorption.

HockeyPop29 said:
This project is going to have a stained black body with a coat or two of lacquer, then I am filling the pores with opalescent mica powder, sealing it under a glass-smooth nitro lacquer top. I'm finishing the neck rickenbacker-style, sealing the rosewood under lacquer as well. It is 70% there and beautiful, with deep flowing grain.

WOWEE ZOWEE that sounds KEWL! Have you done something similar in the past and/or have pics?  Please do document the heck out of this finish process.
 
ihnpts said:
Wetting the body to raise the grain is different than pouring water on it.  One trick I've used & seen used is to use rubbing alcohol.  It's only about 30% water, and most of it evaporates within a few minutes.  That will raise the grain without needing to worry about warping or absorption.

HockeyPop29 said:
This project is going to have a stained black body with a coat or two of lacquer, then I am filling the pores with opalescent mica powder, sealing it under a glass-smooth nitro lacquer top. I'm finishing the neck rickenbacker-style, sealing the rosewood under lacquer as well. It is 70% there and beautiful, with deep flowing grain.

WOWEE ZOWEE that sounds KEWL! Have you done something similar in the past and/or have pics?  Please do document the heck out of this finish process.

Sounds KEWL indeed!  Please post photos of the progress!

 
I will post as I go, but a little bad news. I'm building this bass on contract for a musician, who told me earlier today that instead of my idea with the mica, he decided to go with silver in the pores, and he wants a gloss finish without the pores being leveled off. It'll still look way nice, and I'll shelve the mica powder for a Tele build for my son after the first of the year.  I have a more traditional tele to build under contract after I finish this bass, that one I have a little wiggle room on the finish (one thing I wanted to do on it was use a Springsteen Born to Run LP in place of the pickguard, but he couldn't see it in his mind's eye, so that, too, will wait until some time next year when I have the opportunity to build one for fun!)

As for the explanation on the water warning, thanks to all! I was hoping I just misread it! While I'm waiting for the finishing supplies to arrive, I'll try to get the neck done and some pics up. I suggested that I go no further in filling the pores of the rosewood if the body was going to be more 3D. All but 25-30% are filled now and I'm happy with it even now, so once I finish up on leveling my logo in the headstock, I'll give you an update.

Thanks again, everyone.
 
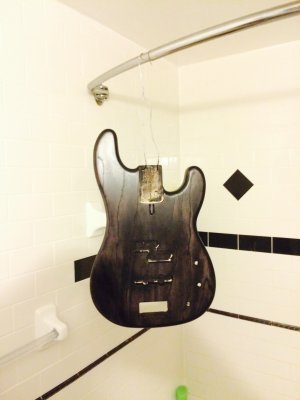
Well, I decided to go with Wudtone's Black Magic Woman dye kit, but it is not going as well as I'd hoped. Given the trouble Swamp Ash has taking dye, I have more of a faded black in some areas, with the brown wood peeking through (first picture). It looks cool, but not for this build.

The Wudtone kit came with an oil based stain and a shellac top coat. I have not passed the stain application, so I think I'm safe to apply a black poly urethane stain over this. Does anyone think there may be an issue with the stain on the body reacting with the urethane coat? (Minwax black polyshade I have on hand) I know from prior use it will give me the correct depth, and I can apply the silver powder and seal it in with a clear topcoat.

I'll post more pics at each step.
 

Attachments

  • image.jpg
    image.jpg
    777.5 KB · Views: 342
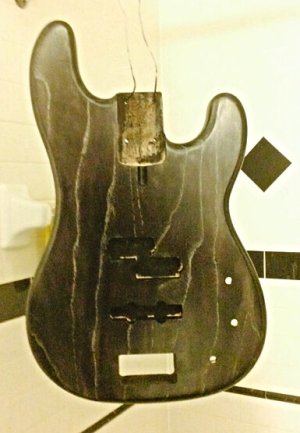
After the deep penetration coat and 5 base coats of the black tint, I finally was ready 2 days ago to apply the silver powder to the pores. I'm not even finished, and already I love the process. While at a local Guitar Center earlier that day, I saw a bass with what appeared to be a Swamp Ash top that was dyed rather poorly in comparison to the project I'm working on.
When preparing to apply the first "Hi Gloss Top Coat" (AKA: Shellac), I looked over the bass in the sunlight. The silver brings the contrast of the woodgrain out beautifully, to the point where I know for a fact that I will apply this technique with mica, gold, etc.
I have just applied a microscopic cost of shellac and realized I didn't get a photo of it, but I will take one later tonight, as it looks extremely close to its appearance before the shellac was applied.
 
You're absolutely right, it must have a photo to exist! Here it is in the initial stage of shellacking. I had some glare problems, so I had my son behind me with a poster board to deflect some of the glare. Unfortunately, it now is possible to see a blurred reflection of us both, but I never claimed to be a top notch photographer. The brown tones are actually reflections of our skin. Rather than trying to edit it out, I left the photo as it is.

I'll post another photo after 3-5 more coats, then when finished with the body. There will be a final flurry of pics when completed, along with a synopsis of the parts I chose.

The body ended up being a lot darker than I first imagined I could get it. Hats off to Wudtone. They have a good product, although they are VERY miserly in the amounts of materials they give you for the money.
 

Attachments

  • image.jpg
    image.jpg
    62.5 KB · Views: 325
Back
Top