Seraphina

Okay here goes with another chapter. Nobody complained about the excessive detail last time, so here’s more.

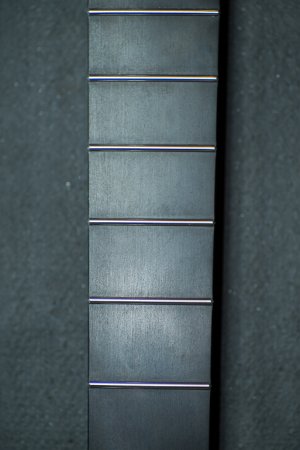
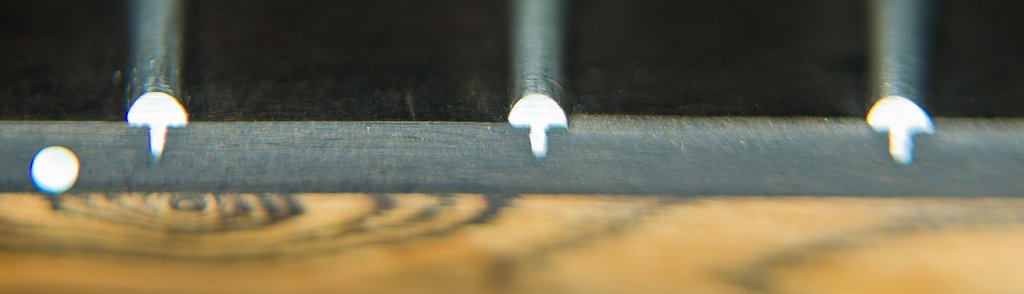
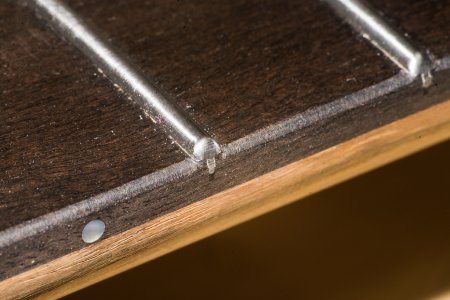
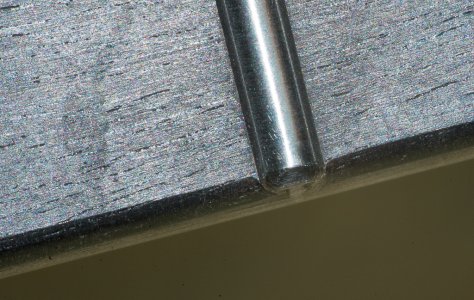
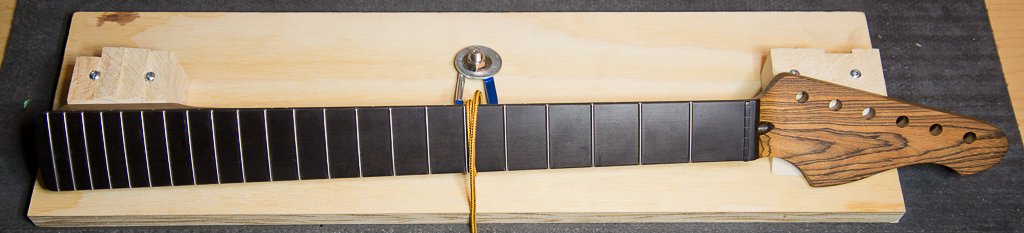
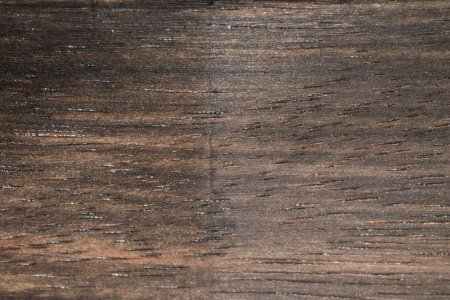
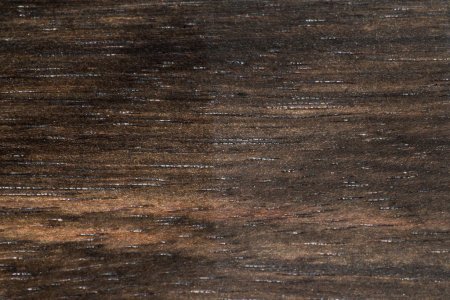
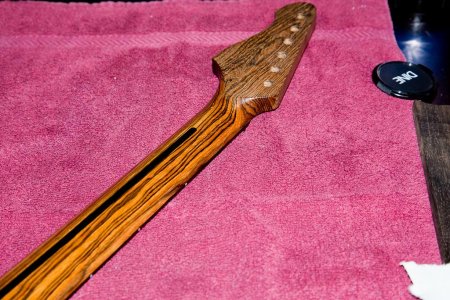
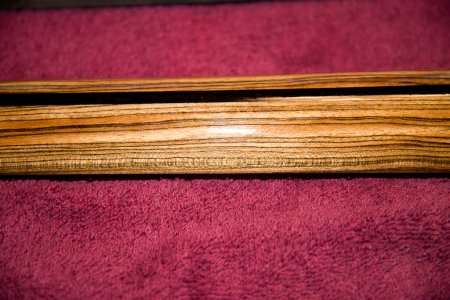
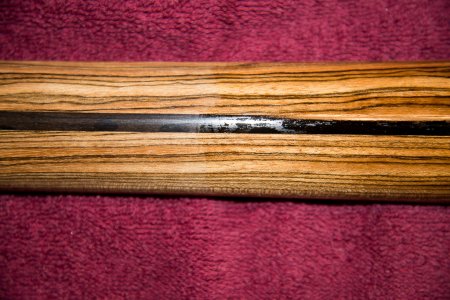
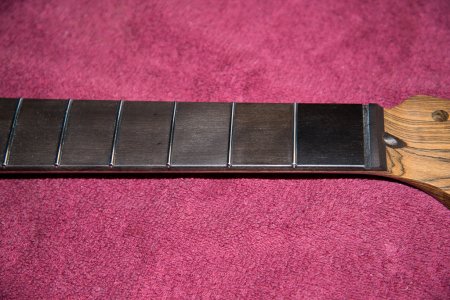
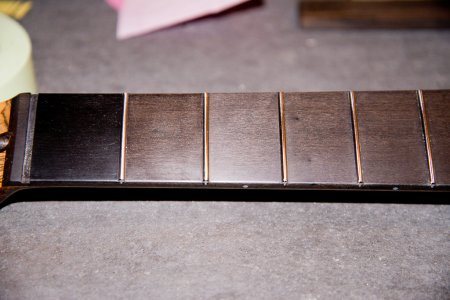
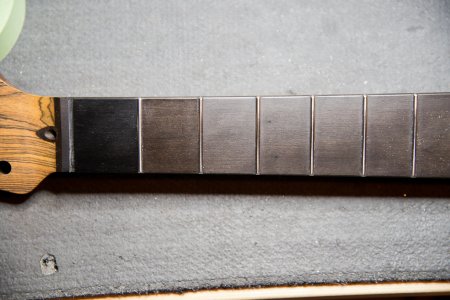
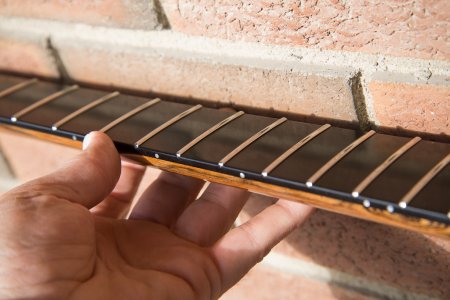
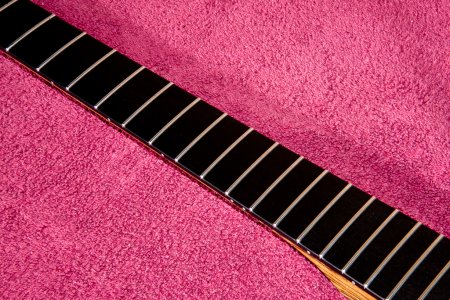
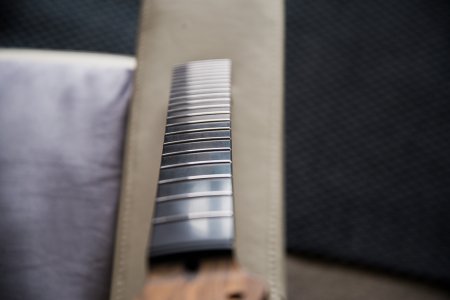
It was time to deal with fine-tuning the neck. First up, those sharp frets, and sharp fingerboard edge. Warmoth leaves the fingerboard edge at a very sharp 90-degrees, and the frets filed to about 35 degrees, and those suckers are sharp. Besides, it’s really dry here, and the neck had already shrunk a bit, leaving the fret tines exposed. Sort of like a barbed-wire fence.

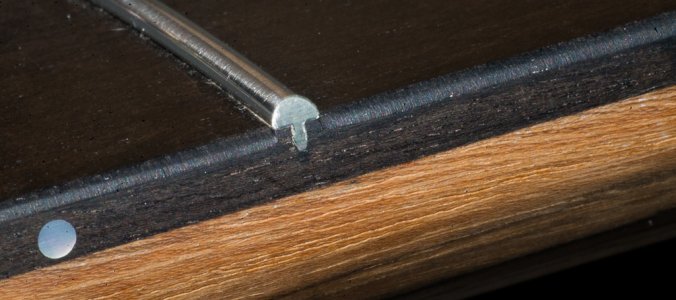
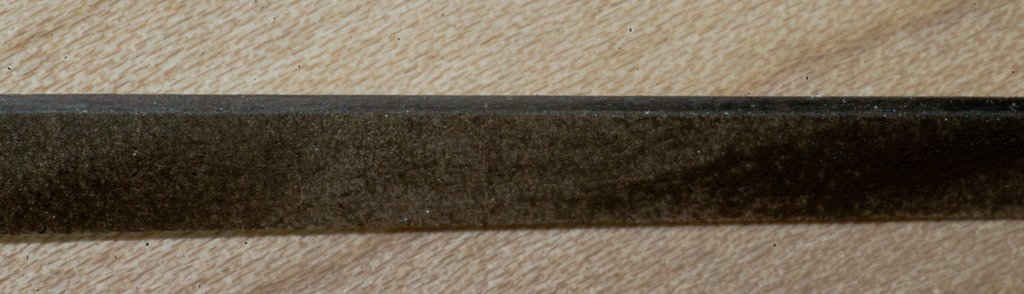
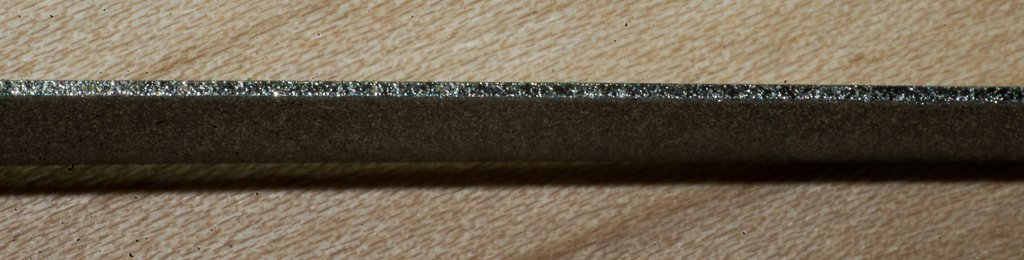
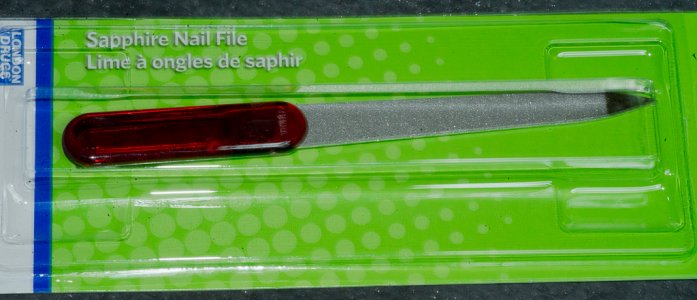
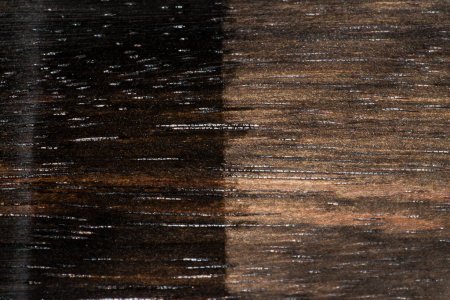
So I made myself a bevelling tool, like the Stew-Mac acrylic one, from a block of maple and a single-cut bastard file. I just cut a slot in the maple to fit the file, and a couple of screws across the cut held the file in place. I cut it a tad shy of 35 degrees. I also rounded out the working surface of the block a bit, the better to fit the radius of the fingerboard.

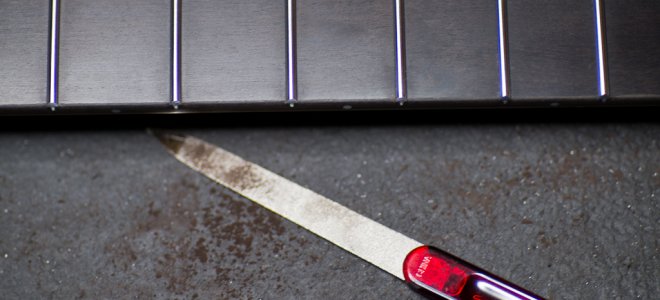
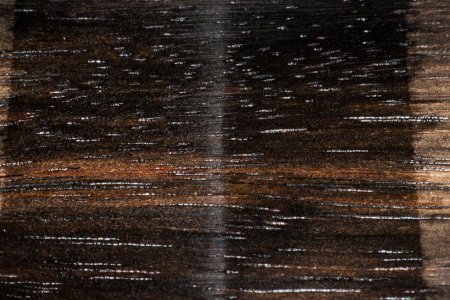
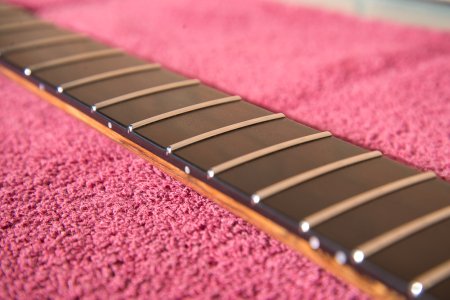
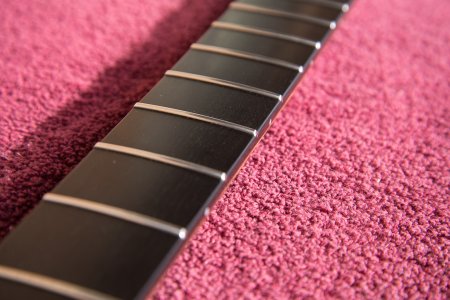
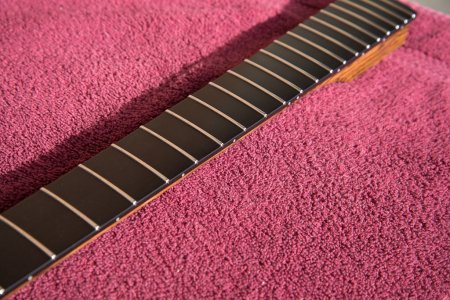
Running this down the neck makes a terrible screeching sound. Not loud, but unnerving. I fiddled with the angle a bit, by eye, to round out the fingerboard angle, and plane down the exposed tines. A few very light gentle swipes on either side yielded a nicer gentler curve-to-flat intersection, no exposed fret ends, and the fret ends at 35 degrees.
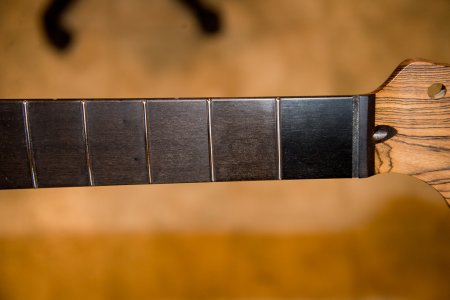
 

Attachments

  • Seraphina+neck-6.jpg
    Seraphina+neck-6.jpg
    304.9 KB · Views: 5
I wanted some roundover (“rolling”) of the fingerboard edge too. Nothing dramatic, just sort of “un-sharpening” it. But I hate the relic-type “worn-in” look, where the edge of the fingerboard looks scalloped. I wanted it nice and uniform. I could have used my beveling tool to do this, but I was also afraid of pruning the frets too far. That can leave the E strings slipping the ends of the frets. So I wanted to just do the board for now, and I could go back later to do more later, after I’d played it like this.

I could have done it with sandpaper. But stropping that across the edge is hard to control, so I decided to file it. I have some fine files, but I wanted something really fine. I ran down to the local pharmacy and bought one. A sapphire nail file. Sapphire is almost as hard as diamond. The file edge had grit too, but I safed it with a bastard file and some sandpaper. The grit was like fine sandpaper, so there’d be no file marks. It cost $3, so I splurged and got two.

It worked great. Carved into the ebony like it was butter, and it was really easy to control.
Yay!
 

Attachments

  • Seraphina+neck-59.jpg
    Seraphina+neck-59.jpg
    458.2 KB · Views: 12
  • Seraphina+neck-34.jpg
    Seraphina+neck-34.jpg
    316.9 KB · Views: 9
  • Seraphina+neck-12.jpg
    Seraphina+neck-12.jpg
    408.3 KB · Views: 7
  • Seraphina+neck-7.jpg
    Seraphina+neck-7.jpg
    206.6 KB · Views: 9
  • Seraphina+neck-94.jpg
    Seraphina+neck-94.jpg
    291.5 KB · Views: 7
  • Seraphina+neck-92.jpg
    Seraphina+neck-92.jpg
    277 KB · Views: 8
  • Seraphina+neck-81.jpg
    Seraphina+neck-81.jpg
    535.8 KB · Views: 6
Next was rounding the fret ends. For this I used the Stew-Mac fret end file.  I made myself a little quickie jig from a spare piece of plywood and a few others that I cut at 45 degrees and laminated together. To this I added a tie-down, so I could set the neck heel and headstock on the angled bits, and used a soft lace to tie the neck down. Not secure enough for hard riding, but sufficient for the stresses that the end dressing would impose. This got the neck at just the right angle to work those sharp ends.

Slowly. Carefully. Under bright light and magnification. Take my time ... a few strokes... a couple more... squint... a few more... re-squint... a few more... keep going ... a couple more very lightly.... OK, next one... and next one... and next one... (some time later) ... wow, that’s a lot of work, I must almost be done, let’s see, I’ve done 1,2,3,...7. Yikes 15 more to go. Then the other side. This takes time! (never mind all the masking!!)

I was pretty shy, knowing that if I took off too much I’d be hooped, so I erred on the side of caution. When done filing, I used a couple of grits of polishing papers to smooth it all out. Came out very nice. But because I’d filed the edges+frets together, and then fingernail-filed down a bit of rollover on the board, the fret ends – while round and smooth – do protrude a bit. I can feel then when I slide up and down the neck. I’m gonna leave ‘em like that for now, and after playing it for a while I’ll decide if the E string shave enough room for me to take ‘em down a little more.
 

Attachments

  • Seraphina+neck-154.jpg
    Seraphina+neck-154.jpg
    619.9 KB · Views: 13
  • Seraphina+neck-148.jpg
    Seraphina+neck-148.jpg
    976.7 KB · Views: 7
  • Seraphina+neck-140.jpg
    Seraphina+neck-140.jpg
    248.3 KB · Views: 15
And then on to the neck “finishing”. This is a raw Bocote neck, and I’d decided to use the burnishing method outlined in the thread here started by Cagey. But I studied up on burnishing, and also considered the burnishing I’ve done on martial arts weapons. For those I use one of the old-style burnishing methods, which involves rubbing a hardwood or metal object on the workpiece. It crushes the fibers together, and makes for a glossy finish that’s really hard. As I had a spare piece of Bocote and another of Ebony, I tried the increasing-grit sandpaper method, and the hard-object rubbing methods. The photos below show the Ebony test piece.

First (left to right) is bare wood sanded to 320. Then sandpaper burnished to 2000. Then to 4000. And then oiled (more on this later). Working from the other end of the test piece (right) to the middle, again first is bare at 320. then polished with 0000 steel wool (=approx 400 grit). Then hand-rubbed with an Ebony burnishing stick, that I made by cutting off and smoothing out a strip from the test piece. And finally the burnished treatment with oil. So the two burnishing approaches are side-by-side in the middle. I included side-by-side closeups of the different patches, all the way from left to right. And a final of the whole piece again, in different light

There is an insignificant difference in the final result. Except that the steel wool and then burnishing stick is a) cheaper and b) way faster and easier. Ummm, a caveat to that “easier” is that you have to be very careful. Because Ebony is not only hard enough to polish Ebony, but also hard enough to scratch it. So your burnisher must be super-smooth. I pre-burnished my burnisher. And you also absolutely have to burnish with the grain. Also, the process scrapes off a microscopic bit of wood (sheared fibers?), and you must keep wiping off the burnishing stick, else one (inevitable) unlucky swipe will grind this slurry into the workpiece. You can’t even see the stuff, it’s so small there’s no visible buildup. But you for sure will see the “scar” that grinding it into the surface will leave. I got all the same results on Bocote.
 

Attachments

  • Seraphina+neck-119.jpg
    Seraphina+neck-119.jpg
    227.4 KB · Views: 4
  • Seraphina+neck-111.jpg
    Seraphina+neck-111.jpg
    1,017.7 KB · Views: 4
  • Seraphina+neck-109.jpg
    Seraphina+neck-109.jpg
    952 KB · Views: 3
  • Seraphina+neck-107.jpg
    Seraphina+neck-107.jpg
    953.2 KB · Views: 1
  • Seraphina+neck-105.jpg
    Seraphina+neck-105.jpg
    942.2 KB · Views: 1
  • Seraphina+neck-103.jpg
    Seraphina+neck-103.jpg
    1,010.1 KB · Views: 1
  • Seraphina+neck-102.jpg
    Seraphina+neck-102.jpg
    890.9 KB · Views: 4
  • Seraphina+neck-99.jpg
    Seraphina+neck-99.jpg
    253.8 KB · Views: 4
I wanted to see what oil would do because I knew I’d eventually probably want to put some on the fingerboard. And I was a tad concerned about skin oils eventually differentially affecting the burnished Bocote shaft, so I thought I’d adopt Tonar’s approach and oil it after burnishing. The oil I used is the same that I used for weapons. It’s called “Terra Nova” oil (also a “Circa 1850” header on the label). It contains “blend of pure oils” and contains no “dyes, perfumes or additives” or peanut oil. It is FDA approved and is certified Kosher. Why? Because it’s commonly (?) used on cutting boards, salad bowls and the like. It is almost as clear as water. I think it contains walnut oil, but I’m just guessing. I wipe it on and wipe it in. Let it set about 5 minutes, then wipe it off and buff it up.

Ok, one note – make sure you do all your burnishing – no matter which method – completely BEFORE you put on the oil. My guess is that the oil penetrates the wood fibers – even though they may be compressed – and then prevent them from compressing any further. But burnish-then-oil works way better than oil-then-burnish.

First I did the shaft. I was unsure of what the rubbing-burnish would do to it, so I opted for the graduated-sandpaper approach. But when I finished that, I still went over it with my burnishing stick. The final polish was with 3M polishing paper, pink. Then the oil. Wow. It came out really nice. Super smooth, but super-slick. And shiny. And the grain pops. Ooooh. Aahhhh.

I have pictures of all the in-process stages, but thought I'd spare you all that. So here is and just the fully-burnished stage (and burnisher), the oiling, and the final result.

The grain and the color look different in different light. Some are natural light, some incandescent, some with flash.

Notice in the last shot the difference between the (untouched) back to the headstock, and the finished shaft. In real life it's not quite as dramatic as this, but still a very real positive difference.
 

Attachments

  • Seraphina+neck-227.jpg
    Seraphina+neck-227.jpg
    170 KB · Views: 11
  • Seraphina+neck-224.jpg
    Seraphina+neck-224.jpg
    463.6 KB · Views: 6
  • Seraphina+neck-223.jpg
    Seraphina+neck-223.jpg
    905.5 KB · Views: 5
  • Seraphina+neck-219.jpg
    Seraphina+neck-219.jpg
    878.8 KB · Views: 3
  • Seraphina+neck-216.jpg
    Seraphina+neck-216.jpg
    1,012.2 KB · Views: 4
  • Seraphina+neck-208.jpg
    Seraphina+neck-208.jpg
    808 KB · Views: 4
  • Seraphina+neck-204.jpg
    Seraphina+neck-204.jpg
    536.6 KB · Views: 5
  • Seraphina+neck-201.jpg
    Seraphina+neck-201.jpg
    594.1 KB · Views: 6
Then the fingerboard. Everything I could find about finishing the fingerboard after the frets were on said essentially “don’t even think about it”. Hmmm. While I often bow to established wisdom, I really wanted a shiny board. So, “damn the torpedoes”, and “into the breach” and all that.  It was darned smooth already, but I wanted it smoother. And it was darned dark already, but I wanted it black as onyx. I was concerned about possible string wear on the spaces between frets, generating polished patches in the middles and leaving the rest buff. Sort of like burnishing-by-playing. I thought that if I burnished it now, that’d harden it up, it’d be a little “pre-polishing” of the whole board, and maybe it’d be a little guard against scratches. And I knew from my practicing that burnishing must be done before oil.

So I sharpened up one edge of my Ebony burnishing stick, and the knife-edge allowed me to come right up to the frets.. And did the whole fingerboard in 0000 steel wool, then burnished, then oiled. I did the first few in stages so that I could post for you the photos below. The first block (between nut and fret 1) is finished. The next (2nd) is to the burnished stage. The next (3rd) is just the steel wool. And the next (4th) is as it came from the factory. A few shots in different light so you can just get the "average effect".
 

Attachments

  • Seraphina+neck-285.jpg
    Seraphina+neck-285.jpg
    932.1 KB · Views: 7
  • Seraphina+neck-281.jpg
    Seraphina+neck-281.jpg
    532.7 KB · Views: 4
  • Seraphina+neck-240.jpg
    Seraphina+neck-240.jpg
    698.1 KB · Views: 4
  • Seraphina+neck-238.jpg
    Seraphina+neck-238.jpg
    566.7 KB · Views: 4
  • Seraphina+neck-235.jpg
    Seraphina+neck-235.jpg
    673.4 KB · Views: 8
It did actually take some time, and some final polishing with polishing paper (pink). But after that, and the oil, and some buffing, it came out spectacularly well.

The first shot is pretty much what it looks like to the naked eyeball. In the next few the lighting is different, so it looks a little browner, but it lets you see the texture better.

The outside shot and the last two let you see the finish. Hard to believe this is still (except for a little oil) a completely raw neck !  I'm happy.
 

Attachments

  • Seraphina+neck-321.jpg
    Seraphina+neck-321.jpg
    364.3 KB · Views: 9
  • Seraphina+neck-308.jpg
    Seraphina+neck-308.jpg
    806.9 KB · Views: 5
  • Seraphina+neck-292.jpg
    Seraphina+neck-292.jpg
    577.4 KB · Views: 96
  • Seraphina+neck-291.jpg
    Seraphina+neck-291.jpg
    576.5 KB · Views: 2
  • Seraphina+neck-290.jpg
    Seraphina+neck-290.jpg
    654.7 KB · Views: 7
  • Seraphina+neck-289.jpg
    Seraphina+neck-289.jpg
    960.3 KB · Views: 4
  • Seraphina+neck-286.jpg
    Seraphina+neck-286.jpg
    1.2 MB · Views: 9
  • Seraphina+neck-325.jpg
    Seraphina+neck-325.jpg
    343 KB · Views: 7
Interesting. I hadn't considered the harder vs. softer abrading/annealing trick, but I understand that works well with metal.

Prometheus said:
Hard to believe this is still (except for a little oil) a completely raw neck !  I'm happy.

Yeah. Even if you just do the abrasives route, the end result is phenomenal. It's time-consuming, but it also tends to last, unlike "satin" finishes will.  Tonar's been doing the burnish + oil trick for years on Maple necks and hasn't had any of them go "pretzel" on him yet.
 
An interesting read and post again. Can you post a link to the kitchen type oil you mentioned ?

Just as a suggestion when I have rolled the edges of the fingerboard I do it after the frets as I find its easier to blend wood than steel, you might want to try it that way around next time.

I noticed you mentioned squinting, and it reminded me that in between doing two necks I found out I needed spectacles for distance and close up work. But even if you don't need them consider getting an optivisor, doing the fret ends with and without makes a huge difference. You can see a pic of mine at the link.

http://unofficialwarmoth.com/index.php?topic=23725.msg347692#msg347692
 
Hi fellas. Thanks for the for the feedback. There seems to be a lot of readers but not many replies. I was hoping to hear some impressions from some of the more experienced forum members such as yourselves (and the 3 or 4 others who've posted), and I really appreciate it. I'm just a first-time builder and can use all the help I can get. It's my hope that my verbose posts will lend help to others, as I've learned volumes from all the posts that have come before.

Cagey, yes, I was eager to get all experimental and try the rub-burnish method. Seems to have worked. I do think that the actual physical crushing must add some sort of additional protection. Maybe on the next neck's shaft I'll try that all by itself.

But I think it'd be best to alternate a bit. Because the amount of crushing varies as the grain hardness varies. That is, the softer parts crush easier, and thus more. So I think optimal would be to burnish hard once. The softer parts would be "lower", and thus a light sanding with a straight block would remove the higher "harder" spots. Then re-burnish. This would re-crush the newly-exposed harder grain, but the softer grain is already compressed. A couple passes like this would leave it mirror smooth and uniformly compressed.

As for the oil, the brand is actually "Circa 1850". It's made in Montreal, Canada, by a company called "Swing Paints Limited". Looking them up, I find that they manufacture an entire line of products, which seem to get good reviews from woodworkers. The "NaturOil" is the only one of theirs that I've ever used, as years ago it was recommended to me by my sensei. They do seem to be sticklers for "real" products - i.e., their TungOil is actually from tung tree nuts, and has no petroleum thinners or polymer additives. Here's a link to their main product page. Each product is a link and site navigation is at the bottom of the page.
www.swingpaints.com/oils_varnish_poly.htm

Yes, I do use magnification. At the "bench" I use for electronics I have mounted a light on an articulating arm. It's a very bright white fluorescent ring light with a 4.5" magnifying lens in it. Great tool - can get in close, or swing out of the way. You just have to get used to it being between you and the work, which can sometimes be a pain when using a soldering iron. I've looked into the Optivisors too, and have decided that the real glass-lens ones would be the type to get. I've yet to find a good enough price, especially as I can manage OK with what I've got.

And yeah, I realize that I screwed up the order of things with the fretboard edge rolling. Live and learn I guess. Was paranoid about reducing my fretboard width. It's really pretty good as is, but I can still feel the fret ends. I'll eventually be able to play it, and decide then if I want to go back and trim them and re-round the ends.
 
Stay tuned to this channel for more exciting (?) episodes. What has come so far have been pretty standard project stages. I have upcoming on my to-do list a few decidedly non-standard stages, and I'll post as they become available. No peeking.
 
Prometheus said:
Everything I could find about finishing the fingerboard after the frets were on said essentially “don’t even think about it”. Hmmm. While I often bow to established wisdom, I really wanted a shiny board. So, “damn the torpedoes”, and “into the breach” and all that.

Nothing like a challenge, eh? <grin>

I've taken to ordering necks fretless (slots only) for myself because it's just so much easier to burnish the thing that way. Sorta pisses me off that you don't get a break on pricing from Warmoth. Fretting is not a trivial task, and they include it in the price because everybody needs them, but if you take a few hours out of production you'd think they'd be somewhat grateful and share the savings.

Of course, they probably have it down to a fine science. All the variable re-curving of the fretwire due to compound radii and so forth is probably somewhat automated there, so they probably don't have to work nearly as hard to fret a neck as your average dingbat like me.
 
Prometheus said:
I realize that I screwed up the order of things with the fretboard edge rolling. Live and learn I guess. Was paranoid about reducing my fretboard width. It's really pretty good as is, but I can still feel the fret ends. I'll eventually be able to play it, and decide then if I want to go back and trim them and re-round the ends.

I don't care how good you are (and I'm pretty damn good, if I must say so myself <grin>), you will always feel the fret ends. They're a series of 21 to 24 bumpy little rascals spanning 18" or so, so there's no getting around it. As long as they're not sharp or abrasive, you're in pretty good shape.
 
Thanks for your well executed work through Prometheus. I'll also end up with oil and then bees wax after burnishing. There are several ways to skin a cat.  :)
 
Yes I look forward to more insights on this build. Thanks for the link to the oil.

I know things about martial arts weaponry I would never have known.

Thanks...keep em comin
 
SustainerPlayer said:
Thanks for your well executed work through Prometheus. I'll also end up with oil and then bees wax after burnishing. There are several ways to skin a cat.  :)

Do what you want, but I wouldn't waste time on beeswax. It makes for a fine finish on things you'll rarely touch like wall hangings, candle holders, knick-knacks or jewelry boxes, but it's much too fragile for something like a guitar. You need either a hard finish or no finish. Keep in mind that it's a tool that's going to get a lot of handling.

 
Cagey said:
You need either a hard finish or no finish.

0fb4fa35fad1b9ed112dc7584f47c531cf14a1c3c55d64bed93d33d5330dfcd1.jpg


Well Jackson and other makers have done it for ages. I just done that for 20 years or so.
 
I've used my share of beeswax, too. Like I said, it's a fine finish. I just don't think it's appropriate for a guitar. Too fragile.
 
Hey guys, thanx for chiming in.

I've heard of using beeswax on guitars. Never tried it. It seemed like it'd be a nice look, but I was also leery of any durability.

And yeah, as to the frets, I've played guitars where the edges are rolled so much and the frets taken so far back that there was practically no feel of them while running my hand up the neck. The downside is that the slightest move of hiE down or loE up would slide 'em right off the board. Not fun.

This neck as-is does feel OK. At least, so far as I can tell without any actual strings to do any actual playing with. So they'll stay as-is for now. Any further tweaking will be after thorough road-testing, and would likely be pretty minimal.

Stratamania, I've no idea if you'll find that oil south of the 49th parallel. It might be just a Canadian thing. Good luck. Oh, and you can probably consider the small 8oz bottle to be roughly a lifetime supply.
 
Prometheus said:

Is it just me or does this ebony board look like molten chocolate ?

Great build log, keep up the good work! I really like how you explain and picture each step.

One note though, you may want to not host your pictures directly on the message board — use an external host such as imgur, or else your pictures will disappear in a few months.
 
Back
Top