zebra
Senior Member
- Messages
- 498
Hello,
Wanted to share a project with you folks -
The goal was to explore 1) stripping finishes, 2) re-shaping bodies, 3) burnishing necks, and 4) DIY, hard-applied, non/low toxic finishing.
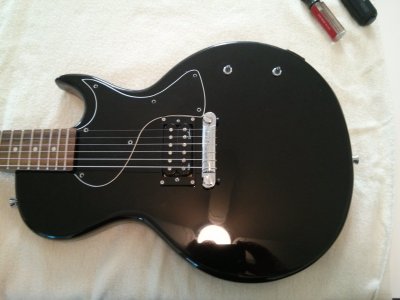
I started with a used J. Reynolds LP Jr (J. Reynolds house brand of Guitar Center). I like the LP Jr. concept - it’s like Gibson’s equivalent of the planky utilitarianism of the Tele. And John Fogerty. But I always felt like this body was encased in plastic - so I decided to sacrifice it to experimentation. Also, I got is used for super cheap, so why not?
After doing some reading on stripping finishes, I decided to use a heat gun. It worked pretty well, as long as your either 1) careful enough not to scorch the wood, or 2) planning on sanding enough so that scorching is sanded away (or, I supposed, if you like the aesthetics of scorched wood, or plan on doing a solid-color finish).
Interestingly enough, beneath the paint was a maple veneer, on both the body and headstock. I guess the bodies were originally intended to have transparent finishes, but someone decided that the cost of applying the veneer and doing transparent finishes wouldn’t translate into an increased profit margin.
Reshaping was done using first rasps and files, then a random-orbital palm sander. I’m a newb with wood working. I’ve come to learn/appreciate that wood shaping is essentially wood removal, and requires saws, planers, chisels, and rasps. Sanding is essentially wood smoothing, and it’s the only use for sandpaper and sanding devices. I was pleased with how the body-shaping came out, for a first attempt. Weight and the lack of body contours are two of the big few things I dislike about Les Pauls, so a well-contoured LP Jr. makes sense to me.
Burnishing the neck turned out beautifully. I was afraid that doing too much sanding early in the process would remove too much wood (especially after stripping the existing finish) but found that it didn’t change the feel very much, and the delicious feel of the burnished wood compensated for perception that the neck might have become thinner. After I was done burnishing, I put on two coats of linseed oil, for a little extra protection. It soaked right it, and the neck felt and looked none-the-less raw after it dried (with the exception of the grain nicely popping a little more). I wish I weighed it before and after, to determine total amount of wood removed, but didn’t. I will next time.
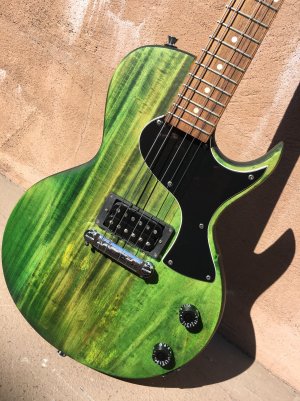
I know that I should have sanded the body better and done some filling to remove irregularities in the wood, but I wanted to keep this simple, so I didn’t want to get hung up on too much finicky stuff this time around. Also, it was apparent that this was a three-piece body. I considered using a separate color for the piece that runs through the middle of the body. This would allow for experimenting with masking and how that would affect bleeding during the dyeing and finishing process. Ultimately, I decided to stick with monochrome. I picked green to accommodate mineral streaks in the poplar, and because green is not sufficiently represented in the existing population of guitars in the world.
I first dyed the body black, sanded back, and dyed green, using Transfast water-soluble dyes. They were easy to work with, wiped right on using a rag, and didn’t get splotchy or streaky.
When sanding after the black dye, I didn’t sand the contours and depth of the body: I wanted to see how it could be used to cover end-grain (which I don’t always mind seeing - sometimes it makes a guitar look like a delicious piece of salmon).
I used The Real Milk Paint Co's "Half and Half" product for the finish. It's a 50/50 blend of pure Tung oil and Pine Oil (which is used as a solvent/thinner). I applied two coats of carnauba wax (also from Real Milk Paint Co.) after 10 days. When folks advise to apply wax as thinly as possible, they mean it! I made that mistake with the first coat, but with the second coat, was able to blend-out the streakiness of the first.
What I learned:
Tung oil cures very slowly, so when it's important to make a distinction between 'applications' and 'coats.' When applying a coat, apply until it stops soaking into the wood, and starts to puddle on the surface. Leave it for 30-40 minutes, and see if it's still puddled. If not, add another coat, and repeat. I probably would stop after 3 coats in an day (wiping off any excess 30-40 minutes after the last application), and just let it absorb, start to polymerize, and let the Pine Oil evaporate. That whole process is what I would call an application, and I'd give at least a few days, more likely a week between them. I'd probably do this minimum 3, maximum 6 times, depending on how thirsty the wood is. If the first coat of a new application isn't absorbing most (maybe 80% or so) of the oil, you're done, and you just have to wait for it to fully cure - at least 10 days, but no longer than 30.
Tung oil is not a production process - although it's easy and doesn't require any special equipment, it's not very time-efficient. If you're patient, it's fine for an easy DIY finish that leaves a subtle, matte look that nicely shows off grain, though!
I'd like to note that Dwayne Siever at Real Milk Paint Co. was very responsive to a couple of questions I sent them via email. Cheers Dwayne! ccasion14:
Wanted to share a project with you folks -
The goal was to explore 1) stripping finishes, 2) re-shaping bodies, 3) burnishing necks, and 4) DIY, hard-applied, non/low toxic finishing.
I started with a used J. Reynolds LP Jr (J. Reynolds house brand of Guitar Center). I like the LP Jr. concept - it’s like Gibson’s equivalent of the planky utilitarianism of the Tele. And John Fogerty. But I always felt like this body was encased in plastic - so I decided to sacrifice it to experimentation. Also, I got is used for super cheap, so why not?
After doing some reading on stripping finishes, I decided to use a heat gun. It worked pretty well, as long as your either 1) careful enough not to scorch the wood, or 2) planning on sanding enough so that scorching is sanded away (or, I supposed, if you like the aesthetics of scorched wood, or plan on doing a solid-color finish).
Interestingly enough, beneath the paint was a maple veneer, on both the body and headstock. I guess the bodies were originally intended to have transparent finishes, but someone decided that the cost of applying the veneer and doing transparent finishes wouldn’t translate into an increased profit margin.
Reshaping was done using first rasps and files, then a random-orbital palm sander. I’m a newb with wood working. I’ve come to learn/appreciate that wood shaping is essentially wood removal, and requires saws, planers, chisels, and rasps. Sanding is essentially wood smoothing, and it’s the only use for sandpaper and sanding devices. I was pleased with how the body-shaping came out, for a first attempt. Weight and the lack of body contours are two of the big few things I dislike about Les Pauls, so a well-contoured LP Jr. makes sense to me.
Burnishing the neck turned out beautifully. I was afraid that doing too much sanding early in the process would remove too much wood (especially after stripping the existing finish) but found that it didn’t change the feel very much, and the delicious feel of the burnished wood compensated for perception that the neck might have become thinner. After I was done burnishing, I put on two coats of linseed oil, for a little extra protection. It soaked right it, and the neck felt and looked none-the-less raw after it dried (with the exception of the grain nicely popping a little more). I wish I weighed it before and after, to determine total amount of wood removed, but didn’t. I will next time.
I know that I should have sanded the body better and done some filling to remove irregularities in the wood, but I wanted to keep this simple, so I didn’t want to get hung up on too much finicky stuff this time around. Also, it was apparent that this was a three-piece body. I considered using a separate color for the piece that runs through the middle of the body. This would allow for experimenting with masking and how that would affect bleeding during the dyeing and finishing process. Ultimately, I decided to stick with monochrome. I picked green to accommodate mineral streaks in the poplar, and because green is not sufficiently represented in the existing population of guitars in the world.
I first dyed the body black, sanded back, and dyed green, using Transfast water-soluble dyes. They were easy to work with, wiped right on using a rag, and didn’t get splotchy or streaky.
When sanding after the black dye, I didn’t sand the contours and depth of the body: I wanted to see how it could be used to cover end-grain (which I don’t always mind seeing - sometimes it makes a guitar look like a delicious piece of salmon).
I used The Real Milk Paint Co's "Half and Half" product for the finish. It's a 50/50 blend of pure Tung oil and Pine Oil (which is used as a solvent/thinner). I applied two coats of carnauba wax (also from Real Milk Paint Co.) after 10 days. When folks advise to apply wax as thinly as possible, they mean it! I made that mistake with the first coat, but with the second coat, was able to blend-out the streakiness of the first.
What I learned:
Tung oil cures very slowly, so when it's important to make a distinction between 'applications' and 'coats.' When applying a coat, apply until it stops soaking into the wood, and starts to puddle on the surface. Leave it for 30-40 minutes, and see if it's still puddled. If not, add another coat, and repeat. I probably would stop after 3 coats in an day (wiping off any excess 30-40 minutes after the last application), and just let it absorb, start to polymerize, and let the Pine Oil evaporate. That whole process is what I would call an application, and I'd give at least a few days, more likely a week between them. I'd probably do this minimum 3, maximum 6 times, depending on how thirsty the wood is. If the first coat of a new application isn't absorbing most (maybe 80% or so) of the oil, you're done, and you just have to wait for it to fully cure - at least 10 days, but no longer than 30.
Tung oil is not a production process - although it's easy and doesn't require any special equipment, it's not very time-efficient. If you're patient, it's fine for an easy DIY finish that leaves a subtle, matte look that nicely shows off grain, though!
I'd like to note that Dwayne Siever at Real Milk Paint Co. was very responsive to a couple of questions I sent them via email. Cheers Dwayne!
ccasion14: