Leaderboard

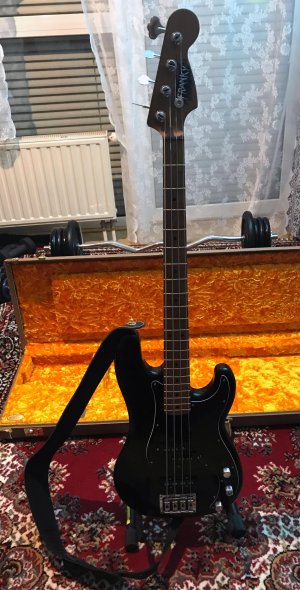
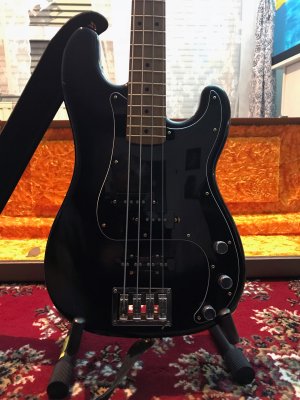
P+J Bass 2 Tek Bridge Shellac matting (self) finished !

freakenfurter

Newbie
Messages
4
Hi this is my first post and my first finished bass.
Roasted Maple neck.
Roasted Alder body.
Bare knuckle pickups.
2tek bridge.
Schaller mechanics (hipshot)
Artys custom guitar electronics.
Fender knobs.
2 weeks of shellac treatment. ;-)
I grounded the bridge using a cable to the input jack ground, didn't want to drill a hole.
Should i ?
Not sure if it waekens the sound. Anyone did it ?
Anyhow, the sound is amazing.
Comments welcome !
Attached two pics.

Rgds. Fränky
 

Attachments

  • frankybass-oben-1440.jpg
    frankybass-oben-1440.jpg
    520.6 KB · Views: 350
  • frankybass-front-1440.jpg
    frankybass-front-1440.jpg
    1.6 MB · Views: 382
Looks like a superb build. Roasted maple = cool. Roasted alder = more cool. What a fine way to start building. Nice work.
 
Nice looking bass! How are you liking the 2-tek bridge?

I'm curious, what sort of shellac finishing did you do? Shellac is awesome!
 
Nice choices, excellent results!

freakenfurter said:
I grounded the bridge using a cable to the input jack ground, didn't want to drill a hole. Should i ? Not sure if it waekens the sound. Anyone did it ?

All electric guitars/basses have some sort of path drilled/routed from the control cavity to the bridge for grounding (although not strictly required when using active pickups). Doesn't affect the sound. The way you did it certainly works, but it leaves the ground wire exposed to the world where it may be inadvertently disconnected through wear or misadventure of some sort. While not a show-stopping tragedy, it would leave you with a slightly noisier instrument until it was repaired.
 
davegardner0 said:
Nice looking bass! How are you liking the 2-tek bridge?

I'm curious, what sort of shellac finishing did you do? Shellac is awesome!
Hi,
i used a shellac kit which i bought from a german specialist.
I only did a matting since the body already was sanded and wanted to preserve the woody structure.
It's very sophisticated because of the roundings of the coropus.
The type is fernandez black shellac.
Did 4 layers with a brush and then continued with a (kit supplied) special sponge. (10 times i think).
So it was a very long procedure. You've to wait several hours before continuing with the next round.
The kit also comes with a manual. Old furniture will be finished with shellac here in europe. It's very expensive though.
I'm quite happe with the outcome and it took two weeks !

Best regards
Frank
 
Cagey said:
Nice choices, excellent results!

freakenfurter said:
I grounded the bridge using a cable to the input jack ground, didn't want to drill a hole. Should i ? Not sure if it waekens the sound. Anyone did it ?

All electric guitars/basses have some sort of path drilled/routed from the control cavity to the bridge for grounding (although not strictly required when using active pickups). Doesn't affect the sound. The way you did it certainly works, but it leaves the ground wire exposed to the world where it may be inadvertently disconnected through wear or misadventure of some sort. While not a show-stopping tragedy, it would leave you with a slightly noisier instrument until it was repaired.
Hi,
There was no hole for the bridge since i ordered the 2 tek bridge. Even if it has been drilled, i would have to drill a hole in the bridge to fix the ground cable to it.
I soldered a round joint and connected it directly to the screws. I think the cave must be altered to leave a space between the wood and the bridge to be able to insert it and not losing connectivity though.
Perhaps someone  has a clue how to connect it to the 2tek bridge.

Best regards
Frank
 
Oddly enough, considering all bridges need to be grounded, almost no bridge manufacturer provides any facility or accommodation for ground connections. I guess they assume everyone does what they've always done, which is either use one of the bridge mounting screws or bridge posts. There's essentially no current involved, so the ground conductor doesn't have to be something that'll take a lightning hit, but at the same time since what you're grounding is such a super-tiny signal, you need a good connection.

You've got a mounting/beauty ring on there - use one of those screws. Just wire from underneath. Then, you may have to drill a hole, but somehow you've got to get that wire into the control cavity where you can ground it.
 
Looks like the ground wire is attached to the trim ring - does that actually touch the main part of the bridge?
 
Fat Pete said:
Looks like the ground wire is attached to the trim ring - does that actually touch the main part of the bridge?

Doesn't look like it*, BUT you could maybe crimp/solder on a ring terminal and slip one of the saddle adjustment screws through it before it threads into the saddle?  The saddle spring should hold it tight against the bridge, in the same way it holds the head of the screw against the bridge.

*Based on this photo anyway.

http://s220.photobucket.com/user/highgain510/media/PRS%20McSoapy/McSoapTek%20Predator/PRS_Mc2Tek_16_zpsde680359.jpg.html
 
Good point. I don't think it does. This is the bridge itself...

2tek-guitar-without-trim-ring.jpg

and this is the bridge with a trim ring...

2tek-guitar-with-trim-ring.jpg

I don't see any connection between the two. So, his current ground goes nowhere. But, looking at the bridge itself we see the mounting plate at the base...

2tek-guitar-bottomside.jpg

So, any of those mounting screws would be a suitable ground connection.
 
Cagey said:
...any of those mounting screws would be a suitable ground connection.

That's what I'd use. With that massive hole as a target, if there really isn't a hole already drilled (it would only be a small one), I wouldn't think it would be too troublesome a diy job.
 
Some foil tape that wraps around the edge of the cavity (and therefore contacts the bridge mounting plate) would also work to give you a solder pad for your ground wire (if you're concerned about the bridge not sitting up against the body wood).  Just needs to be a little bit.  Copper tape if you have it, but I've used the aluminum duct tape (aka real duct tape) with good success.

Seriously, though, manufacturers, just tap a little hole in your bridges somewhere for a grounding screw.  As much as some of these bridges cost, and how much they advertise their manufacturing and latest-and-greatest engineering...you'd think someone would have thought of this by now.
 
I've seen a couple products that have them, but they're pretty rare and in one case, not widely used due to impracticality/cost...

claw-prod-spot.jpg

It's the "Killer Brass Claw" from KGC for use with vibrato bridges. They not only tap a hole, they give you a screw and crimpable wire lug to use as well so no soldering needed. But, at $45 it's a little tough to justify. I've got a drill motor and a 6-32 tap & drill set so I can do it almost for free, and often do.
 
I agree, $45 is a bit steep for...well, for that.  There's some decent-quality bridges that don't cost that much.

Granted, it's not exceedingly difficult to do it yourself if you've got the tools and the time to do it.  Probably something I'll start doing myself once I have a garage to accumulate power tools in.  Just seems like if anyone has the time and tools to do it, it's the manufacturer.
 
Right. It's not like this is some newly discovered improvement or requirement that's taken them all by surprise. Bridges have needed to be grounded since the dawn of electric guitars.

But, you know how guitar players are. If Gotoh, Floyd Rose, Schaller, et al were to start adding a tapped grounding screw hole, the cry would go up far and wide "Jimi Hendrix's bridges didn't have tapped holes in them!" "The mutilated bridges don't sound the same!" "The hole throws the bridge out of balance!" "It used to just be my G string that gave me trouble. Now it's the B string as well!" "They took our jobs!" and all manner of other such nonsense.
 
Sovereign_13 said:
Some foil tape that wraps around the edge of the cavity (and therefore contacts the bridge mounting plate) would also work to give you a solder pad for your ground wire (if you're concerned about the bridge not sitting up against the body wood).  Just needs to be a little bit.  Copper tape if you have it, but I've used the aluminum duct tape (aka real duct tape) with good success.

Seriously, though, manufacturers, just tap a little hole in your bridges somewhere for a grounding screw.  As much as some of these bridges cost, and how much they advertise their manufacturing and latest-and-greatest engineering...you'd think someone would have thought of this by now.
Hi,
that was my first thought too.
I think i will drill a small hole to the control cave and then solder a wire to the foil surface.
it worked out well for the bridge pickup though.
Thanks for the suggestion.
Drilling a hole in the bridge, even if it's a small one, will change the tension distribution appreciable.

Thx.
Frank
 
Back
Top