Leaderboard

New, unfinished body being delivered. Do I need to use filler?

Vic

Newbie
Messages
11
New to this board, as I've just recently ordered a new bass body from Warmoth (t-bass body, totally unfinished). I've been looking up different articles are resources to guide me in the finishing/painting process, and I'm seeing mixed ideas. Many of them are resources for people sanding down and refinishing guitars, and some say to use a body filler. 
 
My question is, do I need to use a body filler in this case? And/or sand and sealer? 
 
Source: http://www.reranch.com/solids.htm 
 
Also, if anyone else has any other good resources they would be willing to share, I would very much appreciate it. Thanks!
 
Hi, Vic.  Welcome aboard.


Whether to use a grain filler will depend on the species of lumber you ordered.  For the top three species,  alder requires no fill, while ash and mahogany have deep, visible pores.  If you want a level, glossy finish, you'll want to fill the grain with these latter two.
 
I see, that makes sense. It's Swamp Ash, so yea, it sounds like I'll need to use a filler. 
 
Thank you! 
 
The more and more I read into this, the more angry I get at myself for not just letting warmoth paint the thing while they still had it.
 
If you haven't taken delivery yet, they may still be able to finish it. Also, although they explicitly say they won't do finish work on parts from outside the factory, if it's one of theirs and it hasn't been touched, sometimes you can talk them into taking it back and putting a finish on it. No guarantees, but it's definitely worth a 2 minute phone call to verify. Their finishes are second to none, highly durable, and very reasonably priced. Anybody else is going to cost you $300+, and if you do it yourself it's highly unlikely it'll be as good unless you're good with lacquer, which is one helluva lotta time/work. They use a catalyzed urethane so it's less work for them than lacquer, but that's not an option for most DIY folks.
 
Another option, if you have a lot of patience and will do two or more bodies, is to gear up to do proper finishes yourself. You can get everything you need including the paint rig and materials to do two guitars for less than $500, and get results like this one I did...

IMG_2929_Sm.JP
IMG_2930_Sm.JP

If you figure $300/body, that means the second body you do will cost you less than having it done, and every one you do after that will only cost you materials, which are usually about $75. It's not a trivial task, it will take some time (usually about 4 to 6 weeks), and a serious amount of patience. But, it's also very rewarding. You can get an idea of the amount of work it is by reading this article. Following that recipe will produce professional results. Plus, you have a nice paint rig, which can come in handy for lots of other things... like painting  :icon_biggrin:
 
Really good information and lots to consider. It's actually out for delivery today, so maybe I could even just reject the package and have it sent back or something? I'll have to give them a ring first and see what they suggest.

While buying the stuff to do it myself is tempting, I'm more concerned with the quality.

I originally thought I could do it myself with a friend of mine that works at an auto body shop and seemed to think he could handle it. Then I started really looking into what is involved... now I think that sending it back to have them do it is probably the best option.
 
To expand on that - I have a friend that works at an auto body shop and has apparently painted guitars before and says they've come out great. I've even asked some of the people who own the guitars, who also say that it comes out great, "no difference from buying a guitar from the store".

Has anyone had any experience with an auto body shop spray job like this?
 
If your buddy is spraying a modern two-part catalyzed finish, that much is likely to be the same as a guitar factory paint job.  YOu do still face the issue of filling the grain, if your friend's got experience in the wood guitar body arena, you probably need only mention that it needs doing to see whether he's dealt with open-grain wood before.
 
I've seen mixed results. Depends on the shop's experience/specialty. A shop that does custom show cars/trucks will likely do a better job than your typical bump & paint collision shop, as regular vehicles don't get the kinds of finish you see on showpieces. This also colors people's opinions about the results they get. Some guys will paint a body without even grain filling it, while others will want a mirror polish. As long as you get what you want, it's great.
 
So after all of this, the body was delivered today, and the wood grain is so nice that I feel like it's almost a crime to paint over it. That said, I'm now looking into staining it.

Does anyone have any recommendations for where to buy stain?
 
Rockler carries Transtint dyes, which can be mixed with anything (water, alcohol, acetone, etc.), and Stewart-MacDonald sells what appears to be the same thing rebranded as "Colortone". I've used the stuff with great success, and I know others here have as well. Transtint is a pretty widely-known brand that you shouldn't have any trouble finding.
 
Where are you?  In the US, even Home Depot and Lowe's are good spots to shop for stain - the Minwax brand has plenty of options for color and for sheen if you go with one of their products for a topcoat as well.  You can also try a speciality woodworking shop.  Amazon and Rockler and Woodcraft have online stores that stock plenty of stuff as well.  Plus there are another 10,000 ways to skin the cat that is guitar-finishing.


Here are the two most important things I can tell you:


1.  There are no shortcuts.  None.  Every single step off the path is fraught with opportunities to royally screw things up.  So bearing that in mind, it is crucial that as you approach finishing a guitar body (or any piece of wood), you have a plan, and adhere scrupulously to the plan.  Anyone pushing a miracle finish or a labor-saving device who does not clearly spell out that you have to bust your ass on surface preparation is more interested in your money than your success with their product.


2.  In order to develop your plan, you really, really ought to pick up a piece of scrap wood of the same species as what your guitar body is made of, and test your proposed finishing schedule (including sanding, filling, sealing, color coating, and topcoating - no shortcuts, right?).  By going through the process on scrap, you can find out what you do and don't know, and you can get some feel for what the things you see in all the videos actually mean in hands-on practice.  Far better to screw up a five-dollar strip of mahogany that you can just power-sand back to a blank slate than to murder a perfect body you just paid no less than $170 bucks for.  Bear in mind professional woodworkers who have done this for decades test a proposed finishing schedule on scrap, too - it's all about getting as close to certainty as possible about what will happen when you apply your idea to your wood.


Best of luck.  Read the sticky thread at the top of the DIY finishing forum on this board. All of it.  Ask all your questions, and insist on understanding the answers.  We are here to help.
 
First of all, thank you all so much for the tips. I really appreciate you guys taking the time to spell this stuff out and answer my stupid questions, even as I flip flop on the finish I want. For the record, I really do want to do it the "right" way. I'm spending a lot of money on all the parts for this thing, and to cut corners and wind up with a bad looking finish would really bum me out.

My original plan was this:
-Candy turquoise body (telecaster bass - 72 p-bass 4 string body) with probably a white pick guard
-Pickups: a MusicMan bridge pickup, and a standard p-bass neck pickup, which is a whole other discussion that I'll get to on the appropriate section of this board at a later date
-Neck: I was thinking it would be cool to do an indian rosewood neck with a light maple fretboard, but warmoth doesn't seem to offer than combo, so maybe I'll just go with a maple neck like this one: http://www.warmoth.com/Showcase/ShowcaseNeck.aspx?Bass=1&Body=1&Shape=40&Type=17&i=BN6399#.VunqLClm1Rk

Again, since seeing how nice the wood grain is I was thinking of just doing a dark stain, but the more I think about it, I might just want to stick with the original plan. I thought about a dyed stain, but I haven't yet seen one that I really like for this build.

I live in New Jersey, right outside of New York City.

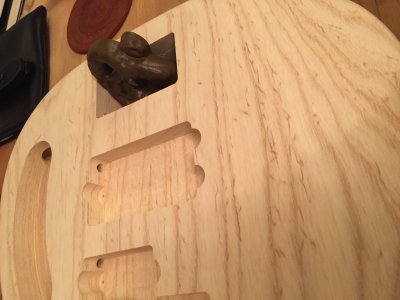
Finally - referring to my original question, I've really looked over this body and it really is very smooth, before I've even sanded it at all (which of course I will do before doing anything else, and in between just about every step of the way). I already bought the grain filler and am happy to do the work, but again, I really don't know that the grain filler would do anything. I'm honestly not trying to skip steps, but it's super smooth with no divets or anything - do I really need it?

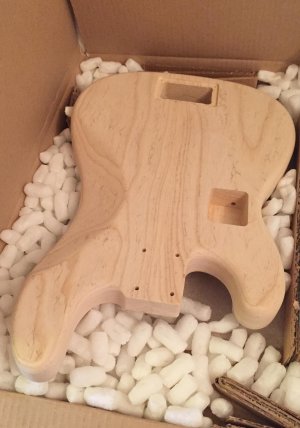
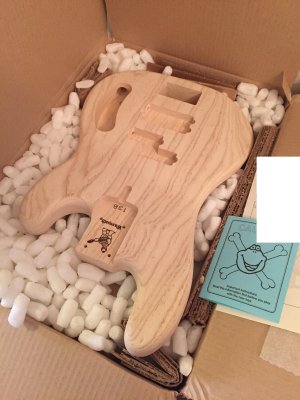
Pictures of the body are below. In the third, you can see that my roommate thought it would be funny to stuff a fake, rubber dog turd where the bridge goes.
 

Attachments

  • IMG_2995.JPG
    IMG_2995.JPG
    385 KB · Views: 316
  • IMG_2996.JPG
    IMG_2996.JPG
    643 KB · Views: 335
  • IMG_2999.JPG
    IMG_2999.JPG
    1,014 KB · Views: 325
That looks like Swamp Ash. That species needs grain filler if you want a gloss finish as it has a fairly deep and prominent grain. It'll be very obvious in the finish if you don't do it. Remember the shots of the L5S I put up at the beginning of this thread? That body is Mahogany, which also has a prominent grain. Took 3 passes with grain filler before I even started with any kind of finishing, and following that I put probably 6-8 coats of sander/filler, 3 or 4 color coats and 8-10 coats of clear on it to get that result. It sounds like a lot, and in bulk it is. But, it goes on very thin and you end up sanding a lot of it off in the process of keeping it level. By the time you're done with something like that, the finish ends up only being about .010"-.012" thick. That's pretty thin, which is why you need to grain fill. If you don't, all the grain lines will telegraph right through.

Although, to be fair, some people like that effect. Gives a natural texture that can be pleasing to the touch. For instance, here's a Swamp Ash Telecaster with an opaque blond finish that hasn't been grain filled...

dsc_0177.jpg
 
Understood, thanks. And actually, when I looked at the grain filler, it was much different than I expected - for some reason I expected it to be much thicker, so seeing that it was quite liquidy makes a lot more sense.
 
There are a lotta solids in grain filler that sink to the bottom of the can if it sits for a while, so when you open it all you'll see is the solvent. Once you mix it up the texture will thicken. Also, word of warning: that sludge at the bottom will snag your mixing stick and if you fight it at all, you'll splash solvent all over the place. So, go slow at first and don't fight it any more than you have to. Then, mix it longer than you think you need to so you're sure everything is evenly dissolved.
 
Man you weren't kidding. That grain filler takes forever to stir properly. Thick stuff.

Got the first coat on there, waiting an hour for it to dry, then going to use mineral spirits to get the excess off, and put another coat of grain filler on there.

Quick question - do I need to put filler in the routed areas? Like where the wiring goes, or battery box, or bridge cutout, etc.?
 
I put the filler on and then after it flashes off (goes flat, usually after 15 to 20 minutes) I wipe it off across the grain with burlap. If you are wiping it off with mineral spirits your are re-wetting it and removing it from the pours. 
 
Back
Top