Leaderboard

New Build - Carved Top Soloist Super-Blues-Strat

mycroftxxx

Junior Member
Messages
44
Kicking off a new build today by ordering a fully finished carved top Soloist body (I’m not set up to do paint/dye/etc.); since that will take 4 months or so to get here, I have plenty of time to order the rest of the parts, including a Warmoth neck, but I wanted to get the body on order as soon as possible due to the lead time. Basic specs are: carved top Soloist in alder, right handed, flame maple lam top, three Strat pickup routs, three control knobs plus 5-way switch, battery box, hardtail drilled for the Schaller 415 aka 3D-6 top loader bridge, tiger’s eye dye on the front. Neck will be 22 stainless frets, modern construction, probably roasted flame maple with classic Strat headstock shape, but I have time to tweak these specs since I won’t be ordering the neck for a few weeks.

The intent is, when complete, to be a kind of blues-ish superstrat, with three medium-spicy noiseless single-coil pickups (likely Zexcoils), an active clean boost control, and an active mid-boost control. The two active circuits will be similar to the Fender “Clapton” mid-boost, except I’m not using that one because with the Fender boost, when you turn it on, the clean boost is always active and you only have control over the mid-boost, and I want independent control over both. Right now I’m planning to go with two EMG parts that meet my requirements for the active elements. I might even use EMG parts for everything but the pickups and try out their solderless wiring system.

I’ll keep this updated as I finalize the part selection and start receiving parts and assembling stuff, which will be some weeks down the road, but anyone who wants to comment is welcome of course!
 
Unexpected surprise…the neck’s status is showing “picked” less than four weeks since ordering! Hope it’s not a mistake…

One thing I’ll be doing differently than my 2023 Tele build is burnishing the (roasted maple) neck. I like the feel of the Tele’s neck just fine, but when I compare it to my Suhr’s roasted maple neck, the Suhr is so much smoother :) and I’d like that for the new guitar too. (And at some point I’ll do it to the Tele as well.) I also ordered some headstock decals and some clear gloss lacquer to prepare the headstock decal location and submerge the decal after finishing. And I just received the Schaller staggered and locking tuners in a gorgeous ruthenium (aka “black chrome”) finish, so those can go on after the burnishing and decal work. Still not expecting the body for another 8 weeks or so, but it will take a while to do the extra finishing work (especially the decal stuff).

Will try to post some pics after the neck comes in, and as I get the neck work completed.
 
Got the neck today! Looks good but I was having a hard time getting a decent photo so no pics yet…hopefully time this weekend to start burnishing the neck - feels pretty good out of the box but I should be able to get it to excellent pretty quickly.

The body is still several weeks out so plenty of time to take things easy and get it right.
 
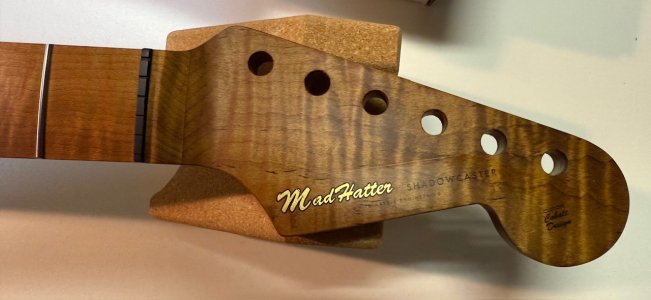
Fifteen weeks and the body is still “processing” (I really wish Warmoth would give more detailed status on where your order is in the process), so I decided to burnish the roasted maple neck - my goal is to get the same glassy smooth and hard feel as my Suhr with a roasted maple neck, which is my gold standard for how a neck should feel. After about an hour with the Super Bufflex and Super Assilex, it’s pretty much there:
IMG_1622.jpeg
I did the back side of the headstock as well, maybe not quite as rigorously as the neck, but I’m happy with it. Grit progression was 600-800-1000-1200-1500-2000, and the Super Assilex and Bufflex were awesome. Once this build is done, I’ll go back and do this to my 2023 build, which also has a roasted maple neck.

I did almost all of this going along the grain, not against as in Aaron’s video, except for a final pass with a super-soft microfiber towel, which I did across the grain.

Oh, and here’s the front of the neck:
IMG_1619.jpeg
I just ordered a tool for drilling the pin holes for the Schaller M6 two-pin tuners, and today I will start in with some light coats of clear lacquer on the headstock as the base for my custom R&F headstock decal. And with a holiday weekend coming up, it would be a perfect time to finish this guitar, if Warmoth will get me the danged body! (Please?)
 
Last edited:
Fifteen weeks and the body is still “processing” (I really wish Warmoth would give more detailed status on where your order is in the process), so I decided to burnish the roasted maple neck - my goal is to get the same glassy smooth and hard feel as my Suhr with a roasted maple neck, which is my gold standard for how a neck should feel. After about an hour with the Super Bufflex and Super Assilex, it’s pretty much there:
View attachment 64952
I did the back side of the headstock as well, maybe not quite as rigorously as the neck, but I’m happy with it. Grit progression was 600-800-1000-1200-1500-2000, and the Super Assilex and Bufflex were awesome. Once this build is done, I’ll go back and do this to my 2023 build, which also has a roasted maple neck.

I did almost all of this going along the grain, not against as in Aaron’s video, except for a final pass with a super-soft microfiber towel, which I did across the grain.

Oh, and here’s the front of the neck:
View attachment 64953
I just ordered a tool for drilling the pin holes for the Schaller M6 two-pin tuners, and today I will start in with some light coats of clear lacquer on the headstock as the base for my custom R&F headstock decal. And with a holiday weekend coming up, it would be a perfect time to finish this guitar, if Warmoth will get me the danged body! (Please?)
Looks great, great job on the burnishing. I went to 3000 with the Bufflex and it is wonderful. I’m debating a clear on the headstock as well. When I sprayed the naphtha on it to clean up after sanding it really popped the grain. Keep us posted.
 
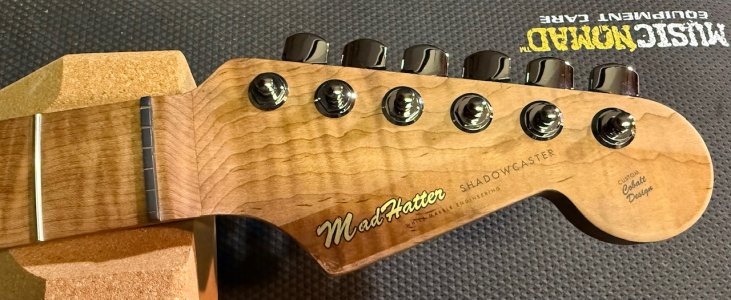
Well, 16 weeks and nary a peep from Warmoth about the body; even if I got the shipping notice tomorrow, no way it gets here before the holiday so looks like this is going to be a June build. And I can’t install the tuners until I get a tool (from StewMac) to precisely drill the retaining pinholes for the Schaller M6 two-pin tuning machines. So…I’ve been installing the headstock decal:

IMG_1627.jpeg
Had the decal made by Rothco & Frost; pretty decent quality (and super-thin). It’s got a couple of annoying flaws in the metallic ink, but nobody will notice it once it’s on the strung guitar. I masked off everything but the decal area, laid down about half a dozen coats of gloss lacquer, let it dry for 24 hours, then sanded the lacquer flat with 600 grit Super Assilex. Cleaned it all up with mineral spirits, let that dry, then installed the decal, not too difficult - maybe my boyhood days building Revell and Monogram model cars and planes are still in the old synapses. Anyway once positioned and blotted and dried for another 24 hours, I did four mist coats on 30 minute intervals, let dry overnight, then about three thin normal coats. Another overnight dry, then pull the masking tape, gently sand flat with the 600 again, then with 1000 for good measure, then a mineral spirits wipe down.

If you look closely you can see the line between the lacquered surface and the bare wood. I kind of tried to feather that edge but in some kinds of light you’ll always be able to see it. I ain’t sweating it; if it annoys me too much, I’ll sand it off, but I think it will be fine; again nobody will really notice with the guitar strung up.

This waiting for the body is killing me though! Help me Obi-Wan Warmoth, you’re my only hope!
 
Well, 16 weeks and nary a peep from Warmoth about the body; even if I got the shipping notice tomorrow, no way it gets here before the holiday so looks like this is going to be a June build. And I can’t install the tuners until I get a tool (from StewMac) to precisely drill the retaining pinholes for the Schaller M6 two-pin tuning machines. So…I’ve been installing the headstock decal:

View attachment 64989
Had the decal made by Rothco & Frost; pretty decent quality (and super-thin). It’s got a couple of annoying flaws in the metallic ink, but nobody will notice it once it’s on the strung guitar. I masked off everything but the decal area, laid down about half a dozen coats of gloss lacquer, let it dry for 24 hours, then sanded the lacquer flat with 600 grit Super Assilex. Cleaned it all up with mineral spirits, let that dry, then installed the decal, not too difficult - maybe my boyhood days building Revell and Monogram model cars and planes are still in the old synapses. Anyway once positioned and blotted and dried for another 24 hours, I did four mist coats on 30 minute intervals, let dry overnight, then about three thin normal coats. Another overnight dry, then pull the masking tape, gently sand flat with the 600 again, then with 1000 for good measure, then a mineral spirits wipe down.

If you look closely you can see the line between the lacquered surface and the bare wood. I kind of tried to feather that edge but in some kinds of light you’ll always be able to see it. I ain’t sweating it; if it annoys me too much, I’ll sand it off, but I think it will be fine; again nobody will really notice with the guitar strung up.

This waiting for the body is killing me though! Help me Obi-Wan Warmoth, you’re my only hope!
I will see what I can do.....................full disclosure..........I can do nothing!
 
The Tele I did two years ago is the same way dots-wise, cream standard dots on roasted maple. I really like Warmoth’s basic cream dots!

And…drum roll please…the body has shipped, and I should have my hands on it late next week! I have all the other parts I need, so it shouldn’t take more than a day or two to complete the assembly. Will post some body pics when it shows up, and hopefully the completed guitar a few days later!
 
What about some in progress photos of the holes drilled, and the tools used to do it?
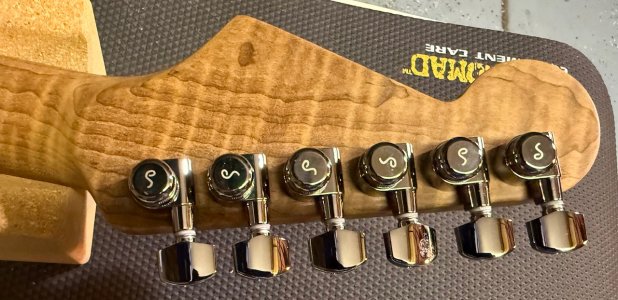
I didn’t take any pictures of drilling the holes for the Schaller locating pins :confused: but the process was straightforward: I put masking tape on the back of the headstock alongside the tuner holes, then inserted the tuners into the headstock, used a straightedge to get them aligned, and carefully pressed them down hard enough for the locating pins to make indentations in the masking tape (the locating pins on the Schaller M6 tuners are pointed). I then used a tuner pin drill jig from StewMac as the guide to drill the holes; the only tricky part was aligning the drill jig with the locating pin indentations, but some magnifying glasses and a flashlight made that not too hard. I used the jig because I don’t have a drill press.

Here’s a link to the drill jig:

And I’ll make sure to take more in-process photos when I’m working on the body! ;)
 
Last edited:
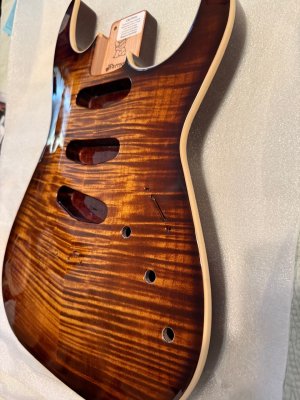
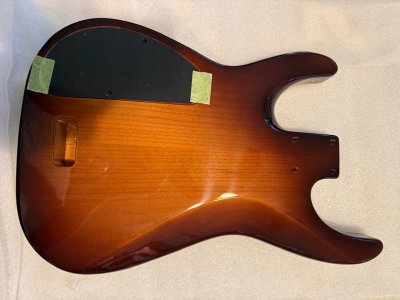
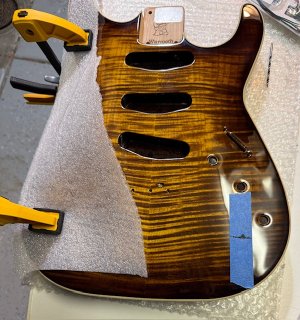
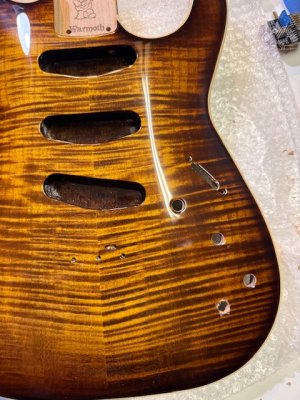
The body has arrived!
IMG_1636.jpeg
IMG_1637.jpeg
IMG_1638.jpeg
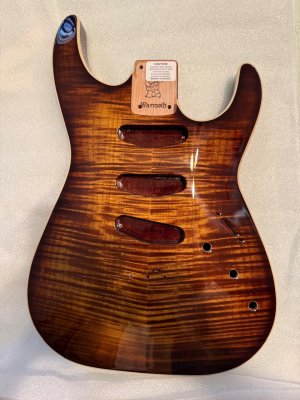
The ivoroid binding is darker than I thought it would be; looks almost identical to the cream binding on my Warmoth Tele from 2023. But that’s barely even a nit; the binding is great. Very happy with the tobacco burst-over on the back of the alder body. And the tiger’s eye dye on the unique choice lam top looks even better than I thought it would. A beautiful guitar body!

I did the basic measurements with the neck in place but not screwed in, everything good. I also made sure the pickups fit - that was an issue on my Tele, but these pickup cavities are huge by comparison. That’s all I have time for tonight; tomorrow after work, I think my first order of business is to check fit the controls (although visual inspection says that the short-shaft controls will fit just fine), then locate and drill the additional hole I need for the clean boost control. I think I will locate it so as to make a near-equilateral triangle with the master tone (middle hole) and mid-boost control (the hole closest to the output jack). Drilling that hole will be the most ticklish part of this build; I’m thinking about getting a stepped bit for it, but maybe drilling one pilot hole then drilling the final diameter would be ok too. The shaft of the clean boost control is 8mm diameter (about 5/32”), so not huge but not small either. Chipping of the finish is what I really worry about. Decisions, decisions…

Edited to add: delivery was seventeen weeks less one day from the day I ordered this body…
 
Last edited:
The body has arrived!
View attachment 65127
View attachment 65128
View attachment 65129
The ivoroid binding is darker than I thought it would be; looks almost identical to the cream binding on my Warmoth Tele from 2023. But that’s barely even a nit; the binding is great. Very happy with the tobacco burst-over on the back of the alder body. And the tiger’s eye dye on the unique choice lam top looks even better than I thought it would. A beautiful guitar body!

I did the basic measurements with the neck in place but not screwed in, everything good. I also made sure the pickups fit - that was an issue on my Tele, but these pickup cavities are huge by comparison. That’s all I have time for tonight; tomorrow after work, I think my first order of business is to check fit the controls (although visual inspection says that the short-shaft controls will fit just fine), then locate and drill the additional hole I need for the clean boost control. I think I will locate it so as to make a near-equilateral triangle with the master tone (middle hole) and mid-boost control (the hole closest to the output jack). Drilling that hole will be the most ticklish part of this build; I’m thinking about getting a stepped bit for it, but maybe drilling one pilot hole then drilling the final diameter would be ok too. The shaft of the clean boost control is 8mm diameter (about 5/32”), so not huge but not small either. Chipping of the finish is what I really worry about. Decisions, decisions…

Edited to add: delivery was seventeen weeks less one day from the day I ordered this body…

Looks great ! The burst over is very well done. Good luck with drilling that hole, that’s always a little nerve racking on finished bodies.
 
It's beautiful. I like it a lot, but your pics are different to what I would have expected from Tiger's eye (not very much yellow).

I think the binding looks like cream. I wouldn't complain if it was me, because it has come out very well.
 
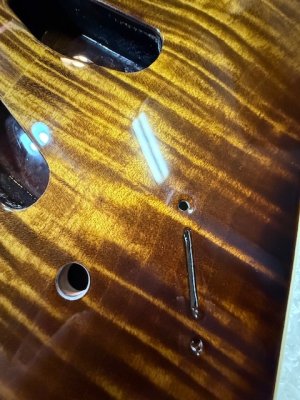
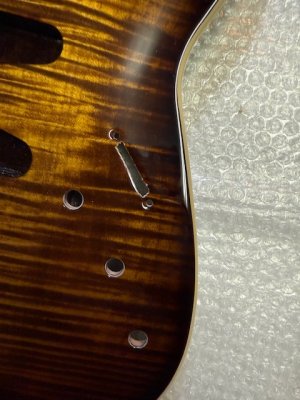
Got some work done last night…first up was the switch channel:
IMG_1639.jpeg
Three issues: first, it hadn’t been chased out after the body was finished, so it was too narrow. Second, maybe it’s the same length as it would be in a Strat pickguard, but with a quarter-inch thick top in between the switch body and the switch lever, the channel wasn’t long enough for a standard Strat-type 5-way switch to have full travel. Third, it’s not properly lined up between the screw holes. To fix all of these issues, I had to lengthen and widen the channel:
IMG_1641.jpeg
Not the prettiest work I’ve ever done, but it won’t be noticeable when the actual switch is installed.

Next up was what I knew would be the most ticklish part of the whole build - drilling the new 3/8” hole for the onboard clean boost control. I’m not a woodworker, so I poked around on teh intertoobs, and the best suggestions I found were to put tape over the area where the new hole would be drilled, drill a starter hole first, then drill the full-sized hole with a brad tip drill. Before, with the new hole location marked:
IMG_1642.jpeg
And after, with the new hole drilled:
IMG_1643.jpeg
The clear gloss chipped a bit despite the tape, but not much, and it will not be noticeable once the actual control is installed. There’s also a bit of blowout on the back side but it’s not enough to affect installing the control, and it’s in the electronics cavity of course. (I wonder how Warmoth drills these holes; they clearly were drilled after the gloss finish was applied…)

Next up today: installing the pickups and electronics, including the output jack! Maybe also the strap buttons, which would finish the drilling. If things go really well…maybe the neck too?
 
Back
Top