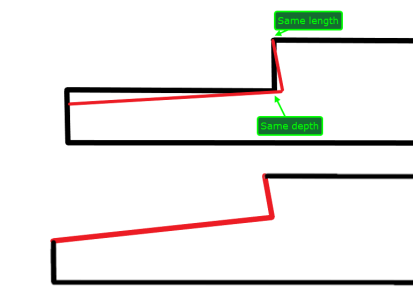
Neck pocket angle - what about the vertical face where the heel meets?

ayavner

Junior Member
Messages
56
Hi there - first post! I am building a guitar based on a template (Garcia style Tiger tribute) with a neck pocket for a s-style bolt-on neck. I have calculated I need about a 2.3 degree angle to tilt the neck back for proper string height over the TOM bridge, and I built a jig for this purpose.

My question is, I can see how to rout the angle in the bottom of the neck pocket, but I am unsure how to get the complementary angle in the vertical face of the neck pocket where the heel end meets it. If I disregard it, then the pocket will no longer be perpendicular between those 2 faces. I don't see an obvious way to rout this surface since my pattern bit is shorter than the 5/8" height of the pocket. Does my question make sense and can anyone advise? Or is ~2 degrees not enough to worry about? Come to think of it, I'd face the same issue if I used a shim for the same purpose.

Thoughts? My project is coming along nicely - I'll start a build thread when I get a little further along. Using a Warmoth Hombre neck which is a real work of art.

Thanks! Adam
 
You're right it's about 2 percent. Never made a guitar body. I'll be watching this thread to see your solution.
 
Use a neck pocket template with perpendicular sides and shim it underneath to get the angle needed, then when you rout you will have the neck angle and also perpendicular sides to the pocket.
 
Use a neck pocket template with perpendicular sides and shim it underneath to get the angle needed, then when you rout you will have the neck angle and also perpendicular sides to the pocket.
Makes sense, and that is what I thought initially. Keep in mind the neck pocket is already routed, flat at first because I was going to use shims, until I decided to give this a try. So I built a jig to use in combination with the neck pocket template. Foremost is that I do not want to disturb the 3" depth, so I do have to make sure if nothing else that the top edge doesn't get touched.

I'll try this out on a mockup and report back. Like with most things, it is entirely possible I am overthinking this 🙃

The other scenario is that as @supertruper1988 says, it's only a couple of degrees and probably negligible and so I leave it alone and get on with it.

I was going to upload a couple of pics, but the forum says "too large". Only 3-4MB, so maybe it is a restriction until I build up more posts. Guess I'll go check the FAQs now! :)
 
I've shimmed a couple necks of my guitars, and would not hesitate to do the same in this case. It seems like you're making unnecessary work for yourself. Suppose you decide to change necks someday and that one needs a slightly different angle?
 
. Keep in mind the neck pocket is already routed

Ok so the top is 3" if already routed the position at the back of the pocket flush with the body top would remain the same (consider it to be a point of rotation), any angle would tilt inwards at the back of the pocket.
 
Ok so the top is 3" if already routed the position at the back of the pocket flush with the body top would remain the same (consider it to be a point of rotation), any angle would tilt inwards at the back of the pocket.
Correct, and that is the angle I was asking about. If I had a router bit that was exactly 5/8", I could let the bearing ride the top edge and route that inwards face on the pocket. Since my router bit is 1/2", I'd have to do it in a couple of passes. Which made me wonder whether I was going to end up either a) with a stairstep of sorts going down or b) going in too deep at the bottom of this angle.

From the feedback so far, I can probably ignore it though that necessarily means at least a portion of the heel won't have contact with that face. The drop over the 3" pocket length is a little less than 1/8", so then probably that amount inward at the bottom corner then tapering up to the top edge. I may be able to use sticky back sandpaper on the heel and fit it in place by sanding.

But I think I'll see how I go with ignoring it. Next time I'll rout the pocket with a taper jig in place!
 
Meanwhile, does anyone know what the limits are for posting pictures? I could not find anything in the FAQ. 3-4 MB doesn't seem unreasonable these days, and I was hoping to throw my hat in the ring with a build thread.
 
Seems like when I get them down to .5 MB, no problem. Just use your resizing tool and reduce by 75% and see what happens.
 
Correct, and that is the angle I was asking about. If I had a router bit that was exactly 5/8", I could let the bearing ride the top edge and route that inwards face on the pocket. Since my router bit is 1/2", I'd have to do it in a couple of passes. Which made me wonder whether I was going to end up either a) with a stairstep of sorts going down or b) going in too deep at the bottom of this angle.

I see what you mean, if you remove the template for the second pass and your router base is now at a different angle than when it was on the template. I suppose you could use a router that has the ability to tilt the base or use something under the base to shim it to the same angle. Or of course, a longer bit that can reach the depth with the template in place.
 
Actually if you want the neck’s position to remain the same distance from the bridge you would have to add material back to the vertical heel surface in the pocket rather than route it out more. Since the neck pocket is already routed this is obviously not feasible. I wouldn’t worry about it at all, seeing as how using a shim would create the same small gap anyway.
 
Actually if you want the neck’s position to remain the same distance from the bridge you would have to add material back to the vertical heel surface in the pocket rather than route it out more. Since the neck pocket is already routed this is obviously not feasible. I wouldn’t worry about it at all, seeing as how using a shim would create the same small gap anyway.

You would not change the distance by any practical amount, if as I mentioned earlier, the top of the pocket would not be routed at the back. You would have this | versus that \ (exaggerated angle) at the centreline looked at from the side, where the top of each of those lines as a point of rotation of angle is in the same place along the scale length. If the angle changed from the bottom of the line as the rotation point rather than the top then you would end up with a situation as described.

As the OP is building a body with a TOM bridge, the thing to do would be to get the neck pocket and neck fitted first and then determine the exact bridge position in any case.

Another approach would be to not have the back of the pocket at a right-angle to the bottom of the pocket, but to put an angle also on the back of the neck so it matches the pocket. No idea if the OP is making the neck or not.
 
I am using an Hombre neck from Warmoth. The body is a hippy sandwich of bubinga and maple, using a template. I fitted the neck and determined the bridge position, and used that to calculate my desired angle of 2.3*, and was going to use shims until I thought "or, I can just rout this", which started my brain down this rabbit hole. :ROFLMAO: Basically, I have the black lines in this sketch (angles exaggerated), and my question was how to get the red lines, which I think @stratamania and others have answered and I have the information I need. I'll do this tomorrow and report back!

Thanks to everyone on this thread for jumping in and helping me visualize my way through this! 🍻

1696594791484.png
 
Another thing to bear in mind is that the top of the body does not necessarily need to be flat. You could also create a desired angle at the top of the body first and then rout the pocket into that.
 
Just an update - after really looking this over closely and considering all that has been discussed here, I have decided to leave it alone for now and picked up an assortment of Stewmac shims to get the angle dialed in.

I was all lined up and ready to get routing, but that nagging voice kept insisting this was a golden opportunity to f*** something up needlessly. I should listen to that voice more often.

I did build a neck pocket angle jig that I can use for next time, but I'll do it all at once rather than after the fact.
 
Back
Top