OK, here we go
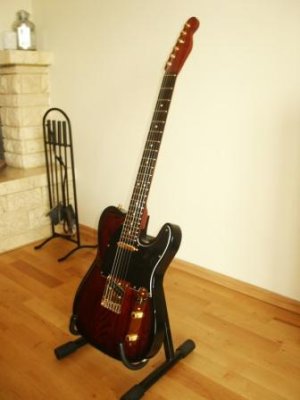
The idea was to have a custom Telecaster vintage look with a touch of modern solutions which make playing more comfortable. Nothing relic or orthodox vintage. Also idea was to DYI as much as posibble with my skills and available tools. I decided to buy neck and hardware at Warmoth and body due to high shipping costs to Poland, customs fees and first of all due to plan of DYI contribution was processed locally.
Neck wood: padouk/ebony was the desire of raw wood feeling and bright sound. Warmoth pro construction.
Pickups bought at www.musik-produktiv.de in Germany for quite competitive price about 120 EUR.
I went to my local sawmill wood supply, selected from tens of them and bought a plank of ash. Around 100" long,20" wide and 2" thick. The plank was originally twice longer but needed not that much. The piece i bought was enought for 3 bodies but only 2 pieces are clean without any gnarls.
The wood was already dry but also seasoned in my house for severel months. Cost of raw wood was around $50.
When working with power tolls i smelled sth like olive oil and i was right since ash belongs to olive trees family.Maybe you know that maybe not.
First i thought i would cut the body with a jigsaw or a bandsaw but then remembred about my local guitar tech who built by himself a CNC router just for that purposes. That way when Warmoth parts arrived and turned to him to do that body shape and neck pocket routing.
Next step was final shaping (tummy cut, heel contour,edge radiusing) and fine sanding, lots of sanding paper from 60-280 grid used for that. Comfort contours shaped by a sanding disc on a drill and then fine sanded. Quite obvious but never bad to remind especially with woods like ash to not to touch the wood with sanding paper in your fingers. ALWAYS use a sanding block unless you like "waves" on the surface. Power tools help a lot when fine sanding front and back of the body.
Next step was drilling string through holes. A standard drill in a drill press wouldn’t work since press' arm is to short to get to that place on the body so i used a drill holder which looks more like router and works the same and was really happy with result. Ferrules sit pretty straight in the body. Another remark - for wood drilling use wood bits with pilot pin . Metal drills don't work fine with wood. You will not get right diameter and they will chip edges.
Finishing: Was really stranded, natural oil, danish oil, shellack,nitro,polyurethane etc. The choice was polyurethane. I have some expoerience with shellack. I think natural finished are nice but chemical ones and definitelly more durable.
After continuous visits at home depots where you can buy beautiful nice cans with "perfect" substances - that's what labels say i found a wood finish supply store where i got everyting i reaaly needed. The problem was they sell wholesale quantities so i negotiated as small qunantity as possible. Dye, primer and finish cost me around $35.
Preliminary grain filling: Since coudn't get famous Stewmac grain filler or similar i used a thinned black wood filler and than sanded acces off,
Dye: acetone solube - great choice of colours at theplace I finally found myself and the choice was to match padouk blood shade. Results on pictures. Dye applied just by a piece of old cotton t-shirt. Smells moderate bad.
Primer/sealer: polyester. Base +2 other components added inn ratio 2%. Applied by kinda credid card tool. Than levelled with sanding paper. Horrible stinking stuff.
Burst: the idea of bursting appeared when i unexpectingly sanded off some dye on the edges and in the comfort contours. Bought 100 ml of black acrylic 2 component car finish and applied by spray pen (we call it aerograph) with 0.3 mm jet. It’s usually used for artist spray painting
Final finish: 2 component polyurethane gloss finish. 3 Coats, sanded-sprayed-sanded etc. Last sanding started with 1800 grit, than 2500 grit than used a angle grinder with adjustable speed and a buffing sponge with Farecla G3 paste. This stuff is used for buffing car finishes but works perfectly with a guitar.
Applying finish was quite a problem since I was doing it in winter and it was to cold for “outdoor show” so it was partially done in my bathroom covered totally by pvc foil. The bad smells almost led to a divorce. The worst was the polyester, with acetone was not that problematic as my wife spreads the same odour when decorating nails.
I used the old and good method of fake neck bolted to the body and a stand made of spare pieces of wood which worked perfectly.
Brass nut shaped by file and sanding paper, since I have no expensive nut files I used for unwould strings a cheap metal blade filed to proper thickness and for would strings a small metal file. No problem with that and no need to buy special tools. It’s good to file the slots in a vise otherwise the slots would become curved and strings would buzz.
Electronics soldered by a soldering station. A cheap but good working stuff – 10 times better than a trafo soldering gun. Besides some say trafo gun induction may damage pickup magnets.
Not really sure but wouldn’t experiment with that. Besides a very useful tool-a vacuum pump for sucking off solder when de-soldering. Cheap and perfect thing.
Several frets required leveling, you can buy a level measure tool but again a credit card works perfectly when detecting swinging on not leveled frets. Just cut out one of the edges to have right lenght for frets from sth like 17th to 22nd . An expired card is what I mean.
The slight problem occurred when I tried to mount the neck pickup directly to the wood. With 22nd fret extension you need to remove neck to remove pickguard and then you can adjust pickup height. That’s why I drilled mounting holes in the pickguard for easy adjusting. Of course I could route pickguard in the place under the extension fret but found it easier to drill two holes. Differences of sound by direct mount and pickguard mount are subject to a different discussion already ongoing on this forum.
That’s more less all about it. Hope there’s at least one person to go though the whole text. Sorry about my language, English is not my mother tongue.


 ccasion14: I predict someone will "suggestion box" Warmoth get some of that Polish Ash...