My first "from scratch" body build... The building actually begins!

War_in_D

Senior Member
Messages
239
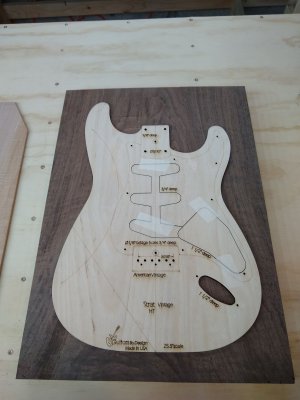
So I have decided to enter the realm of building my own guitar body (maybe bodies, depending on how this goes).  Most smart people would start of with something simple, but I have never been accused of being smart..  So, I'm going what I would consider big on the first one!  If I'm going down, might as well be in flames.  It's going to pretty "run of the mill" as far as shape and layout, so nothing too fancy there.  Just your normal Strat body shape, hardtail bridge with either a single hum/neck single or if things go well once I have gotten to the point of routing pickups, I may do a Jake E. Lee type of reversed singles layout for the middle/neck.

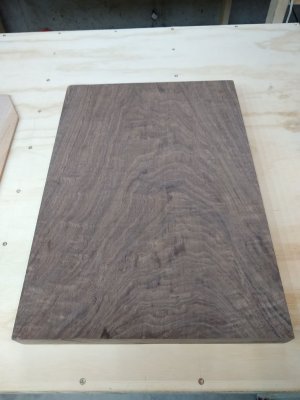
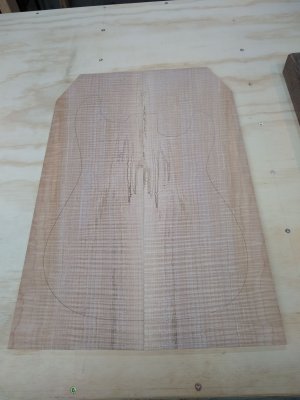
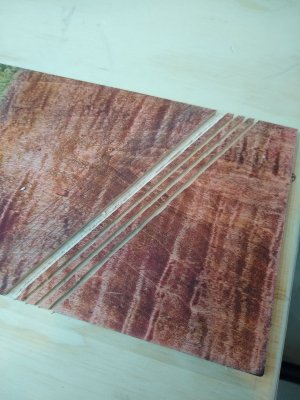
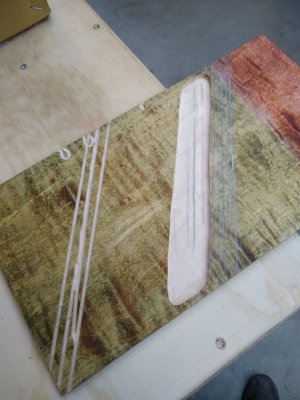
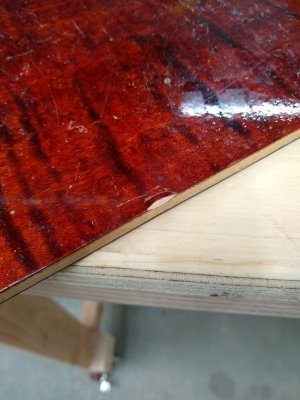
Where I kind of went out of the norm (I believe, for a first time) is in the selection of body woods, and the construction method.  Now, this may be old hat to a lot of you but keep in mind this is my first build and it's a little scary. LOL  This process will be slow, and very meticulous as I'm hoping not to screw anything up too badly.  The back is a one piece walnut blank, with a really nicely figured 1/4" flamed/lightly spalted top (shown dry in the pics below).  Depending on where the body weighs once it's been cut out, I may try my hand at some limited chambering/weight relief which should be interesting and I've done a ton of studying online about how to bend a 1/4" top for the forearm contour (this part freaks me out a little bit), and I'm all ears if anyone has any ideas on that.

Anyway, here are the raw materials.. Wish me luck, I have a feeling I'm going to need it.   
 

Attachments

  • Walnut body blank.jpg
    Walnut body blank.jpg
    348.3 KB · Views: 20
  • Walnut blank with Template.jpg
    Walnut blank with Template.jpg
    312.5 KB · Views: 35
  • Flame Top for Walnut.jpg
    Flame Top for Walnut.jpg
    360.9 KB · Views: 28
Wish I had the tools/talents/guts to do something like this.


The only red flag I see is the Spalted Maple drop-top. Spalted Maple is notorious for cracking as it bends over the forearm contour. Warmoth has purposely softened the angle of the forearm contour on many of our bodies to make drop-top-lams easier to do....and even then we don't offer Spalted Maple as an option.


Just something to consider.
 
Aaron is quite right on his warnings about spalted wood. It can be very hard to work without problems with cracking or splitting. You might want to consider a very shallow contour on the body, or perhaps no contour.
If you try to bend the top you'll need to get it as flexible as possible and use something like thin sheet metal or plastic to press it down in a consistently supported way. Check out how acoustic sides are bent and you'll see what I mean. Spalted wood is very porous and the fibers don't tend to cling to each other well as a result of the process that created the spalting.
That said, your wood blanks look fantastic and should make a fine looking body. Walnut can be a bit hard to mill so you'll need to go slow on your cutting and routing. Don't try to route more than 3/16 to a 1/4 at one time. I don't know if you have access to a band saw, if you don't and have to use a jig saw be aware that your not going to get a 90 degree angle on the edge cuts, so go wide and then sand to straighten it out some before you route. If you have forstner bits use them to hog out some of the material in the pickup and control cavity areas before you route.
Don't want to get preachy here, so if you have any other questions feel free to ask. The experience can be daunting, but you'll be glad you did it. You should have seen the first body I did when I started out, but I'm glad no-one did, it was pitiful. Patience and double checking everything is the key. I wish you great results and a fun time getting there.... :icon_thumright:
 
Thank you both for the input.  Duly noted on the spalted maple, so I'll be extra careful on that part.  I had already planned on softening up the forearm contour a bit and making it more gradual out to the end of the body to aid in the bending process.  In some of the videos I've watch, I've seen people channel out the underside portion of the top where it bends over the curve but that's a last resort option for me as I'd like to not have to worry about sanding thru in that area later on.  I've also seen some dampness and heat applied to help it bend, which is more where my mind is at.  Using a gradual approach of incremental heating/dampness and clamping it little by little until I get close to the final contour and then do the final gluing once it's nearly there.  The thing that worries me about doing this repeated application of the dampness part of it.. Will that hurt the wood any?  I know applying moisture to raise the grain is one thing, but wasn't sure about doing what I'm thinking of doing with regard to how it might effect things later on. 
 
War_in_D said:
Thank you both for the input.  Duly noted on the spalted maple, so I'll be extra careful on that part.  I had already planned on softening up the forearm contour a bit and making it more gradual out to the end of the body to aid in the bending process.  In some of the videos I've watch, I've seen people channel out the underside portion of the top where it bends over the curve but that's a last resort option for me as I'd like to not have to worry about sanding thru in that area later on.  I've also seen some dampness and heat applied to help it bend, which is more where my mind is at.  Using a gradual approach of incremental heating/dampness and clamping it little by little until I get close to the final contour and then do the final gluing once it's nearly there.  The thing that worries me about doing this repeated application of the dampness part of it.. Will that hurt the wood any?  I know applying moisture to raise the grain is one thing, but wasn't sure about doing what I'm thinking of doing with regard to how it might effect things later on. 

If you follow the traditional method of water first then heat, the heat will steam off most of the water which is how the softening process works. So I wouldn't think you should have any problems later. Just don't soak it down too much. You only want enough moisture to make steam.
One thing I forgot in my previous post is that the center line of the body is most important to getting things right. Just about everything locates off the center line. If that's not right, it'll give you big headaches later.
 
PhilHill said:
If you follow the traditional method of water first then heat, the heat will steam off most of the water which is how the softening process works. So I wouldn't think you should have any problems later. Just don't soak it down too much. You only want enough moisture to make steam.
One thing I forgot in my previous post is that the center line of the body is most important to getting things right. Just about everything locates off the center line. If that's not right, it'll give you big headaches later.

Good info.. Luckily, the templates I bought have a clearly marked center line and I'll be sure to carry that over to the body as well.

With regard to the steaming process, I was thinking of using a damp rag and an iron to soften the wood.  Much like you would if you were trying to get a dent out, by applying the damp rag and the "ironing" over it to create the steam.  Am I on the right track with that line of thinking?

 
War_in_D said:
PhilHill said:
If you follow the traditional method of water first then heat, the heat will steam off most of the water which is how the softening process works. So I wouldn't think you should have any problems later. Just don't soak it down too much. You only want enough moisture to make steam.
One thing I forgot in my previous post is that the center line of the body is most important to getting things right. Just about everything locates off the center line. If that's not right, it'll give you big headaches later.

Good info.. Luckily, the templates I bought have a clearly marked center line and I'll be sure to carry that over to the body as well.

With regard to the steaming process, I was thinking of using a damp rag and an iron to soften the wood.  Much like you would if you were trying to get a dent out, by applying the damp rag and the "ironing" over it to create the steam.  Am I on the right track with that line of thinking?

I've seen that method used successfully before. It may take multiple tries before you get it flexible enough. All you can do is try it. it'll either work or it won't. Worst comes to worst, you have to get a new top piece. But if it works you've got a unique body..... It largely depends on how solid the drop top is in that area....Hope it works well for you... :headbang:
 
I got y'er spalted drop top right here:
817e3ac0fb8d06e608f0d32b793c0e2f.jpg
 
This sounds like a fine project. The materials you chose are as good as you could ask for. I look forward to following you progress on it.
 
Man, you all really make a fella feel confident in trying to use spalted maple for a top.. LOL  I'm not even sure if the top I have would qualify as "spalted" anyway, it's just has the minor discoloration lines in the middle of the bookmatch..  From my understanding, spalted maple is akin to decayed wood and usually has to be stabilized before use.  This piece is is pretty solid, so I'm hoping for the best.

I did, however, find this is the showcase tonight.. With a spalted top.  So, it would appear that Warmoth does use spalted maple for tops at least from time to time.


Attachments

  • Spalt Top Warmoth.JPG
    Spalt Top Warmoth.JPG
    72.3 KB · Views: 17
With my limited woodworking experience, if I wanted to bend 1/4" thick maple, spalted or otherwise, I...

a. wouldn't attempt it and just do the contour 'through' the top, leaving a diagonal reveal.
b. if I absolutely insisted on making the attempt, I'd plane half the thickness off first.

Good luck and take photos!
 
Some shops will heavily steam the lam to make it playable, but then get it glued with Hyde glue and pressed down right away before the piece begins to harden and hopefully not destabilize.  There are more modern methods nowadays, but some woods are just persnickety to work with in a consistently productive manner.
 
It's not too late, you could get Tele templates  :laughing11: :laughing3:

Seriously though I'm crossing fingers it'll go smoothly. Looking forward to the body as this is a very fine choice of woods indeed.

I only ever made one body and I started very simple: 1 piece poplar Tele body. It turned out decent, there was some tear out along the way but no big deal for a solid finish.

 
War_in_D said:
Man, you all really make a fella feel confident in trying to use spalted maple for a top.. LOL  I'm not even sure if the top I have would qualify as "spalted" anyway, it's just has the minor discoloration lines in the middle of the bookmatch..  From my understanding, spalted maple is akin to decayed wood and usually has to be stabilized before use.  This piece is is pretty solid, so I'm hoping for the best.

I did, however, find this is the showcase tonight.. With a spalted top.  So, it would appear that Warmoth does use spalted maple for tops at least from time to time.

One of the things that instrument builders are famous for is pushing the boundaries of the art. They love to experiment. All that's being risked here is the price of a drop top. Your the only one who can determine if your willing to do that.
That being said, I do agree that 1/4 inch is way out at the end of the realm for bending. I've seen thicker pieces bent, but they weren't maple. You may want to consider reducing the thickness some before you attempt the bend. The best way to do that would be a drum sander if you have access to one.  You could kerf the back of the top in that area, but then you would have to come up with a way to route for binding to cover the sides. Or as has been suggested, do a shallow contour that's only 1/8 to 3/16 deep. Fortunately your only trying to do this once.
 
I was kidding about ink though I'm sure it would work. But I don't doubt for a minute that all that spalted lumber isn't harvested as such. You can't really mill the stuff. Dollars to donuts someone has a spray bottle of sugar water/fungus and sprays them after they've been milled to approximate size.
 
swarfrat said:
I was kidding about ink though I'm sure it would work. But I don't doubt for a minute that all that spalted lumber isn't harvested as such. You can't really mill the stuff. Dollars to donuts someone has a spray bottle of sugar water/fungus and sprays them after they've been milled to approximate size.

You may have something there. I've wondered myself how they cut the stuff, I've seen some spalted tops that looked like they would explode if you tried to run them through a planer or sander. Somehow they got them down to 1/4.  :dontknow:
 
Thanks for all the input..  At this point, thinning the top is probably out of the question as I don't have the tools to do that effectively.  I have done a few practice runs cutting kerfs on some scrap pieces of 1/4" maple top I had laying round from when I was working out some dyed finishes and that does help it to bend, but I don't want the cuts to run all the way out to the edge since it won't be a bound body and I hadn't really plan on bursting the edges to cover up the ends of the cuts.  So, maybe a combo of kerfs running just short of the edge and then moisture/steam to help the uncut portions bend a little easier might work?  Don't know, just spit ballin' here.. lol

I also thought about gluing it flat and then cutting the contour with a diagonal reveal as Fat Pete suggested, but I'd really like to keep the top all the way out to the edge if at all possible.

Eh, what the heck.. Damn the torpedoes and full steam ahead!!  They say ignorance is bliss, so maybe if I just attack this with the mindset that it's all going to work out just fine.. it will. LOL  If worse comes to worse.. I've messed up a $60 top and I've gained some knowledge for the next go around.
 
Did some experimenting with the kerfing idea to bend the top.  First pic is from the other night and is the cut all the way across the board to see if doing this would even work.  Used a Dremel with an 1/8" router bit to cut the relief slots and this method seems to work quite well actually.  I think doing it this way with the kerf all the way through would easily bend over a standard forearm contour.  However, I don't want the cuts showing as I'm not planning binding or an opaque finish on the outside edge to hide them. 

So, I tonight tried to do the kerf but just stop short of the edge of the board.  I cut several lines, but that maple is hard on a tiny 1/8" router bit and dulled it to the point that it started wandering all over the place so I busted out the router and decided to try just cutting a channel, leaving the edges intact.. and this seems to work equally as well.  I think it would bend far enough to cover a forearm contour.  Especially if it were cut at a reduced angle with a very gradual transition.  I did test the limits of how far it would bend by pushing it on pretty hard, deflecting it nearly 2" at the end of the board before it very slightly cracked the edge as shown. 
 

Attachments

  • Kerfing.jpg
    Kerfing.jpg
    616.4 KB · Views: 14
  • Router cut for bend.jpg
    Router cut for bend.jpg
    444.9 KB · Views: 10
  • Kerfing crack.jpg
    Kerfing crack.jpg
    412.8 KB · Views: 13
Back
Top