

Goose_Goblin
Newbie
- Messages
- 5
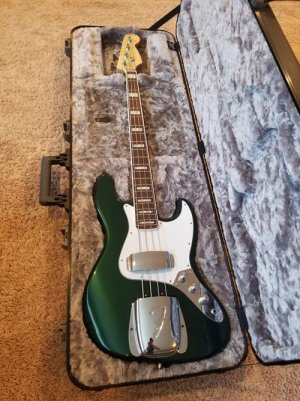
My 'Modern' Relic - I wanted something to have a look of something vintage with some more modern amenities!
Neck:
-3A Flamed Maple Neck
-Pearloid Block Inlays
-White Binding
-6150 Stainless Steel Frets
-Standard Truss Rod
-White Corian Nut (38mm)
-Standard 34" inch length
-14mm Tuning Holes
-Standard 4 Bolt
-21 Frets
-High Gloss Finish
Body:
-4 lbs 10 oz solid Alder Body
-Routing for standard jazz bass pickups, top rout, 9V battery rout
-Tummy Cut / Forearm Contour
Hardware:
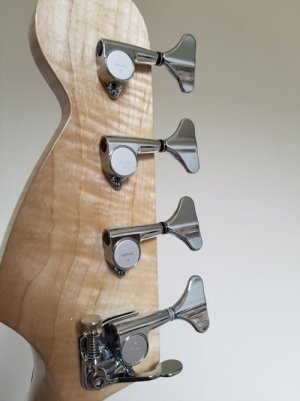
-Chrome - Gotoh 201B Bridge
-Chrome - Gotoh GB7 Bass Tuners
-Chrome - Hipshot Gotoh Bass XTender GB7
-chrome - Guitar Fuel KB-1, KB-2 (Concentric) Volume/Tone Control Knob
-Chrome - Pickup Cover
-Chrome - Standard Neck Plate
-Chrome - String
-Chrome - Dunlop Strap Locks
-White Jazz Bass Pick Guard
Electronics:
-Fender Gen 4 Noiseless Jazz Bass Single-Coil Pickups
-Copper Shielding Tape
-Guitar Fuel SBK-2D Pre-Amp Wiring Harness (Balance, Volume, Treble/Bass)
http://www.guitarfuel.com/sbk-series-preamps.html
Other:
-Fender 9050 Stainless Flatwound Bass Strings
-Fender Deluxe Moulded Jazz and Precision Bass Guitar Case - Black
-Snark SN5X Clip-On Tuner
Body Preparation:
-Dupli-Color Clear Perfect Match Automotive Top Coat - 8 oz Aerosol (2)
-Dupli-Color Gray Perfect Match Scratch Filler Primer - 8 oz Aerosol (2)
- Dupli-Color Amazon Green Metallic Automotive Top Paint - 8 oz Aerosol (3)
-Meguiars Fine Cut Polish 16 oz
-Music Nomad The Guitar ONE All-in-One Clean, Polish, Wax for Gloss Finish
Tools:
-Harbor Freight
-Anbes Soldering Iron Kit 60W Adjustable Temperature Welding Tool
Steps I took (Notes & Rationale)
PART 1: INSPIRATION AND ORDERING
I've been itching to build my dream bass for quite some time. That being said, I knew I liked the style of something vintage, wanted something aesthetically pleasing to the eye, and preferred to incorporate modern technology as well. Looking through pictures of vintage basses, I've always been drawn to the 1970s era Fender jazz basses. After coming across some inspirational pictures of older basses, I had a solid idea of where I wanted to start.
My father had ordered parts from Warmoth to build a custom telecaster and was impressed with the quality of their work so I felt comfortable looking further into them. Let me tell you, Warmoth is a rabbit hole of choices. From neck woods, scale length, routing options, reaming size of tuning machine holes, and pretty much else you think you might want to customize. Moral of the story...plenty of options, but it can often feel overwhelming. Luckily, there is a great community of people like me who have built guitars/basses and often discuss a variety of topics on their unofficial Warmoth message forum.
Honestly, it can be challenging to think about all the details and what you need. Again, Warmoth has a great parts and accessories section for anything else you would need to complete your project. It's a one-stop shop and are pretty fair with their pricing.
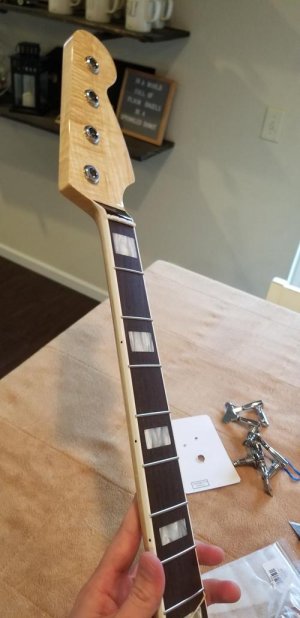
I started with the neck - which I would argue is THE most important part of any guitar/bass. I know it sounds shallow, but I wanted it to look beautiful and something fun to look at. I wasn't worried so much about the construction because I felt confident in Warmoth's ability to deliver. Again, I was impressed by my father's roasted flame maple telecaster neck so I assumed they would do a great job. Now back to the aesthetics... Drawing inspiration from the 60s-70s jazz basses, I wanted block inlays and a bound fretboard. I eventually landed on a 3A flamed maple neck, white binding, pearloid block inlays, and rosewood fretboard in a standard scale length. This was the most expensive part of the order, but 100% worth it.
Now I had to set my sights on a body. I've heard and read some good information about Alder bodies, so I decided to start there. I've heard a lot of arguments of the effects of different "tone woods", but I guess I don't have enough experience playing with different wood types to make an educated assessment on if it matters - or if at all. My perspective is that on electric guitars/basses the strings, pickups, electronics, and amplifier have more of an impact on how a stringed instrument sounds. I am not saying that it doesn't matter - I just think it's more subjective to what people feel is pleasing to the ear.
Something I needed to consider is weight. I have played a number of basses and even a few ounces can make a difference on how your body feels playing it when standing for an hour or two with a heavier bass. That being said, I tried to find the lightest body I could find. I ended up landing on an unfinished 4 lb 10 oz alder single piece body. I went unfinished route because although Warmoth has a number of different finishing/paint options, they still didn't have the color I wanted. The closest they had was sherwood green, but if I was going to make it custom and perfect to my specifications I needed to find someone else to paint it for me in a custom color or do it myself. I ended up deciding to do it myself. I knew it would be a daunting project as I had never painted/finished a body before. More on that to come...
After spending multiple hours, changing my custom order and loading/unloading my cart, I finally ordered it. My heart was racing (weird I know!). All I had to do was wait. Ordering custom pieces can take 8-10 weeks, so I had to patiently wait for my all my parts to come.
I know I have been plugging Warmoth over and over, but honestly they deserve it. They know what they are doing and have great customer service. A customer sales rep named Brian helped me out quite a bit through this process which was helpful being a first-timer.
Fast forward 9 weeks later, my packages arrive! I had seen people do "unboxing videos" and I gave it a shot. I thought it might help people who were in my position and wanted to learn more. I felt kind of stupid watching myself stumble through it, so I haven't decided if I will upload it or not. I'll edit this post if I do.
Opening the boxes felt like Christmas, except I am my own Santa. In the words of Tom Haverford and Donna Meagle - Treat Yo Self!
It came in two different packages. One just for the neck, the other for the body and any hardware/parts that were included in the order. I put everything in safe place that my 1 year old wouldn't get to. I put the project on hold briefly so I could decide how I would want to proceed with finishing the body.
PART 2: FINISHING THE BODY
The color and finish was very important to me so I initially set on a quest to see if someone would paint it for my. I stumbled across a website called guitarpaintguys.com. Browsing their selection of colors (solid, metallic, pearl, custom) I contacted them to help me decide between a few colors. They sent some pictures of guitars with the ones I was torn between which helped, but I was still on the fence. I was being very picky. I knew I wanted it to be a darker green/slight teal color so I went searching high and low.
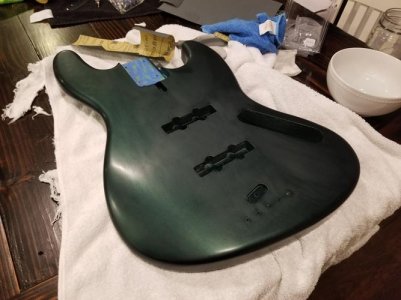
Now painting and finishing a guitar that looks good and factory finished is no small feat. After watching hours and hours of youtube videos to see if I could do it myself, I pulled the trigger. I recommend watching the three-part series for painting/finishing nitrocellulose guitars by a channel called Lonestar guitars. He did a great job explaining the rationale and how to get a great final product. Not too long after watching a variety of videos, I ended up buying automotive Duplicolor sandable primer, color, and clear coat. The color I like was called Amazon Green found on a variety of Ford vehicles. When it arrived, I did a test spray on a scrap piece of wood and was happy with the result, so I felt comfortable proceeding.
The first step is prepping the body. I would recommend filling the grain, as recommended in the previously described series. If you take the time to close the grain, sand, and make it a smooth and level surface, you will take a lot of work and headache out of the whole process. My alder body is a closed-grain wood and was already quite smooth so I felt comfortable spraying it with primer right away. Note to others out there, if there is a tiny, small dent - it should be filled. I ended up dropping something pointy on the body, which I thought was pretty small that the time, but I had wished I would have taken the time to fill it before priming. Mistakes are the best teachers! I'll remember this for next time.
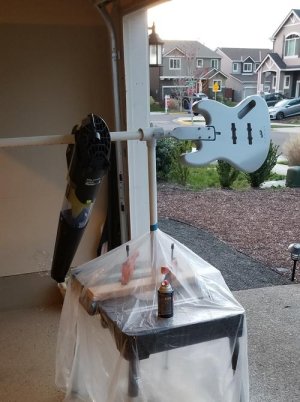
I ended up making a little jig that would allow me to attach a piece to the neck cavity. It is important two do two things to consider. First, tape the neck cavity from getting painted. Additional layers of paint could affect the fit of your neck. I suppose you could just sand it back, but better be safe than sorry. Second, if you have a jig that fits into the neck cavity, give it some space around the perimeter as there could potentially be some bridging of the paint/finish from the body to the jig. If this happens, when you take off the jig, you may take of some of the body's paint with it. Just a word to the wise.
Now I ended up seeing a video on youtube where a gentleman spraying with duplicolor had a PVC tubing set up arrange in a 'T' which allowed him to stabilize the piece and rotate it as needed. Using some scrap wood, PVC, and screws I ended up making one myself. I am glad a did. I ended up clamping it to a small portable workbench that would be the site of most of the finishing process.
I waited until I had a nice day until I painted, I knew having a windy, dusty, cold, or rainy day could ultimately affect the finish. Being in the pacific northwest in Portland, OR, my window in the spring is generally pretty small, but I got lucky. It was high 60s, sunny, and minimal wind.
I first sprayed the primer, light coat. Waited 15-20 minutes. Sprayed a normal/heavier coat again. And repeated the process over and over until I went through about 2 spray cans of primer. I let it dry overnight. The next day, I got lucky again with good weather conditions and decided to move onto the painting/clear coat process. Before I did so, I sanded with 400 grit sandpaper to level any bumps/irregularities, wiped it clean with mineral spirits, and let it dry for a few minutes.
I was nervous about the next part of the process - painting. A lot can go wrong. Being inexperienced with finishing guitars, I tried my best to control the variables. I ended up making my own make-shift paint booth by draping plastic dust barriers over a couple of hanging lights outside. I didn't want dust/pollen/etc to float into my finish, so I knew that although it was labor intensive, it was necessary and required for a chance at a good finish. Note to readers, make sure you have good ventilation and you're wearing appropriate protective gear. You don't want to be breathing in aerosols and nitrocellulose compounds. It's no good.
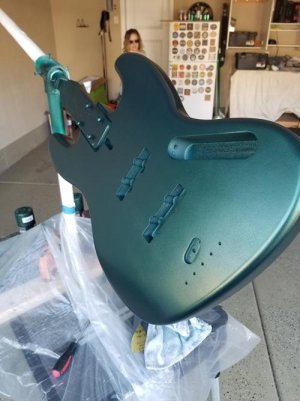
Once all set up outside, I did my first light coat of color. Kept it light at first before moving to heavier coats. A couple of important notes about rattle cans, paint/metallics can settle so to help it spray better and more consistently put the spray cans in warm water for a little bit and then shake/stir the paint around for a few minutes before spraying. For the second coat, I went a little heavier, starting the spraying process before and after reaching the edge of the body, moving in parallel lines across my work with a slight overlap, and attempt to avoid flicking my wrist or arcing the spray pattern (this can lead to variable coverage). I encourage people to watch that video series I mentioned before. He describes the process in detail and various pitfalls of the process. That being said, I continued to spray coats with periods of drying time until I used up about two and a half spray cans of Amazon Green. If there were any blemishes in the finish, I would wait until it was dry and briefly sand with 600 grit sandpaper before moving onto the next coat. Your goal is to keep the surface as smooth and as consistent as possible. Don't rush the process.
I know I am contradicting myself, but I ended up waiting a few hours to spray my clear-coat instead of the next day. Do as I say, not as I do. Now the unique thing about these lacquers is that they melt into each other which helps them self-level in a way. I was skeptical about the Duplicolor clear-coat, but I was pleased. Once it dried to the touch, there was some slight orange-peel, which I expected, but overall was pretty level. I knew I would be sanding with various grades of sandpaper to help, but first I needed to let the paint/clear cure. They recommend 3-4 weeks, I waited for three. Different places I've read have suggested waiting 4-8 weeks before wet-sanding, but if you don't smell the finish anymore your probably safe to proceed. I gave it a sniff and didn't smell a strong aroma of VOCs, so I decided it had cured enough to start wet sanding.
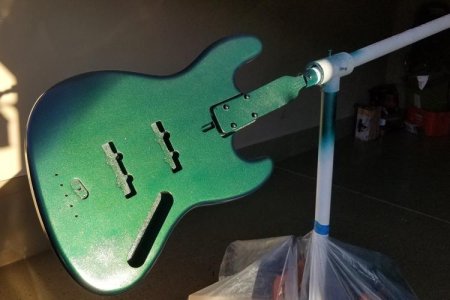
Wet-sanding is such a strange, labor-intensive process. It seems counter-intuitive to start scratching up a surface you spent such a hard time on to keep flat and shiny; however, it is necessary to get a good finish. Using a small piece of 1000 grit sand paper, water, and a droplet of soap, I sanded and sanded and sanded until I achieved a consistent matte, milky surface. Don't push too hard and let the sandpaper and water do the work. Take breaks to wipe off your work with a towel to see your progress. I will encourage anyone doing this plug or prevent any water from getting into any holes or cavities. This can cause the body to swell up and you don't want that. I used tons of q-tips to plug holes or attack any stray regions of moisture in holes/cavities. Also, it is important to be careful around the edges of the body or near cavities as they generally are areas being over-sanded and you'll end up ruining your finish thus far.
Now after sanding for what seemed like an eternity, I moved onto 1500 grit and repeated the process. You'll start to see a little more sheen, but still a matte finish overall. I kept wet sanding until I finished with 2000 grit. Using drill attachment with a buffer pad that I bought cheap at Harbor Freight and Maguiers fine-cut polish, I went to town. This is where it gets fun. You really start to notice the glossy, mirror-like finish start to come out. When I was happy with it, I used a guitar polish/cleaner/wax spray with a scratch-free towel to complete the finish. It even smelled nice!
The sanding process took me about 5 hours. Again, I am a novice being overly cautious, but I did it! Seeing your reflection in the finish makes all the hard work worth it.
PART 3: HARDWARE / WIRING
This is getting long. So I'll wrap it up. This was pretty straight forward except I bought the wrong knobs for the potentiometer from my pre-amp harness. Be sure to get the right size knobs for all you future builders! Also, putting on the bass x-tender key was a bit tricky for me, but it all worked out in the end. Intonation and string height just need some final adjustments and it then it's perfect! :rock-on:
Disclaimers: This is my first time finishing a body or putting together a guitar, so I'm sure there will be critiques coming my way, but overall I had a blast!
Neck:
-3A Flamed Maple Neck
-Pearloid Block Inlays
-White Binding
-6150 Stainless Steel Frets
-Standard Truss Rod
-White Corian Nut (38mm)
-Standard 34" inch length
-14mm Tuning Holes
-Standard 4 Bolt
-21 Frets
-High Gloss Finish
Body:
-4 lbs 10 oz solid Alder Body
-Routing for standard jazz bass pickups, top rout, 9V battery rout
-Tummy Cut / Forearm Contour
Hardware:
-Chrome - Gotoh 201B Bridge
-Chrome - Gotoh GB7 Bass Tuners
-Chrome - Hipshot Gotoh Bass XTender GB7
-chrome - Guitar Fuel KB-1, KB-2 (Concentric) Volume/Tone Control Knob
-Chrome - Pickup Cover
-Chrome - Standard Neck Plate
-Chrome - String
-Chrome - Dunlop Strap Locks
-White Jazz Bass Pick Guard
Electronics:
-Fender Gen 4 Noiseless Jazz Bass Single-Coil Pickups
-Copper Shielding Tape
-Guitar Fuel SBK-2D Pre-Amp Wiring Harness (Balance, Volume, Treble/Bass)
http://www.guitarfuel.com/sbk-series-preamps.html
Other:
-Fender 9050 Stainless Flatwound Bass Strings
-Fender Deluxe Moulded Jazz and Precision Bass Guitar Case - Black
-Snark SN5X Clip-On Tuner
Body Preparation:
-Dupli-Color Clear Perfect Match Automotive Top Coat - 8 oz Aerosol (2)
-Dupli-Color Gray Perfect Match Scratch Filler Primer - 8 oz Aerosol (2)
- Dupli-Color Amazon Green Metallic Automotive Top Paint - 8 oz Aerosol (3)
-Meguiars Fine Cut Polish 16 oz
-Music Nomad The Guitar ONE All-in-One Clean, Polish, Wax for Gloss Finish
Tools:
-Harbor Freight
-Anbes Soldering Iron Kit 60W Adjustable Temperature Welding Tool
Steps I took (Notes & Rationale)
PART 1: INSPIRATION AND ORDERING
I've been itching to build my dream bass for quite some time. That being said, I knew I liked the style of something vintage, wanted something aesthetically pleasing to the eye, and preferred to incorporate modern technology as well. Looking through pictures of vintage basses, I've always been drawn to the 1970s era Fender jazz basses. After coming across some inspirational pictures of older basses, I had a solid idea of where I wanted to start.
My father had ordered parts from Warmoth to build a custom telecaster and was impressed with the quality of their work so I felt comfortable looking further into them. Let me tell you, Warmoth is a rabbit hole of choices. From neck woods, scale length, routing options, reaming size of tuning machine holes, and pretty much else you think you might want to customize. Moral of the story...plenty of options, but it can often feel overwhelming. Luckily, there is a great community of people like me who have built guitars/basses and often discuss a variety of topics on their unofficial Warmoth message forum.
Honestly, it can be challenging to think about all the details and what you need. Again, Warmoth has a great parts and accessories section for anything else you would need to complete your project. It's a one-stop shop and are pretty fair with their pricing.
I started with the neck - which I would argue is THE most important part of any guitar/bass. I know it sounds shallow, but I wanted it to look beautiful and something fun to look at. I wasn't worried so much about the construction because I felt confident in Warmoth's ability to deliver. Again, I was impressed by my father's roasted flame maple telecaster neck so I assumed they would do a great job. Now back to the aesthetics... Drawing inspiration from the 60s-70s jazz basses, I wanted block inlays and a bound fretboard. I eventually landed on a 3A flamed maple neck, white binding, pearloid block inlays, and rosewood fretboard in a standard scale length. This was the most expensive part of the order, but 100% worth it.
Now I had to set my sights on a body. I've heard and read some good information about Alder bodies, so I decided to start there. I've heard a lot of arguments of the effects of different "tone woods", but I guess I don't have enough experience playing with different wood types to make an educated assessment on if it matters - or if at all. My perspective is that on electric guitars/basses the strings, pickups, electronics, and amplifier have more of an impact on how a stringed instrument sounds. I am not saying that it doesn't matter - I just think it's more subjective to what people feel is pleasing to the ear.
Something I needed to consider is weight. I have played a number of basses and even a few ounces can make a difference on how your body feels playing it when standing for an hour or two with a heavier bass. That being said, I tried to find the lightest body I could find. I ended up landing on an unfinished 4 lb 10 oz alder single piece body. I went unfinished route because although Warmoth has a number of different finishing/paint options, they still didn't have the color I wanted. The closest they had was sherwood green, but if I was going to make it custom and perfect to my specifications I needed to find someone else to paint it for me in a custom color or do it myself. I ended up deciding to do it myself. I knew it would be a daunting project as I had never painted/finished a body before. More on that to come...
After spending multiple hours, changing my custom order and loading/unloading my cart, I finally ordered it. My heart was racing (weird I know!). All I had to do was wait. Ordering custom pieces can take 8-10 weeks, so I had to patiently wait for my all my parts to come.
I know I have been plugging Warmoth over and over, but honestly they deserve it. They know what they are doing and have great customer service. A customer sales rep named Brian helped me out quite a bit through this process which was helpful being a first-timer.
Fast forward 9 weeks later, my packages arrive! I had seen people do "unboxing videos" and I gave it a shot. I thought it might help people who were in my position and wanted to learn more. I felt kind of stupid watching myself stumble through it, so I haven't decided if I will upload it or not. I'll edit this post if I do.
Opening the boxes felt like Christmas, except I am my own Santa. In the words of Tom Haverford and Donna Meagle - Treat Yo Self!
It came in two different packages. One just for the neck, the other for the body and any hardware/parts that were included in the order. I put everything in safe place that my 1 year old wouldn't get to. I put the project on hold briefly so I could decide how I would want to proceed with finishing the body.
PART 2: FINISHING THE BODY
The color and finish was very important to me so I initially set on a quest to see if someone would paint it for my. I stumbled across a website called guitarpaintguys.com. Browsing their selection of colors (solid, metallic, pearl, custom) I contacted them to help me decide between a few colors. They sent some pictures of guitars with the ones I was torn between which helped, but I was still on the fence. I was being very picky. I knew I wanted it to be a darker green/slight teal color so I went searching high and low.
Now painting and finishing a guitar that looks good and factory finished is no small feat. After watching hours and hours of youtube videos to see if I could do it myself, I pulled the trigger. I recommend watching the three-part series for painting/finishing nitrocellulose guitars by a channel called Lonestar guitars. He did a great job explaining the rationale and how to get a great final product. Not too long after watching a variety of videos, I ended up buying automotive Duplicolor sandable primer, color, and clear coat. The color I like was called Amazon Green found on a variety of Ford vehicles. When it arrived, I did a test spray on a scrap piece of wood and was happy with the result, so I felt comfortable proceeding.
The first step is prepping the body. I would recommend filling the grain, as recommended in the previously described series. If you take the time to close the grain, sand, and make it a smooth and level surface, you will take a lot of work and headache out of the whole process. My alder body is a closed-grain wood and was already quite smooth so I felt comfortable spraying it with primer right away. Note to others out there, if there is a tiny, small dent - it should be filled. I ended up dropping something pointy on the body, which I thought was pretty small that the time, but I had wished I would have taken the time to fill it before priming. Mistakes are the best teachers! I'll remember this for next time.
I ended up making a little jig that would allow me to attach a piece to the neck cavity. It is important two do two things to consider. First, tape the neck cavity from getting painted. Additional layers of paint could affect the fit of your neck. I suppose you could just sand it back, but better be safe than sorry. Second, if you have a jig that fits into the neck cavity, give it some space around the perimeter as there could potentially be some bridging of the paint/finish from the body to the jig. If this happens, when you take off the jig, you may take of some of the body's paint with it. Just a word to the wise.
Now I ended up seeing a video on youtube where a gentleman spraying with duplicolor had a PVC tubing set up arrange in a 'T' which allowed him to stabilize the piece and rotate it as needed. Using some scrap wood, PVC, and screws I ended up making one myself. I am glad a did. I ended up clamping it to a small portable workbench that would be the site of most of the finishing process.
I waited until I had a nice day until I painted, I knew having a windy, dusty, cold, or rainy day could ultimately affect the finish. Being in the pacific northwest in Portland, OR, my window in the spring is generally pretty small, but I got lucky. It was high 60s, sunny, and minimal wind.
I first sprayed the primer, light coat. Waited 15-20 minutes. Sprayed a normal/heavier coat again. And repeated the process over and over until I went through about 2 spray cans of primer. I let it dry overnight. The next day, I got lucky again with good weather conditions and decided to move onto the painting/clear coat process. Before I did so, I sanded with 400 grit sandpaper to level any bumps/irregularities, wiped it clean with mineral spirits, and let it dry for a few minutes.
I was nervous about the next part of the process - painting. A lot can go wrong. Being inexperienced with finishing guitars, I tried my best to control the variables. I ended up making my own make-shift paint booth by draping plastic dust barriers over a couple of hanging lights outside. I didn't want dust/pollen/etc to float into my finish, so I knew that although it was labor intensive, it was necessary and required for a chance at a good finish. Note to readers, make sure you have good ventilation and you're wearing appropriate protective gear. You don't want to be breathing in aerosols and nitrocellulose compounds. It's no good.
Once all set up outside, I did my first light coat of color. Kept it light at first before moving to heavier coats. A couple of important notes about rattle cans, paint/metallics can settle so to help it spray better and more consistently put the spray cans in warm water for a little bit and then shake/stir the paint around for a few minutes before spraying. For the second coat, I went a little heavier, starting the spraying process before and after reaching the edge of the body, moving in parallel lines across my work with a slight overlap, and attempt to avoid flicking my wrist or arcing the spray pattern (this can lead to variable coverage). I encourage people to watch that video series I mentioned before. He describes the process in detail and various pitfalls of the process. That being said, I continued to spray coats with periods of drying time until I used up about two and a half spray cans of Amazon Green. If there were any blemishes in the finish, I would wait until it was dry and briefly sand with 600 grit sandpaper before moving onto the next coat. Your goal is to keep the surface as smooth and as consistent as possible. Don't rush the process.
I know I am contradicting myself, but I ended up waiting a few hours to spray my clear-coat instead of the next day. Do as I say, not as I do. Now the unique thing about these lacquers is that they melt into each other which helps them self-level in a way. I was skeptical about the Duplicolor clear-coat, but I was pleased. Once it dried to the touch, there was some slight orange-peel, which I expected, but overall was pretty level. I knew I would be sanding with various grades of sandpaper to help, but first I needed to let the paint/clear cure. They recommend 3-4 weeks, I waited for three. Different places I've read have suggested waiting 4-8 weeks before wet-sanding, but if you don't smell the finish anymore your probably safe to proceed. I gave it a sniff and didn't smell a strong aroma of VOCs, so I decided it had cured enough to start wet sanding.
Wet-sanding is such a strange, labor-intensive process. It seems counter-intuitive to start scratching up a surface you spent such a hard time on to keep flat and shiny; however, it is necessary to get a good finish. Using a small piece of 1000 grit sand paper, water, and a droplet of soap, I sanded and sanded and sanded until I achieved a consistent matte, milky surface. Don't push too hard and let the sandpaper and water do the work. Take breaks to wipe off your work with a towel to see your progress. I will encourage anyone doing this plug or prevent any water from getting into any holes or cavities. This can cause the body to swell up and you don't want that. I used tons of q-tips to plug holes or attack any stray regions of moisture in holes/cavities. Also, it is important to be careful around the edges of the body or near cavities as they generally are areas being over-sanded and you'll end up ruining your finish thus far.
Now after sanding for what seemed like an eternity, I moved onto 1500 grit and repeated the process. You'll start to see a little more sheen, but still a matte finish overall. I kept wet sanding until I finished with 2000 grit. Using drill attachment with a buffer pad that I bought cheap at Harbor Freight and Maguiers fine-cut polish, I went to town. This is where it gets fun. You really start to notice the glossy, mirror-like finish start to come out. When I was happy with it, I used a guitar polish/cleaner/wax spray with a scratch-free towel to complete the finish. It even smelled nice!
The sanding process took me about 5 hours. Again, I am a novice being overly cautious, but I did it! Seeing your reflection in the finish makes all the hard work worth it.
PART 3: HARDWARE / WIRING
This is getting long. So I'll wrap it up. This was pretty straight forward except I bought the wrong knobs for the potentiometer from my pre-amp harness. Be sure to get the right size knobs for all you future builders! Also, putting on the bass x-tender key was a bit tricky for me, but it all worked out in the end. Intonation and string height just need some final adjustments and it then it's perfect! :rock-on:
Disclaimers: This is my first time finishing a body or putting together a guitar, so I'm sure there will be critiques coming my way, but overall I had a blast!
Attachments
-
 20190325_131959.jpg53.2 KB · Views: 15
 -
 20190329_193621.jpg54.2 KB · Views: 21
 -
 20190330_140019.jpg43.8 KB · Views: 23
 -
 20190330_182844.jpg42.5 KB · Views: 23
 -
 20190412_210510.jpg44.1 KB · Views: 25
 -
 20190415_183615.jpg80 KB · Views: 29
 -
 20190415_183639.jpg73.9 KB · Views: 20
 -
 20190415_184159.jpg61.9 KB · Views: 24
 -
 20190420_121130.jpg32.4 KB · Views: 23
 -
 Warmoth2.jpg30.6 KB · Views: 25