Leaderboard

Masked Binding; Natural and Colored

s1player

Junior Member
Messages
76
Hello Everyone - I am considering doing a masked binding on a flame maple top - it may be Natural masked or it may be Color Masked - haven't decided which but want to explore both. The top will be dyed using rubbed on grain pop black and color.

Natural Masked Binding Prep. Let's assume we are doing a one eighth inch Masked binding. I have read here and on other forums that where natural binding is going to run on the guitar - should be masked and have Sanding or Lacquer Sealer applied and allowed to dry. Then, the masking removed and 3M striping tape or similar should then be applied where the natural binding is. The theory is that the sanding sealer should prevent top and side die from penetrating the wood under the Masked Binding type - leaving a clean line.

My question: when masking the binding - should the masking be for exactly one eight inch or should the lacquer sealer coat be slightly wider than one eighth? If wider, by how much?

I have read both: that the sealed area should be exactly the width of the masked binding AND that the sealed area should be slightly wider.

Color Masked Binding Prep. What if instead of Natural masked binding - one wants to apply a color and then put binding masking over the color and finish the top - leaving the masked binding underneath.

Under this scenario - where color has been put down before the binding masking - does one need to do the lacquer sealer step? If so, do you do it over the first layer of color - such that the sequence is first dye, lacquer sealer, then the masked binding tape?

I really appreciate this forum and any advice that you can provide.
 
I can't imagine why you'd use a mask of a different width than what you want to limit exposure to. If you want a 1/8" stripe, use 1/8" masking. Even if it did change width for some reason, how much would it actually be? Is somebody gonna put a micrometer on it?

That said, I think 1/8" is pretty narrow. 1/4" would be more typical for such a treatment. But, it depends on the effect you're trying to get. There's certainly no rule.

As for natural vs. colored binding, you seal over where you're going to mask regardless of whether or not you've colored the wood. You're trying to stop the wood from absorbing the next layer, so the previous layer and the mask need to have a tight edge. Easiest way to do that is to just seal the whole body once you've got the color you want on it, then mask as desired and proceed from there.

As an aside, you may want to get some professional pinstriping tape rather than using painter's masking tape. Pinstripe mask is thinner, makes a better seal and a finer edge than the paper tapes you use to mask off trim or woodwork. 3M makes a wide variety of such tapes - something like their 218 series tapes is ideal.
 
Cagey said:
I can't imagine why you'd use a mask of a different width than what you want to limit exposure to. If you want a 1/8" stripe, use 1/8" masking. Even if it did change width for some reason, how much would it actually be? Is somebody gonna put a micrometer on it?

That said, I think 1/8" is pretty narrow. 1/4" would be more typical for such a treatment. But, it depends on the effect you're trying to get. There's certainly no rule.

As for natural vs. colored binding, you seal over where you're going to mask regardless of whether or not you've colored the wood. You're trying to stop the wood from absorbing the next layer, so the previous layer and the mask need to have a tight edge. Easiest way to do that is to just seal the whole body once you've got the color you want on it, then mask as desired and proceed from there.

As an aside, you may want to get some professional pinstriping tape rather than using painter's masking tape. Pinstripe mask is thinner, makes a better seal and a finer edge than the paper tapes you use to mask off trim or woodwork. 3M makes a wide variety of such tapes - something like their 218 series tapes is ideal.

Thanks Cagey.

I used one eighth width as an example. It's on my warmoth Bass VI. once I have the body and see the radius used on the maple top edge - I will select a width that's in proporation.

For the mask - I plan to use 2 types of pinstriper tape. One the width of the binding. But, there is also pinstriper tape that essentially acts as a stencil for pinstriping itself. Was going to buy some of that to use as my mask for the binding - since it would allow applying the 2 sets of masking all at once - on a common backing. The stuff is here: http://www.finessepinstriping.com/striper_order.asp

On the sealing itself - so it seems you are saying for the color masked binding. Get the top to the color I want after the grain is popped. I can then apply sealer to the top. Mask the binding. and then apply the additional layers of dye.

Will additional applications of dye absorb through the sealer?

Very much appreciate your help with my question.

 
If I'm understanding it correctly, that multi-part tape you linked to is designed for adding a painted stripe, not masking one in. It is as you say, a "stencil". In other words, you'd paint in the open part and not around it. What you're trying to do is mask the surface so the stripe is left over after you apply the overall finish to that area, not created. The two part stuff is for creating a positive, and you want to create a negative. You want to prevent finish application to get your stripe, not add it.

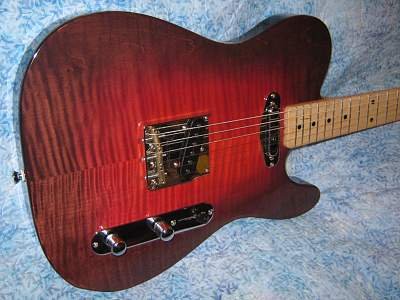
You can dye sealer, but in this application you shouldn't need to. Color the top, seal it, mask for the binding strip, shoot the edge burst, remove the mask, then clear coat it. If I understand what you're trying to do, it should look something like this?

IMG_0238SM.JPG

That's not my work; that's from Warmoth. I've done it in black/blue, though, and got similar results. I just don't have pictures. Hated it. Painted over it.

One thing I will caution you about - be sure to have enough clear coat on before you start level sanding, and be very careful around those edges. The smaller area means you'll inadvertently put a lot more pressure on the sandpaper than you think, and you'll burn through so fast it's frightening. Normally, that's repairable, but with the masked binding it would be a Big-Time Major League pain in the shorts. Just give it a few wipes and check it frequently, and stop early if you're unsure and add another coat or two of clear. Once the orange peel is gone, you start the finish sanding/buffing/polishing.
 
I'm not sure where I got that. I just pulled it out to look and there are no identifying marks on it. It may be an AmStd knock-off from GFS or someplace like that, but the wang bar mount is different; more like a Wilkie. It also looks different because I replaced the saddles with some stainless roller saddles I found somewhere.
 
Looks like it's this unit from GFS...

thumbnail.asp

...with these saddles from the same place...

thumbnail.asp

Turns out they're hardened steel, not stainless. No matter. They work well in combination with an LSR nut and Schaller Mini-Lockers to keep the thing in tune.
 
I'm surprised I haven't used more of them. The bridge and saddles together only total $60, which is half the cost of a Wilkie.
 
Actually, Carvin sells Wilky bridges pretty dang cheap:


http://www.carvinguitars.com/group/guitar_bridges


$80 for the beadblasted stainless version.
 
Cagey said:
If I'm understanding it correctly, that multi-part tape you linked to is designed for adding a painted stripe, not masking one in. It is as you say, a "stencil". In other words, you'd paint in the open part and not around it. What you're trying to do is mask the surface so the stripe is left over after you apply the overall finish to that area, not created. The two part stuff is for creating a positive, and you want to create a negative. You want to prevent finish application to get your stripe, not add it.

You can dye sealer, but in this application you shouldn't need to. Color the top, seal it, mask for the binding strip, shoot the edge burst, remove the mask, then clear coat it. If I understand what you're trying to do, it should look something like this?

IMG_0238SM.JPG

That's not my work; that's from Warmoth. I've done it in black/blue, though, and got similar results. I just don't have pictures. Hated it. Painted over it.

One thing I will caution you about - be sure to have enough clear coat on before you start level sanding, and be very careful around those edges. The smaller area means you'll inadvertently put a lot more pressure on the sandpaper than you think, and you'll burn through so fast it's frightening. Normally, that's repairable, but with the masked binding it would be a Big-Time Major League pain in the shorts. Just give it a few wipes and check it frequently, and stop early if you're unsure and add another coat or two of clear. Once the orange peel is gone, you start the finish sanding/buffing/polishing.

Sorry Cagey - I think I am being a bit too imprecise - since I am going to try something I haven't seen before.

The picture you posted is essentially what I want to do. However - in the case of the example you provided - I want to capture the masked binding one step before. So, after the figured is popped, but before the red dye is applied.

I know not a great move for a beginner to try something totally new - but here we go.

The end effect I am going for. The body is flame maple top with an alder back. The end result that I want is: Dark Cordovan Dye Alder back (using Transtint Cordovan color), the top flame "popped" using Cordovan Transtint sanded back and finished with Transtint Bright Red dye, AND finally the binding "frozen" at the grain pop step as the Cordovan Sanded back without the Red.

It would like something like the attached picture - though not a burst - just a solid field of color somewhere in the middle. But, with the masked binding added.

I think what I need to do accomplish this is:

1. Stain the whole body front and back with Cordovan in a very dark concentration.
2. Sand back the top to Pop the grain (perhaps a couple dye and sand cycles to get the grain like I want)
3. Then, I need to apply sealer to where the masked binding will be. So, I will mask above the binding and below the binding, leaving open just the line where the masked binding will be (the stripers tape masks above and below the binding all in one step. You apply both the above and below strips in the same pass because they are 2 strips on the same tape backing.)
4. Then, I would apply some thinned lacquer or sander sealer (which I am not sure yet) to the masked binding area to "freeze" the masked binding with the grain pop and prevent future Red dye passes to seep under.
5. Let dry and remove the masking from above and below where the binding will be.
6. Then, mask over the actual binding area that I just clear sealed.
7. Then, go over the grain-popped flame maple top with Red dye. Sand and repeat until top is the right shade of red, scratches are out, etc.
8. Let dry then remove the Masked Binding Tape.
9. Scrap any Red dye that may have seeped under the binding tape past the sealer.

This "process" is really what I am trying to confirm or improve - as it's cobbled from different forum instructions plus my own guesses based on that.

Hopefully, the end result of this process is a masked binding that is the sanded, grain-popped Cordovan color AND the top would be the Grain popped Cordovan and Red Dye Color.

And, again the Stripers tape is just a short cut to mask above where the binding will be and below where the binding will be in preparation for the clear sealer - all in one step.

BTW - what kind of a sealer does one use for this. I have read very diluted (so it penetrates the wood more deeply) lacquer sealer or sanding sealer. Which one?

I really, really appreciate this great advice you are providing.
 

Attachments

  • 002a.jpg
    002a.jpg
    21.1 KB · Views: 502
A couple of things to consider the striping tape may not go around curves awfully well... A trial run with the stuff may be worth it before attempting this idea.

Next I would suggest trying the idea out on some scrap wood prior to experimenting on the body. That way if it doesn't turn out a success you can reevaluate accordingly or if it does work you've gained some practice and practical insights for the real job.

 
stratamania said:
A couple of things to consider the striping tape may not go around curves awfully well... A trial run with the stuff may be worth it before attempting this idea.

Next I would suggest trying the idea out on some scrap wood prior to experimenting on the body. That way if it doesn't turn out a success you can reevaluate accordingly or if it does work you've gained some practice and practical insights for the real job.

Thanks for that advice. I have been trying to locate a local seller that has some Tiger or at least figured maple. When I have the raw guitar body - I planned to go find a couple pieces of maple that look similar to the top and practice the finish process and the Masked binding process on those.

This is my first dyed top - so I am a total rookie. Definitely need a couple trial runs on scrap wood.
 
Practice is definitely a Good Thing, particularly for something like this where a number of time-consuming steps can be compromised in later steps.

You don't necessarily have to get the same wood you're using. The techniques are what you're trying to learn. So, just something close will do.

Also, there are some really inexpensive bodies available from the far east, if you want to get real about the whole thing. For instance, a new raw Paulownia Strat body from here is less than $50. You could terrorize that thing several times over if you wanted to, and if it ends up decent-looking at all, you could put a neck/pickups/etc. on it and use it as a beater. Guarantee you'll learn a ton. Better than experimenting on a high-end part that costs real money.
 
Practicing on a cheap body - that is a fantastic idea. Those bodies don't cost a whole lot more than I would spend on figured maple test scraps.

Thank you. You have been tons of help thinking this through.

Cagey said:
Practice is definitely a Good Thing, particularly for something like this where a number of time-consuming steps can be compromised in later steps.

You don't necessarily have to get the same wood you're using. The techniques are what you're trying to learn. So, just something close will do.

Also, there are some really inexpensive bodies available from the far east, if you want to get real about the whole thing. For instance, a new raw Paulownia Strat body from here is less than $50. You could terrorize that thing several times over if you wanted to, and if it ends up decent-looking at all, you could put a neck/pickups/etc. on it and use it as a beater. Guarantee you'll learn a ton. Better than experimenting on a high-end part that costs real money.
 
s1player said:
Practicing on a cheap body - that is a fantastic idea. Those bodies don't cost a whole lot more than I would spend on figured maple test scraps.

Right. No sense wrecking expensive wood. Plus, working a body will teach you to make handling sticks, hanging procedures, how to sand without destruction, etc. Best of all, you can always strip it and start over, and if it gets too bad, you can just toss it in the fireplace <grin>

Just be aware that different woods will respond differently, so some minor things might change when you go to the real thing. For instance, some woods need grain filling while others don't, some woods don't accept stain or dye evenly (like Alder and Maple), and so on. But, usually it's just the initial prep work that changes. The rest of the finish work remains the same.
 
I will report back.

May even post a picture if the result looks any good.

Thanks again everyone for the assistance.
 
I now have from Stewmac - Seagrave Vinyl Sealer and Seagrave Nitro Lacquer Thinner for sealing the masked binding.

What ratio should I mix these 2 together in order to get a diluted mixture that will really absorb in to the wood grain  to prevent other colors bleeding under the masking tape?
 
If I remember correctly, they already thin the stuff for spraying. That could just be the formulation StewMac distributes, for profitability's sake. But, you sorta have to shoot some and see how it behaves to know if it needs to be changed. The formulation makes a difference, as does the temperature, humidity and how you've got your gun/compressor set up.

If after an hour or so it still feels a bit rubbery and doesn't want to sand without loading the hell out of your paper, it's too thick and you need to add some acetone. If it runs/sags too easily, it may be too thin or the temperature may be too low. If the temperature is high, you may need to add some retarder to slow everything down.

It's a feel thing. This is why everybody will tell you to practice. Also, it's handy to have some instrumentation around. A temperature/humidity meter is a wonderful thing, and they're not expensive. For example, Honeywell sells these units...

31nFQ6EnLIL.jpg

... for $23. Tells you the temp in F or C, as well as the relative humidity. You gotta know that stuff.
 
Back
Top