Lowering and leveling neck pocket - am I on the right track?

hamid

Newbie
Messages
6
A bit more than a year ago I bought this beautiful swamp ash body attached below.
It was a one-piece showcase ash body I selected the paint option.

I have a neck for it and had bought all the hardware ready to go. Installed tuners on the neck and tested the fit, unfortunately, there was a gap on the side of the neck fit. After further inspection, I figured out that the pocket had a slight curve on one side and the front (attached also.)

The curve is not that much, but the gap is visible when the neck is installed. So I debated what to do with it for a couple of weeks and decided to keep it and fix it. The neck pocket is high enough that could be taken down 1-1.5mm with no issue.

It has been sitting around waiting for me to fix it, and I finally got a router bit and template to start. Here are the tools I got:
Makita compact router (https://www.makitatools.com/products/details/RT0701C)
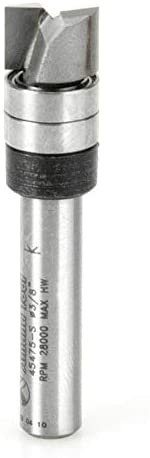
Amana tool carbide tipped top bearing router bit - 3/8" diameter, the cutting part is 1/4" so the bearings would roll on the neck pocket cavity wall
Stew mac strat neck pocket template

Here's what I plan to do:

I noticed the stewmac template is a bit different to the warmoth neck pocket shape, but that doesn't matter as I just use it under router base and use cavity walls as guide for the bit. I put the template on top and lower the cavity floor by 1mm leveling it.

Is there anything I should be aware of, or do differently? All advice is appreciated.

Cheers
 

Attachments

  • IMG-3813_resized.jpg
    IMG-3813_resized.jpg
    618.5 KB · Views: 86
  • IMG-0055_resized.jpg
    IMG-0055_resized.jpg
    301 KB · Views: 102
  • IMG-0063_resized.jpg
    IMG-0063_resized.jpg
    570 KB · Views: 98
  • bit_.jpg
    bit_.jpg
    7.4 KB · Views: 50
That seems dicey to me, but could possibly be done.  I might be tempted to glue a thin veneer on the offending side to raise it up a hair. You could at least reverse that if you don't like it. Or just live with the gap? However, the router way is going to change the geometry and could be catastrophic if there is a mishap. I am not a luthier, and have only removed material from neck heels, or shimmed but no experience with adjusting neck pockets.
Someone else that knows more will chime in soon. Perhaps Stratamania.
 
I think I would be more inclined to adjust that with sandpaper on a small flat block rather than using a router.
 
I'm with stratamania on that one.  You can sand with a block much more gradually than you can rout with a carbide-edged whirligig spinning 15,000 rpm.

 
Just a thought, but may I suggest something at 15k rpm is NOT the solution

I’m still trying to figure out how a depth measurement changes a width parameter.

You specified a
figured out that the pocket had a slight curve on one side and the front (attached also.)

Side is not bottom.
 
Considering that the high spot is the open corner, I'd suggest sandpaper and a block too. Or, a good flat file. I think you might find that you don't have to remove as much material as first thought............ :headbang:
 
Before hacking and sanding I’d put it together first. It’s on a side you’re not going to see and you don’t know if anything else is going to turn south.  After it’s together you can make an assessment.  Who knows, while unlikely , there could be other problems.
 
Lowered a neck pocket recently by about 1mm with a sanding block and some chisels. Way safer imo. Router will remove material very fast.
 
Thanks everyone for the help.

stratamania said:
I think I would be more inclined to adjust that with sandpaper on a small flat block rather than using a router.
Thanks, I will do that then. I was afraid I might put an angle on the cavity but I guess this is safer still.

PhilHill said:
Considering that the high spot is the open corner, I'd suggest sandpaper and a block too. Or, a good flat file. I think you might find that you don't have to remove as much material as first thought............ :headbang:

It is a couple low spots (cupped) unfortunately, so all the rest of the cavity needs to go down as well as that corner. I will try to do it carefully using a block 👍
 
I would also recommend a router as a last resort.  Adjust a neck pocket with (in increasing order of destructiveness) sandpaper, a file, or rasp.

{for future readers}

IF using a router to adjust a neck pocket, place scrap wood the same thickness as the body above the pocket and ideally another piece of scrap the same thickness as the template so that the router has something to rest on. It's easy to think one will have a steady enough hand to keep the router level when it's unsupported, but that's a rookie mistake (because I've made that mistake).

One might have a steady enough hand and enough beginner's overconfidence to believe one can do it, but then the tape attaching the template might say "yeah, no -- too much downward pressure on the opposite end, so I'm going to release .... NOW."  It's one thing for that to happen to an unfinished slab of wood, but for an already-finished body?  <<shudder>>

 
Actually, if tried to router and you didn't have the exact tools set up exactly right, you'd have an excellent story to tell.
 
I have used my router a few times, enough to know that anything more than a countertop edge is dangerous territory for me. :laughing7:
 
No more that what is showing in the photos, I'd just use some wood filler and sand the pocket back level.....Just my 2c
 
DangerousR6 said:
No more that what is showing in the photos, I'd just use some wood filler and sand the pocket back level.....Just my 2c

That is similar to what I thought/recommended to glue on thin veneer to the offending edge and sand level.
 
Spud said:
DangerousR6 said:
No more that what is showing in the photos, I'd just use some wood filler and sand the pocket back level.....Just my 2c

That is similar to what I thought/recommended to glue on thin veneer to the offending edge and sand level.
But adding the filler and sanding back won't change the depth of the pocket....
 
I guess I am not interpreting the pics correctly. I thought he had a very small low spot on one edge of the pocket. Just thought that a thin 1/4 inch wide piece of wood and glue would raise it and then could be sanded down to blend/level. Maybe not.
 
I reckon it will not require much sanding to level it.

There is some finish build up at the outer facing parts of the pocket which in themselves are probably causing the level to show light through it. Obviously I can only see what I can see from the photos but it does not look very much that the wood itself is uneven.

I always clean up any finish residue from a neck pocket as a matter of course.
 
stratamania said:
I reckon it will not require much sanding to level it.

There is some finish build up at the outer facing parts of the pocket which in themselves are probably causing the level to show light through it. Obviously I can only see what I can see from the photos but it does not look very much that the wood itself is uneven.

I always clean up any finish residue from a neck pocket as a matter of course.
I hadn't noticed that until re-looking at first pic. that along with the pic of the triangle edge, it's quite possible it is just finish overlap. So I would agree, it's worth sanding the pocket free of any finish overlap before any drastic routing...
 
Back
Top