

You are using an out of date browser. It may not display this or other websites correctly.
You should upgrade or use an alternative browser.
You should upgrade or use an alternative browser.
Gonna try a GFS and see if it sucks or not. **Done, Review on Pg3**
- Thread starter Volitions Advocate
- Start date
Volitions Advocate
Hero Member
- Messages
- 1,239
Yeah, I used to lay carpet at Expos all the time. that tape is pretty rock solid.
The mortise is basically just a bit, right? I have the router and the jigsaw, so that's something I could do at home. But I would need the proper bit.
I've decided I'll test my sandblasting technique on the back of the body first. Right at the top and see what happens. That way if it's total crap I can just sand out a tummy cut and do a more traditional finish. Prepping for plan B
Cagey
Mythical Status
- Messages
- 24,425
A mortising bit is used to cut channels, like this...
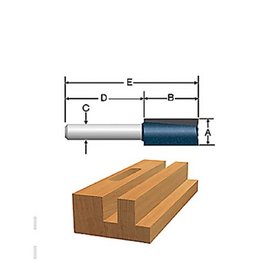
That particular type would work for what you want/need to do if you have a router table. If you're using a portable router, then you'll want a pattern follower, which looks essentially the same but has a bearing mounted on it that follows the template (pattern) you want to cut to.

You attach the template to the workpiece, then install the bit so the bearing rides on the template and the cutting flutes cut the material. The bits come in different diameters and lengths to deal with the particular hole or edge you're making. They're used extensively in guitar building, and sometimes the pattern is the workpiece itself...
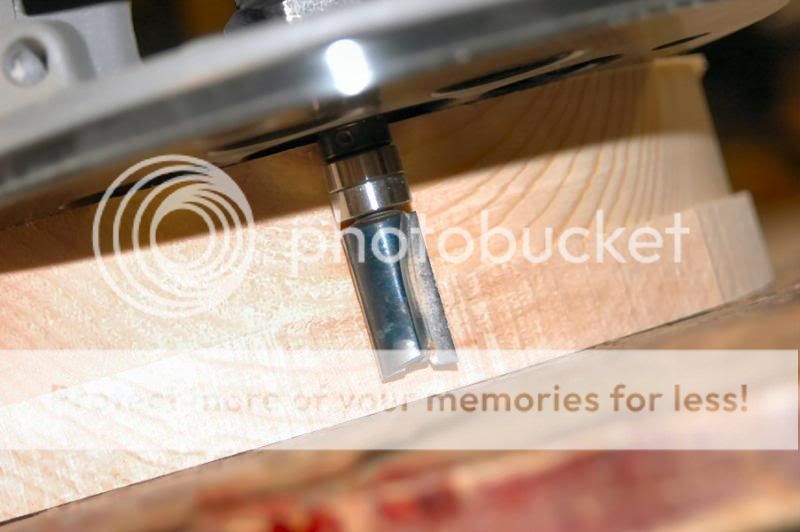
In that shot, he's going to be cutting a glue-up to be flush with the body.
That particular type would work for what you want/need to do if you have a router table. If you're using a portable router, then you'll want a pattern follower, which looks essentially the same but has a bearing mounted on it that follows the template (pattern) you want to cut to.
You attach the template to the workpiece, then install the bit so the bearing rides on the template and the cutting flutes cut the material. The bits come in different diameters and lengths to deal with the particular hole or edge you're making. They're used extensively in guitar building, and sometimes the pattern is the workpiece itself...
In that shot, he's going to be cutting a glue-up to be flush with the body.
Volitions Advocate
Hero Member
- Messages
- 1,239
I ended up using a scroll saw this afternoon at the woodshop at the University (it's up the stairs and around the corner from my office, just needed to charm the keymaster and was let in)
i took a piece of scrap wood from the bin and taped it to the front of the headstock with some carpet tape, just cut from my trace on the back.
Did a quick sand with a finishing sander while I was there with 100 grit to remove the worst of the marks. This picture is after I went over it again with 60 grit by hand to remove all of the cut marks I made. I'm still going to go over it with some 220 and 320 before I start staining, First coat tonight.
Shape isn't perfect. But I'm fine with it. It looks mostly normal as long as you're not looking too closely. Good enough for me.
Volitions Advocate
Hero Member
- Messages
- 1,239
Not terribly easy to see even in the dusk sunlight. Looks nice though. another 30 coats or so....


Volitions Advocate
Hero Member
- Messages
- 1,239
So it turns out I don't know my vocabulary very well. I had to go back and read CB's post about the different finishes to realize my mistake. Varnish is not a natural kind of wood tone.. It's a freaking hard finish. Not to dispair though. It just means I have less coats to do. Did the first coat and burnished it down with some fine steel wool. The tung oil penetrated as deeply as it could with only 1 coat. After letting it cure for a day I put a second coat on it, and this was turned into a high gloss. I burnished that again and it came down to a nice natural flat & smooth surface. I probably should have stopped there because the 3rd coat did not go as well when it came time to pull out the steel wool. I was going to stop at 3. Anyway. It seems kinda.. gunky now, when I rub it with the wool. and the back of the neck is still slightly tacky when I touch it. I don't know if I just haven't done enough with the steel wool, or if i should use some 600+ grit sandpaper or what. A guy told me to get some extra fine steel wool and dip it in some Gojo, that will make the neck super smooth. I don't know what Gojo is other than a certain type of mechanics soap?
Anyway. The headstock is fine, the back of the neck needs a bit of work. I still need to drill some pilot holes for the machine head screws, but other than that I'm quite happy with the way it looks, if not yet how it feels.
*YOUTUBE LINK HERE ONCE IT"S DONE UPLOADING AND PROCESSING*
The body...
Well.. I gave up on sandblasting. I'd have to wait too long to do it and I'm getting impatient. So i sanded the body down to 400, pulled out the black dye, and went to town. It occurred to me afterwards that maybe I was supposed to dilute it first with some water? I didn't see any instructions on that, but it turned out fine so oh well.
I dyed it, let it dry, then sanded it back with 320 trying to expose some of the grain. It worked alright, not quite how I expected, but I am not unhappy with the results. The only really disappointing parts were that there was more grain on the back than the front, and due to the imperfections in the wood and the construction of the body, there are a few light spots where there was grain filler, and some sort of liquid that had dried and dripped onto the body before they shipped it.
I mixed some Emerald and Lime dye together at about 3/1 and added a few mL of water to the mix and came up with a colour I liked, and I slapped that on. It's a bit dark, but I love the colour. once it dried I MIGHT go over it again with a very light sanding to expose some of the wood colour again, then dye it again with just the straight lime diluted 1/1 with some water, just to lighten it up a bit.
Pictures are a little diarker than it seems IRL. but it's also in my dark basement.... We'll see in the morning, in the sunlight.
After sanding:

Green stain:

I have no idea what to shoot the body with once I'm done with the colour though. A laquer? I'm not really worried too much about a thick glossy finish. Just somethign to protect the soft wood would be great. Even if it's a rattlecan.
Anyway. The headstock is fine, the back of the neck needs a bit of work. I still need to drill some pilot holes for the machine head screws, but other than that I'm quite happy with the way it looks, if not yet how it feels.
*YOUTUBE LINK HERE ONCE IT"S DONE UPLOADING AND PROCESSING*
The body...
Well.. I gave up on sandblasting. I'd have to wait too long to do it and I'm getting impatient. So i sanded the body down to 400, pulled out the black dye, and went to town. It occurred to me afterwards that maybe I was supposed to dilute it first with some water? I didn't see any instructions on that, but it turned out fine so oh well.
I dyed it, let it dry, then sanded it back with 320 trying to expose some of the grain. It worked alright, not quite how I expected, but I am not unhappy with the results. The only really disappointing parts were that there was more grain on the back than the front, and due to the imperfections in the wood and the construction of the body, there are a few light spots where there was grain filler, and some sort of liquid that had dried and dripped onto the body before they shipped it.
I mixed some Emerald and Lime dye together at about 3/1 and added a few mL of water to the mix and came up with a colour I liked, and I slapped that on. It's a bit dark, but I love the colour. once it dried I MIGHT go over it again with a very light sanding to expose some of the wood colour again, then dye it again with just the straight lime diluted 1/1 with some water, just to lighten it up a bit.
Pictures are a little diarker than it seems IRL. but it's also in my dark basement.... We'll see in the morning, in the sunlight.
After sanding:
Green stain:
I have no idea what to shoot the body with once I'm done with the colour though. A laquer? I'm not really worried too much about a thick glossy finish. Just somethign to protect the soft wood would be great. Even if it's a rattlecan.
S
swarfrat
Guest
I use a scroll saw for templates because it's all I have. But the main thing against the scroll saw is it's slow as molasses in January on anything thicker than 1/4" or so.
Volitions Advocate
Hero Member
- Messages
- 1,239
I am happy with the colour, it came out darker than I expected, and it's a bit washed out now that the dye is dry, but hopefully it will pop back out with the hard finish. I picked up some clear gloss Urethane stuff from Varathane at Home Hardware. Should do the trick. Supposed to be for furniture. I'm sure it will suffice.
Question is.. Pickguard or no pickguard? I keep jumping back and forth on that one.
Question is.. Pickguard or no pickguard? I keep jumping back and forth on that one.
TonyFlyingSquirrel
Master Member
- Messages
- 4,794
Advoc said:I am happy with the colour, it came out darker than I expected, and it's a bit washed out now that the dye is dry, but hopefully it will pop back out with the hard finish. I picked up some clear gloss Urethane stuff from Varathane at Home Hardware. Should do the trick. Supposed to be for furniture. I'm sure it will suffice.
Question is.. Pickguard or no pickguard? I keep jumping back and forth on that one.
Just be sure to let it cure properly. The 7 string Ibanez that I cleared with Varathane ended up orange peeling after some time, several months. That was with good level sanding & cure time between coats. When it was completed it looked great, but as the months progressed, orange peel started showing.
") This is assuming you're going to break your "only GFS parts" rule here...
This is assuming you're going to break your "only GFS parts" rule here...I had a chance to play it, It's a great little guitar! Great job! It looks great, the pickups are surprisingly good, and with a setup, it's a perfectly serviceable (and awesome looking) gigging machine!! Here's my take on it: Warmoths are better, but more expensive, but with a little extra care and skill, you can make something that's quite good for a whole lot less money. I'll be picking up the V kit tomorrow, and I'll start my own thread rather tan take over advoc's and I'll report to you guys on what that one is like. Good job Advoc  ccasion14:
ccasion14:Volitions Advocate
Hero Member
- Messages
- 1,239
Ironeddie and I share an office at the university. We often don't do any work because we're busy playing guitar.
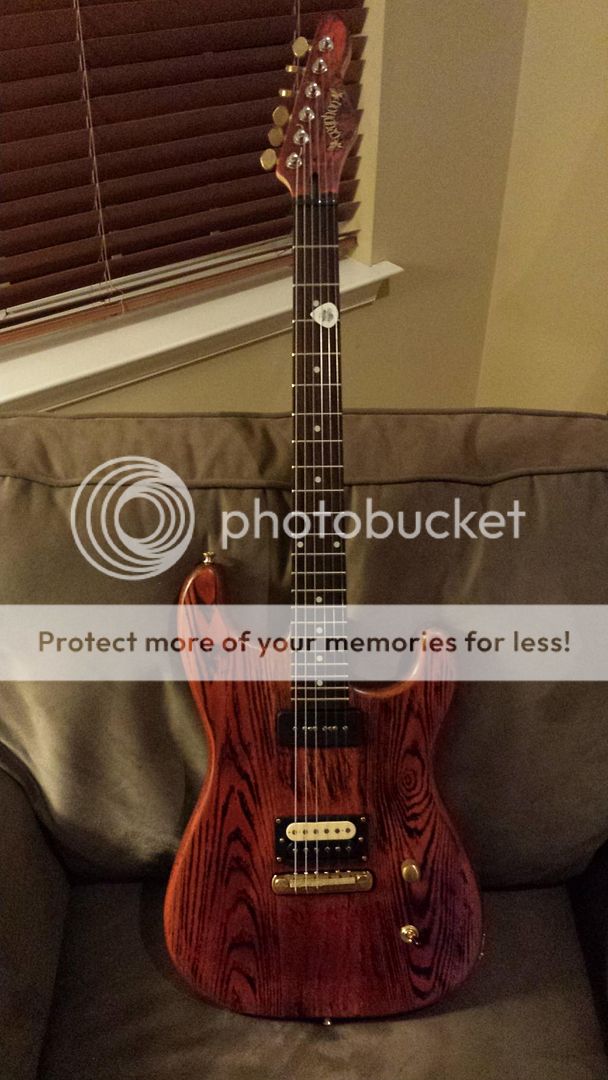
It's mostly finished now. I opted to leave the pickguard off and I like it that way. Varathane's instructions said it would take about 3 days to cure fully and to avoid heavy use until then.
I swear this thing weighs 3 pounds. It's so light.
Things left to do:
Fret dressing
Action setup
Intonation
sand back of neck down to 600 or finer
Custom headstock decal
Take lots of pictures
I also have to take the bridge off, route out the bridge pup cavity a tiny bit, fill my screw holes, and redrll/reposition the bridge. Right now it's on a bit crooked, angled toward the top. The low E is just barely resting on top of the 21st fret and the high e has almost an 1/4 inch of room. In retrspect, some fishing line or string or something would have stopped that from happening.
So far the only time I have broken the "only GFS" rule was with the strap buttons. I lost one of them, so I grabbed a different pair out of my parts bag.
[youtube]U_0N9_WEs9U[/youtube]
I'll have my final thoughts soon.
Volitions Advocate
Hero Member
- Messages
- 1,239
Okay, Here is the finished guitar. I'm still going to add a decal to the headstock. I'm making it myself and I haven't finished it yet so I don't know what it's going to be yet.


My thoughts:
I wanted to see if GFS products were any good based on the price. I opted to go for one of their kits rather than put together all the parts myself, because it was priced a bit better (I figured because they put it in a package and ship it out all at once).
I think I did myself a disservice here, because based on what I've seen on youtube and some other places. What I bought was not a GFS kit. It's just a kit they bought from somebody (probably in China) and re-sold. The biggest telltale giveaway I have for this observation is that even their cheap bodies have the bridges drilled or routed before shipping. My kit did not.
The quality of the parts was not good. Upon first opening the box I felt impressed by what I saw because I expected absolute crap, and got something useable. My first impressions, however, have soured over time.
Neck:
1. My rosewood fingerboard, while nice and dark. Is DRY DRY and cracked in a couple of places. This is nothing I can't fix with some lemon oil and a bit of super glue, but it's nto good. The frets are okay. There's nothing glaringly wrong with them, the ends did need a bit of dressing, but I expected to do that. The dry rosewood probably compounded this issue, as I'm sure it has shrunk since whenever the neck was made.
2. Tuner holes were not aligned.
3. Truss rod adjustment didn't have a little PVC collar or anything (like an old squire neck I have), Doesn't seem to affect function, but it doesn't look good and gets messy.
4. Inlays are fake MOP, no surprise there, but they are not level with the fingerboard. One even popped out on me when I pulled the masking tape off. They aren't very noticable, and I can't tell when I'm playing except for one of them.
Body:
1. Neck Pocket was nothing special. Very rough cuts and was not a snug fit at all. the open wood grain was pitted, and it looked like they routed with a dull bit all around.
2. Most of the edges were filled in with wood filler, which made staining difficult, since it would take the colour so differently. It's good that I planned on a textured finish, if I had wanted to do a sprayed nitro or something, it never would have worked without tons of grain filler applied properly.
3. LIGHT. The body was so light it was uncanny. (it still is) Itt is Pawlonia, which I think is supposed to be some type of poplar. Big porous grains, takes dye VERY well. and is a very light colour. I'm not super interested in a really light guitar, especially when it makes the guitar neck heavy, but I'ts interesting to have, and I wouldn't complain about it after three 90 minute sets at the bar. I'll bet the entire guitar weighs less than 5 pounds.
4. Routing was not correct. Now that I know GFS doesn't actually make these, I can give them a LITTLE bit of slack for thinking they would fit their pickups. In this case, it didn't. I didn't want to wreck the body by accidentally blowing something out with a router bit, so I took a dremel to the bridge pickup. Shaved about 1/8" total from both sides of the base so it would fit in the cavity.
Pickguard:
Didn't use it. Neck pocket was too narrow, Didn't line up with the bridge properly. Big fail here. Good thing it was a Tele, since the only thing it really did was mount the neck pup. Instead I took 2 little rectangle pieces of breakout foam from a pelican case, jammed them in under the neck pickup, and mounted it directly on the wood. It works. I have no complaints.
Electronics:
If it were a really serious build, I would toss out all of it and get some quality American, European, or Japanese made parts. They were fine though. so I used them.
Hardware:
1. Bridge. It's functional. It only has 3 mounting holes at the back, so the front lifts off the body just slightly. Annoys me. doesn't affect performance. The saddles tend to tilt side to side and cause buzzing problems if your strings are too light and don't have enough tension. The set of strings the sent with were terrible, and didn't hold the saddles still. I put some Ernie Ball Power Slinky's on, and the problem has gone away.
2. Machine heads. Lubricated with gravel. Manage to hold steady, for now.
I finished the neck with a Tung Oil based Varnish, Not knowing what varnish was I thought it would work like regular tung oil. But I did not end up needing 30 coats as I had originally planned, 2 was perfect. Of course I screwed it up by adding a 3rd coat. I've got it sanded out now and super smooth, but that was my fault. I actually quite like the varnish, It almost feels like bare wood.
Body was finished using Saman furniture dyes. Dyed it straight black with no dilution. Sanded back with 320, then stained with a (roughly) 2:1 mixtures of Emerald to Lime, and added in a few mL of water, I did not dilute much. Clear coat was a Varathane rattle can. Some sort of high gloss, quick drying Urethane. 5 coats. applied 45 minutes apart when it was still tacky, let cure overnight. Worked beautifully, I will report in a couple months with how well it held up.
You can build a hafl decent guitar with these kits if you're moderately skilled with a few simple builds under your belt (like me). It was the first time I finished a guitar, however, and while my results are not perfect, it gave me the confidence I needed to contemplate finishing my own Warmoth. That's worth the money right there, for me. The real star of the whole build, was the pickups. I did not use the OEM pickups that came with the kit. I ordered a Tele pair of GFS after market pickups they called the "Lil Puncher XL" in the "hot lead" winding. They are 4 conductor humbuckers, but I wired them up straight without any switching magic. GFS goes to great lengths to tell you how noiseless their pups are. They aren't lying. These things are really quiet when you arent playing them. But they punch. The pair cost me $50. Best value I have ever gotten in a pickup. Not as sexy as SD or Dimarzio, and the fit and finish isn't up to that level, but these things are worth more than they charge for them.
Now that I realize I didn't really ACTUALLY build a GFS gutiar. It means I'll have to try again with one of their SG bodies or something that is NOT in a kit. I doubt the hardware on my new tele is even their hardware. So for that I'm sorry, this was supposed to be enlightening. What I really built was a cheap chinese kit guitar, with damn good GFS pickups.
Ironeddie ordered a V kit from them right after mine arrived. He is working on it now and plans to have his own thread on here detailing it. It had better parts than my kit did, especially with the fingerboard, fretwork, and body. But it did cost a whole $40 more.
I look forward to seeing and playing his creation when he is done. Too bad it's also not really GFS stuff. But his pickups are, so we'll have to hear from him.
This guitar is not what I would call a dream to play or anything. It is enjoyable for me to play because I made it. It's a perfect punk rock guitar, because it's light. easy to throw around, has nice high output pups, and has no bells and whistles. I love the colour I concocted for it, but that is entirely my fault and GFS gets no credit for that. Would I build another? No. I am however still interested in building something with ACTUAL GFS parts, because the youtube unboxing videos I've seen are a few orders of magnitude better than what I received. One thing is for sure though, it is no Warmoth.
I'm glad I did it. I'll try once more maybe around Christmas, with the better stuff. Maybe I'll get a bit more adventurous with the finish. Maybe Ironeddie and I can record a jam session with these 2 guitars when his is done, for you guys. That would be pretty sweet.
Cheers.
Twanking45
Junior Member
- Messages
- 80
Look at it this way, you got better at putting guitars together, satisfied your curiosity about gfs (though others could probably have told untouched of their suckage) and you made a fine beater guitar. Have you played gigs with it?
dmraco
Master Member
- Messages
- 4,655
This was a good experiment. The GFS stuff is hit or miss. Some of the hits are:
--VEH pickups...really high output with some good tone
--Most of the P-90s they offer sound good, especially in the neck position.
--the Sperzel style locking tuners. I have used them is several build and are rock solid
--most of the SLICK components. The bridges and tuners are solid brass and give a nice tone and hold tuning well.
--XGP bodies and necks. These take it to the next level for GFS. The only issue was the finish neck made it too tight for the neck pocket. I had to hit t he pocket with some 220 to get the neck to fit. I also had one fret that was a bit high but nothing too crazy.
If you are looking to build an all in sub $400 guitar it can be done.
this was a slick guitar I got for $180, I added some dye and a GFS P90. All in I was at $225. Solid Ash.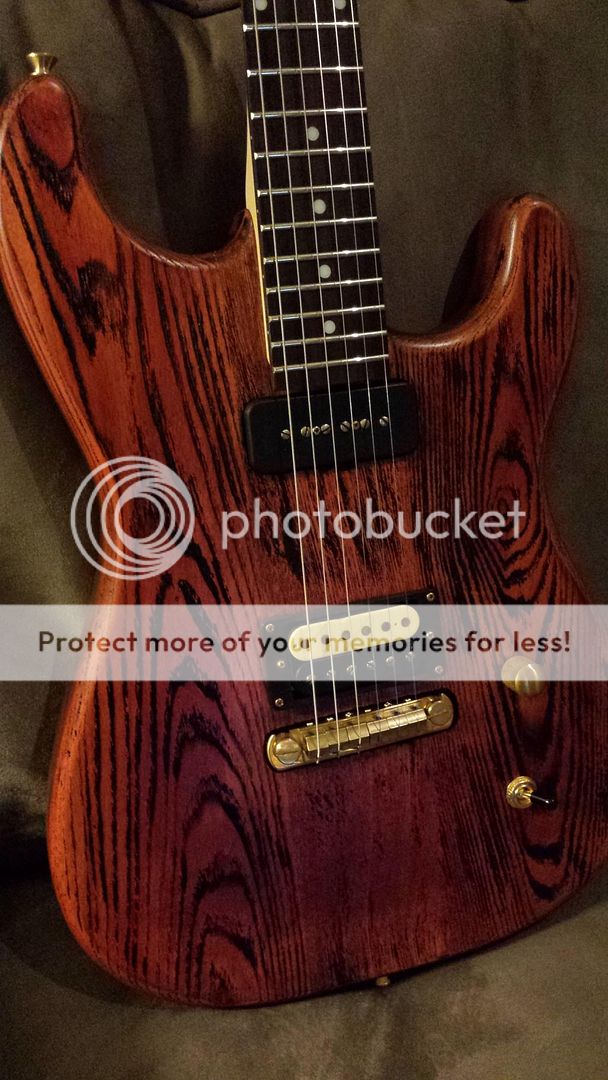


S
swarfrat
Guest
I love the Memphis. Its a humbucker with attitude for die hard single coil fans. Really crisp, bell tones. Nice sting at barely breaking up. Searing at higher gain settings.
Similar threads
- Replies
- 0
- Views
- 212
- Replies
- 12
- Views
- 364
- Replies
- 15
- Views
- 2K