Gonna try a GFS and see if it sucks or not. **Done, Review on Pg3**

Volitions Advocate

Hero Member
Messages
1,239
Hi guys!

Going on an adventure this time around!  I know it's been brought up before over the years (I did a forum search), but I have recently discovered Gutiar Fetish which is like a guitar hardware candy store.  Or...  well maybe dollar store.  I doubt much of what they have is very good quality, but when all you need is ferrules...  it might be worth a shot.

There are a few people locally who have tried their pickups and a few people have mixed reviews, while others seem sing their praises, much to their, and my, incredulity.  Since everything in that place is so cheap.

Well I am going to conduct an experiment.  I'm going to do a 100% GFS build with their stuff and see if anything resembling a decent guitar may come of it.

I ordered this kit:
lwtele_kit_rw_200_thumbnail.jpg


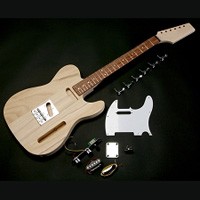
Which is supposed to come with literally everything to make the guitar, except for the finish. Including some inexpensive OEM pickups.
I don't want OEM tele pickups.  so I also ordered these go to along, time to find out if the GFS pups are really any good.
catepisethle.jpg

CLICK LINK

I have also gutted a GK3 pickup and intend to do a stealth install of it somehow.  It came apart easily enough, I'm just trying to figure out what kind of switch I can replace the Guitar/Midi/Both switch on the board with.  I have to take all of the control components off the board to mount on the guitar somewhere (and the 13 pin jack).
I intend to do a sandblasted guitar finish like this:
fender-sandblasted.jpg


Probably wont look quite so cool because the kit isn't a one piece body, but whatever.  It was so cheap I'm okay if I screw it up.  I'll do black for the grain and a green over top to match my Warmoths, as green as turned into my thing.  I saw a picture somewhere that I can't find anymore, where the highlights were white instead of black, I would love to do that, but I have no idea how you could dye the green over top of the white and not just turn the white into an opaque green.

It just cleared customs and is on it's way to Alberta, I figure I'll have it by Monday and I'll get started. Taking pictures and posting here along the way.  Any tips? 
 
My Bari-Tele in my siggy below is a GFS blem body.  Just had some scratches on the Red body, which I didn't sweat over knowing in advance that I was gonna cover it.  My wifey bought for my birthday some years back.

Someone else on here did a GFS 335 project that seemed to have turned out ok, but if memory serves, they upgraded the hardware.

Let us know how this turns out, the '67 V has me interested in a Schenker styled project.
 
I haven't used their pickups, but I've used a lot of their hardware and have done a couple of projects with their bodies and necks. My experience has been that the hardware is excellent, the bodies are surprisingly nice, and the necks are acceptable for the price but require a lot of work. I love the solder that they sell, it's all I use. Great customer service in my experience as well. Enjoy your build, I suspect you'll be pleasantly surprised!
 
Since discovering GFS I have ordered tons of stuff from them. I don't have reservations about any of it. I have used probably 7-8 different pickups of all types (humbuckers/single coils/tele sets/ single-coil sized humbuckers) and never felt any of them were of poor quality or sound, especially considered their "Premium" pickups are about 45-50 bucks a piece. I've never had any problem with the hardware I have gotten from them, and have at least one bridge that I used very extensively playing in my college's jazz band.

Again, no reservations ordering anything from them. They also ship very fast and have great customer service.

I think most people just don't realize it is absolutely unnecessary to spend 50 dollars on a plain old hardtail bridge, or almost 75 for a TOM style (what? just no...)
 
Used a bunch fo GFS pickups. They're fine. They're made at the same place Warman, Wilkinson, Irongear, and a bunch of other low-priced pickup brands are. They're not built any better than your common Squier or Epiphone stock pickups, but hey, a pickup is only a magent(s) and a coil of wire or two, it's not like there's any premium pixie dust that the big brands use to make pickups better. It's all about getting the wire gauge, wind & magnet combination which suits you.

As far as the finish goes, there's two ways to do it with lighter-coloured grain.

The most 'solid' way is to use coloured grain filler. You get your bare body, paint or stain it with your main colour, and then you grain fill with grain filler which hase been dyed. You usually then touch up the effect using 0000 steel wool to limit the filler to the only the main, big grain lines. This gives you the coloured grain effect with a totally flat surface which you can then shoot clear gloss over. This is also the best way to get the most contrast between the main colour and the grain colour, so it's what's usually used when you see black with white grain, or white wood and black grain. Bear in mind this is definitely the harder and more time-consuming method, too.

The more common way, with more texture, is to 'ceruse' the wood. Rub along the grain with a wire brush to open the grain as much as possible, then apply a stain; stonger-pigmented stains work best, which is why this method is most commonly used with bright primary colours as the main wood colour. Leave it for 5-6 hours, then completely cover the surface with stain/dye pigment mixed with some paint thinner. Again, you want it to be a pretty strong mix, though just how strong you need depends on the colours and the wood you're using. Let it settle for just a moment, then rub the whole thing down with 0000 steel wool. Don't scrub at it; you're just trying to get as much of the second colour off of the highest surfaces of the wood. If you scrub too hard you might lift it back out of the grain. It's quite hard to fill the wood properly after this, so you're left with the texture of the wood. Some clear grain fillers can work, but if you want a smooth gloss finish you're best off going with technique #1.

In any case, those finishes are not actually sandblasted. If you sandblast it you'll just strip everything off and be back to bare wood. :icon_thumright:
 
That's very useful information.


I think, however, that Fender calls that finish "sandblasted" because the wood is blasted BEFORE any finish or color is applied - gives it that rugged, barn-door appearance.
 
^^^ This is my plan.

Sandblast the body to rough up the grain.  Stain it a dark colour, do an intentionally piss poor job of sanding the top with a flat edge of some kind. Should keep the deep grains nice and dark. Then stain the the whole thing again.  The surface will be the lighter colour, and the grains themselves and the areas where I didnt' sand as well, will still be black.

At which point I'll do some sort of thin, semi-gloss finish.  Just enough to seal it up, I don't want to try to smooth out the grain or anything, not that it would be possible without grain filler, which would ruin the stain job I just did.

The neck I think I'll just do a clear finish.
 
Package came!

If you feel like it you can listen to me talk about it for roughly 14 minutes.  I'm no Spielburg.

[youtube]AWPQexGGtJY[/youtube]
 
TonyFlyingSquirrel said:
Let us know how this turns out, the '67 V has me interested in a Schenker styled project.

I'm probably going to pick up the V kit today.  Advok and I share an office and we have been talking about doing this for a while and when his arrived, I got pretty excited!  I'm probably going to grab the crunchy rails for the bridge, and the VEH extra hot for the neck.  Does anyone here have any experience with those?
 
ironeddie said:
TonyFlyingSquirrel said:
Let us know how this turns out, the '67 V has me interested in a Schenker styled project.

I'm probably going to pick up the V kit today.  Advok and I share an office and we have been talking about doing this for a while and when his arrived, I got pretty excited!  I'm probably going to grab the crunchy rails for the bridge, and the VEH extra hot for the neck.  Does anyone here have any experience with those?

I've heard good things about both VEH's, and I used to have a Power Rails, very hot pickup, reminds me of the Dimarzio X2N.
 
GFS is hit or miss.  It is either very good or very bad.

I love the VEH pickups.
 
Advoc said:
Package came!

If you feel like it you can listen to me talk about it for roughly 14 minutes.  I'm no Spielburg.

[youtube]AWPQexGGtJY[/youtube]

You can do a True Oil finish on it.  That's what I did to my Bari-Tele.
 
bkN4yBJ.jpg


Hopefully this stuff'll work.  I wanted just plain tung oil, but they only had the big cans left.  Didn't want to spend 60 bucks on it.  So I bought the small can with the varnish.  I think it'll go well..  Not to decide what to do about exposing the grain.  Wirebrush or sandblast?

The local arts space has a woodshop you can use for $5 a day.  Might be a good opportunity to use the sand blaster and a band saw to cut out the headstock.  Then the staining starts.
 
kyh3lS5.jpg
HoEf8EN.jpg


2IgbgJv.jpg


The nutwidth is a bit small. Only about 1.625, when most standard american tele's are either 1.650 or 1.685.  Had to jimmy rig the template a bit, but I think it will turn out fine.

Now to watch some youtube videos... I haven't used a bandsaw in years.
 
Mayfly said:
I'd recommend a scroll saw over a band saw for that little job!

I saw somebody mention using a jigsaw too.  With a scroll saw and jigsaw I worry about the reciprocating blade, won't it chew up the underside?  I've never tried to saw through maple. I know it's a pretty hard wood, so maybe I shouldn't worry.    Also saw somebody say to use a coping saw.    Too much effort.
 
if you keep the backside of the headstock planted on the scroll saw table, it will give you a clean cut on the front and back. You'll still need to sand the cut surface, but the thin kerf and narrow depth of the blade will give you much more control when you move through the curves.


Do yourself a favor and pick up a packet of blades for a couple bucks so you know you're using a fresh one, rather than hoping the one at the shop is still sharp and straight. 
 
Maple can be tricky. It wants to chip. Use a bandsaw or jigsaw to rough cut it to shape, then make a template for your final shape and use a router with a pattern-following mortise bit to get that shape. It'll be nice and clean and will only require minimal sanding after that. Plus, you'll have something highly repeatable should you decide to make more than one.
 
Back
Top