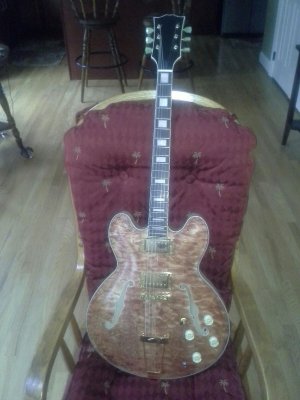
Gecko (narrow) Fretless Mahogany/Flame Koa - Last bits all done. :)

telecutie said:
What you're seeing is one reason I like to begin natural finishes with boiled linseed oil--BLO.  BLO is a penetrating oil. It gives definition and provides depth to the natural wood grain (there are alternative oils to BLO, but it's my preference). Apply BLO until the wood stops absorbing it.  Then apply the Tru-Oil to create a hard outter surface.  TO is essentially BLO with hardeners added... So, only the initial coat of TO penetrates the wood.  The second and subsequent coats of TO build layer upon layer without blending... just like paint.

BTW... The imperfections in our projects are always less noticeable, if at all, by others than by ourselves.  It looks great!

Telecutie, this is a very interesting method.  I can see that if it worked, you'd get better chatoyance out of flamey wood grain with this process.  Does this take longer to cure?  How does it hold up?  I'm working on a body for a friend who wants a TO finish, and I might try this....
 
Chatoyance?  Dang...

It is a great method to finish flame and quilt maple, especially using two varying, but complimentary colors of aniline dyes.  Mix the dyes with alcohol for quick drying times.  Apply a darker colored dye first.  The different pore sizes in the flame/quilt will absorb different amounts of dye.  Sand back with a 320-or-so grit to the point where the dye is completely removed from the wood with tighter pores.  Then apply the lighter colored dye.  Allow to thoroughly dry before oil applications-- one key to all finishes is proper curing/drying.

Next, apply the BLO and TO using the instructions previously posted.  Again, allow the BLO to thoroughly dry prior to moving to the TO applications.

I've omitted some steps, but it's an inexpensive, simple and durable finish process.  I used this method to produce an awesome 3D finish on a quilt maple ES project...  Sorry for the poor quality cellphone photo, but it should give you an idea of what's possible...
 

Attachments

  • 20130712_184304.jpg
    20130712_184304.jpg
    150 KB · Views: 34
telecutie said:
...it's an inexpensive, simple and durable finish process.

"Durable" being the optional word in that sentence. Oil, varnish, and wax finishes are among the least durable finishes you can apply to an instrument. They're variously susceptible to water, alcohol, sweat, slobber, etc. and are soft enough to scratch easily so you have to rework them from time to time if you're interesting in maintaining an appearance. That's why lacquer gained popularity as a finish, and eventually polyurethane.

But, on the plus side, it is as you say - inexpensive and simple.

Incidentally, that's a beautiful ES!
 
Thanks for all the input, have learnt some new techniques to implement next time. I've carried on as I was and the tru oil is nearly done. I'm just waiting on a hipshot bridge from Best bass gear.
 
I've made a little progress with this, tru oil is all done and the bridge and pickup are in, and I've also put copper shielding in. But, when I came to install the tuners, I realised that I misunderstood what the 13mm size related to, and they are too big! Bugger! So these are up these are up for sale.

I thought I was going to get it finished yesterday, but I have to wait to get the right tuners, so I'm just getting the electrics soldered ready for the tuners.

The only wiring I'm having inside the control cavity is a switch for series/parallel switching, so does any one have a wiring diagram for an on/on switch for series/parallel switching?
 
I did look there, but couldn't see a diagram for just series/parallel switching. I have since decided that I might as well wire it up for series/single/parallel switching seeing as I have a quad coil pickup, and there is defintely a diagram for that. I was mainly wiring it series/parallel as I already had an on/on switch but I've just ordered an on/on/on switch.

Thanks any way though :)
 
Thought I'd update this. It's coming together now, and I got an email saying my tuners have been posted, so will be up and running sooner than I thought. I've attached the bridge and pickup. Just need to wire it up then attach the tuners when they arrive and it's done.

So here's a few pics on it semi assembled;

4523FEB8-F7F2-42FA-847C-81207B0392D0_zpsf23cgohz.jpg


707B4919-DC98-46BA-B0B9-F31C4E144B11_zpswmxu2w4b.jpg


DFD0C86D-0ACA-4FEC-A8A2-AAFF4F47B6A8_zpslxaczk52.jpg


There is one slight hitch, I've left the string ferrules in the Warmoth box that is currently under my Christmas tree, so will be looking at the New Year before I get those back. :)

The only thing I want to do now, is to make a control plate cover and a truss rod cover out of wood. I'm thinking a mahogany cover on the body and maybe an ebony cover for the truss rod cover. I still need to source this wood yet.
 
Every time I see a Gecko, I'm tempted to build one and take up bass. That's a beautiful thing, and I'm envious all over again. One of these days...

By the way, that first shot above is pretty cool. When the thing's done, you should take the same shot and frame it for your music area.
 
Cagey said:
Every time I see a Gecko, I'm tempted to build one and take up bass. That's a beautiful thing, and I'm envious all over again. One of these days...

By the way, that first shot above is pretty cool. When the thing's done, you should take the same shot and frame it for your music area.

Haha  you should! I really want a mooncaster, or a regal! Shame I can only play basic guitar at best.

That's a great idea! Haha I'll hang it above the bass, so you can see what it looked like in front of the piano without moving it. :)
 
I bought a 5 string jazz bass clone some years back for therapy purposes and couldn't get next to it. Now it sits in its case in the closet and cries itself to sleep every night. Not gonna do it again... bass is just not my instrument. Can't scream with it, and I need to scream every once in a while. But, every time I see a Gecko I weaken a little more...
 
Electrics are all done. Keeping this one simple. I'm not even drilling a hole for the switch, but would like a little control if I fancy a change. One day I may add a volume knob and have a hole for the switch, but for now I like the slick simple look. :)

F14C51CC-FC0A-44F7-B7D3-6C8B88CABE7A_zpssswwmjqm.jpg
 
It can never hurt to store a couple of potentiometers and knobs close at hand, right there where you might want them! And it gets even better when somebody idly picks it up, twanks a twank and they can hear the difference in the "midrange slope control" or whatever foolishness pops into your head at the time.  :help:
 
The bass is complete and it's sounding awesome! Pics to follow.

I thought I left the string ferrules in th box under the christmass tree but turns out they're not there. So will have to order some more....I bet I find them as soon as I order them.

I'm yet to make the truss rod cover and control plate cover, so that's my next port of call. I'm going to try make the control cover from mahogany to hide it as much as possible.

Oh, for what ever reason, the nut came off so I had to re glue it. Not a massive job, just not sure why it came off.

One other thing, when intonating it, I had to take the saddles as far back as they would go to get it intonation right.  Am I doing something wrong, or is this normal for the gecko?
 
looking forward to the pics!!...On my Gecko I have the low B quite far back so that the spring is almost fully compressed but there is still a small amount of room there( I am also using a taper wound B string so that may allow it to be a bit further forward, it ends up almost in line with the E). Mine really started to bloom after a few days of heavy playing and is still getting better, so I did  not worry about a final intonation for a while. Now that it has  broken in I am able to give it very low action for a fret-less without any buzzes so the bridge bits do not have to be too far back to line up with the marks.
 
Yea, i've put D'addario Chrome flats on it, and I don't think that it has a tapered B string. I just thought it was odd as all the saddles are either maxed out or very close. Its still not perfect, but I'm talking small fractions. I'll let it settle in and have another look.

I might have to hold off on the pics, I'm sourcing some wood for the control and truss rod cover and I'm still trying to figure out what I did with those F***ing string Ferrules! I remember putting all the part from the warmoth box into my parts box, but they have disappeared. I wonder if they are a standard size?
 
That looks amazing! 

Also: wiring straight to the jack - all the cool kids are doing it!  Volume controls are so last century!  :icon_jokercolor:  I did that with both my thinline Firebird and my headless beast (though I also have a Tonestyler on that one). I'd want to have that switch more accessible than under the cover, but I could see why you'd want to leave the top with no controls at all. Maybe get a sliding switch on the back of the control panel?  That way you'd still have access to it on the fly, it wouldn't stick out like the switch you have now, and all without doing a permanent mod to the front. Getting out screw drivers just to change from series/parallel to single would drive me nuts, but YMMV.

As to where the string ferrules are, as my wife would say: "They're where you last left them."  :icon_scratch: :help:
 
Back
Top