Leaderboard

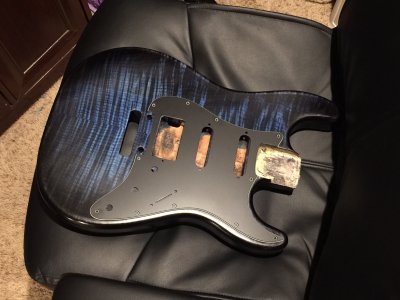
Finished dying Start body

I'm by no means an expert at this and I appreciate your help, but I double-checked my memory of chemistry class and found something to share: there are many different alcohols and the one that I am using is isopropyl alcohol (91%) aka rubbing alcohol.  I briefly stated it in my very long tangent so its understandable if it was missed.

Anyways, isopropyl alcohol has a higher viscosity than water.

Also, I'm not sure if viscosity has as much to do with it as the fact isopropyl alcohol evaporates extremely quickly, especially compared to water.  Or maybe I'm wrong, but nevertheless, isopropyl alcohol has more viscosity.

Nevertheless, I am a complete newb in the refinishing department haha I just recall some info from chemistry class...

With that out of the way, thank you again for elaborating on the info.  It's very useful.  I definitely need to get some 400 grit and tack cloth.  I will practice wet sanding on my test strips.  Unlike my thorough dye practice runs, I half-assed my finishing practice runs and thats what sabotaged me. Some reason, I thought the dying was the hard part and I got over-confident haha.
 
When I talk about alcohol with reference to finishing, I'm talking about ethanol (usually denatured), and you're right - that's different from isopropyl alcohol. I'm not aware of any use for isopropyl alcohol in finishing, perhaps because it's often mixed with water and would produce unwanted side effects or interactions.
 
I'm not sure if you're familiar with Keda dyes but they seem pretty legit.  I know PRS uses them.  The reason that I bring that up is because I have put my confidence in their knowledge.  They recommend using either water or specifically "isopropyl alcohol".  I highly doubt they would suggest it if there's any unwanted side-effects, at least on a normal, consistent basis. 

Additionally, I'm not aware of 100% isopropyl alcohol so I just grabbed 91%.  Keda said that you can add a little bit of warm water to an alcohol solution if the dye isn't dissolving well.  During the test runs, I did this and it worked fine... initially haha.  To explain, and if my memory serves me correctly, eventually I put way too much water (to lighten the very saturated color + I was getting low on rubbing alcohol) and as you predicted, there was an unwanted side-effect; it occurred instantaneously.  The dye wouldn't absorb whatsoever; it just puddled on the surface.  Don't really understand what happened chemically but I assume I may have broken its threshold and, not to sound silly, the molecular bonds began deteriorating (this happens to acrylic paints which is normally thinned with water but can break down with too much water - I'm an art major - or even with cell membranes in your body if you overdose on water - yes this can actually happen and it is fatal).  Then again, that doesn't really make sense to be the cause... must be something else actually...

Anyway, so anyone coming across this and is curious of how it'll work; working with isopropyl alcohol with dye, at least dye made from Keda, will in fact be resilient against bleeding in comparison to water based solutions, and significantly so.  This held true on both test runs and on the dying process on the guitar body itself.  Nevertheless, I suggest anyone to do a test run before doing the same as me just to double-check my findings.  I can't imagine where I could have missed something but I'm human so yah... Oh, and... I'm a 100% NEWB at this! :icon_tongue: haha.  With that said, mystery reader, ask Cagey for any future questions because he's O.G.  :headbanging:

Good chat  :occasion14:
 
Well, this is all very interesting. I'm no expert, either. Always plenty to learn, and it happens daily. It might be getting a bit late in the year for me to start any more finishing projects, although I'm debating stripping one of my bodies and shooting a fresh clearcoat on it. Damned thing spiderwebbed on me, and I'm not a fan of broken finishes. Perhaps next year I'll give some of that Keda dye a shot. You're right that you can hardly argue with PRS' success in finishing.
 
Everyone always tell me that blemishes like that gives a guitar character haha I think I'm in the same boat as you.  I like my guitar in reasonable condition.  Anyway, bummer to hear about that!  May I ask what it is?  I like nerding out on guitars haha. 

I think you'll like Keda if you give em a try.  They are pretty saturated.  Well, I never used dyes on wood before but I have a hunch vibrancy is no issue with them.

Btw, you've helped me a lot.  You pin-pointed my most pressing issue, probably unknowingly haha, and I'm pretty confident my next whack at this finish will be acceptable because of your provided info.  So thank you!

On an unrelated note, I looked back at my old posts.  I only posted one thread before and I asked what body wood I should go for.  You chimed in on that thread as well.  Not sure if you'll remember such an obscure reference but nonetheless, thanks x2.  I ended up going with Korina; no maple top.  In fact, posted that build just a few minutes ago in the "completed" section.  Long overdue!  I wonder if I can submit it in October's guitar of the month... even though I finished it at the end of August. 
 
You can enter a guitar in the GOM contest anytime regardless of its birthday. You can even enter more than once if you don't win.

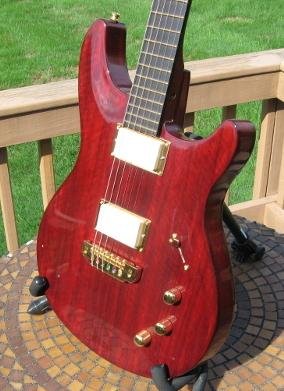
The body that spiderwebbed on me was this bloody black Korina VIP...
 

Attachments

  • IMG_3338_Sm.JPG
    IMG_3338_Sm.JPG
    24 KB · Views: 22
That looks new...  I'm surprised something like that happened to a Warmoth! Also, I thought they use Poly and that only Nitro spider-webs.  I may be wrong...

How old is that guitar?

Do you think just sanding off a majority of the clear coat and reapplying more, rather than touching the body wood and dealing with dye, is a possible solution?  Would be much easier. 

I never tried it but have you tried Meguiar's Scratch X?  I don't think its intended for anything but light scratches but may help you out if you wanna test it on a small obscure spot.  Then again, I have no clue what's in it's formula; I like my unplugged resonance (with the assumption the formula may dampen it).  :dontknow: 
 
I finished it myself roughly 3 years ago. Color with Transtint dye, then clear lacquer over that. I think what caused the spidering was the first couple/few coats of lacquer were brushed on, as I was having trouble finding a sprayable lacquer locally and I was pressed for time. "Brushable" lacquer uses a vehicle with a slightly different chemistry than sprayable lacquer does - it's like sprayable with retarder added. Slows down the flash-off so the brush marks flow out, and slows down the drying overall. Problem is, it goes on much thicker than sprayed coatings, and will sag/run very easily. Plus, even with a very expensive brush, you still get brush marks.

After much cussing and swearing cleaning that mess up, I finally got in the lacquer I normally used (Behlen's) and finished it off with that. So, I suspect what caused the spidering was a thick slow-drying undercoat with a thin fast-drying final coat. I'm not going to test my theory because I don't like the effect, but if anyone does prefer that sort of thing, there's something to try.
 
Haha ya know, the relic guys might give that a go actually! :laughing7:

But yes, that makes sense.  Same thing applies with "glazing" and layers in general in regards to oil paintings. Spider-webbing is also a woe for antique oil paintings.  Funny to see parallels like that.

Anyway, hope you get that resolved sooner than later!  Sure is a nice looking axe!
 
Wet sanding has been a huge improvement.  Got a 320 grit sandpaper sponge block (couldn't find 400) made for between coats and anti-clogging.  Gave it a good dip with mineral spirits and kept switching sides.  Worked like a charm.

However, whenever I had previously applied the poly, I could see it's gloss evenly apply throughout; however, whenever I sand, near the edge easily strips off... and I'm talking about the wood!  I'm seeing the natural color!  It's as if the poly isn't hitting those places.  It gives an almost natural binding look but not quite on the edge.  It's kinda weird and I don't like it at all with the black burst!

Can I dye on top of a clear coat to fix the black burst?  I ran out of black so I have to buy more dye, other wise, I might have had tried it myself.  Hmm... I guess I could email Keda about this. 
 
Edges are a bitch because of physics. If you're applying 2lbs of pressure on a 2" x 4" pad, you're applying roughly 4 ounces per square inch of pressure on the surface (32 oz divided by 8 square inches). When you get to an edge, the surface area decreases dramatically, to maybe only a 1/2 square inch if you're on an edge. That means the pressure increases to about 32 lbs per square inch. Whaddaya suppose happens? Yeah. The sandpaper gets real aggressive. It'll tear through that finish like it's not even there.

So, there's a couple tricks. One is to sorta stay away from the edges. You'll hit them by mistake often enough to cut them back as far as they need to be. Edges have a higher surface tension, so they tend to be smoother (and thinner) than the flat areas and not need as much sanding anyway.

Another is not so much a trick as a normal part of the process - make sure you have enough finish on there that you sand back the orange peel without sanding off the finish entirely. Usually, that means several color coats to start with before you even begin sanding, then don't go all gonzo on it between coats until you're up to about 6-8. Then, you start with the clear, and do the same thing. A few coats to build up some thickness, then start sanding between coats until you're up to 6 or 8.

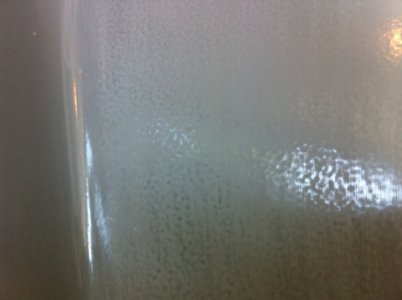
Lotsa light is helpful, and wipe the thing off once in a while to make sure you're not going too far. You only want to remove the orange peel to where it's level with the lowest points on the surface. If you sand a bit, then wipe it off and let it dry, you can look at it from an angle and see which parts are dull and which are still shiny (see the picture at the bottom here). In the pic, you can see where the peaks of the orange peel have been sanded back, but not yet all the way to level. When it's level, the whole surface will look dull. Also in that pic, you can see how the edge is being avoided, and doesn't look like it needs much attention.
 

Attachments

  • Orange Peel Example.jpg
    Orange Peel Example.jpg
    51.8 KB · Views: 19
I'm sorry - I just remembered you're doing a poly finish. Some of what I said above only applies to sprayed lacquer finishes. Still, the parts about pressure and staying away from the edges applies.
 
Thanks again for the tip!  Damn physics got it in for me!  Haha

I think my coats are very thin and I'm not even thinning them; just straight from the can.  It's just goes on so thin.  I make sure I shake the bejesus out of the can too. 

Since you mention to make sure to have enough finish before sanding, can I apply more coats without sanding?  Or... do I even need to sand in between coats at all?  If I do, maybe I can avoid only near the edges instead. 

 
You can apply more coats without sanding. However, any imperfections in the surface will have a tendency to get amplified. It also gets increasingly difficult to get rid of surface imperfections as the finish builds, so surface quality is crucial. 10 coats sanded in between will be nice and flat and buff/polish out to a mirror finish. Without sanding, it'll look like an old wooden park bench and any effort to make it look good will probably be futile. Your friends will point and laugh. Maybe make jokes about your ancestry...  :laughing7:

Finish work is a real pain in the shorts. That's why it costs so much to have it done. For your next build (and you know there'll be one), let Warmoth finish the body. For what they charge, it's a seriously good bargain.
 
Haha yah that's for sure... real pain in the arse! However, I don't mind a challenge :headbang1:

I'll apply a bit more finish and/or skip sanding every other coat.  I seriously think I'm sanding off most of the coat even though I'm doing it only so lightly.  I swear, each coat is so thin, it's just like a film of water.

Maybe I should go with spray... I thought wipe-on would be easier.  What do you think?  And could I go spray after wipe-on?  My wipe-on is almost out but nonetheless, I was planning on doing the last two coats as semi-gloss anyway.

Actually, I don't really like assembling guitars haha this will be my last build!  I much prefer playing!  Plus, I'm not one to own many guitars and don't see how anything can be better than my 2 Warmoth specifically spec'd for me  :headbang5  ...Or my Gibby SG Special. 
 
It's pretty labor intensive. That's why the pros all use catalyzed finishes these days. They're pretty much a one-shot deal, let it cure, buff it out and ship it. If they still shot lacquer, guitars would probably cost an extra $750-$1,000. But, it requires a setup that the vast majority of DIY people don't have.

As for thickness, yeah. I'll usually go through a quart to 3 pints of lacquer on a single finish, and the bulk of that gets sanded off. I'm sure wipe-on finishes are pretty much the same way. Good thing, too, or the guitar would gain 2-3 lbs.  :laughing7:

Wipe-on is usually only a choice for those who cannot spray for any of a number of reasons. Spray always produces better results, although you tend to use more due to application losses. Whether you can spray over what you've done, I can't answer. Generally speaking, it's considered poor practice even to change brands, let alone formulations. Unexpected/unwanted things can sometimes happen. You'd need to contact whoever makes the finish you're using and ask them. Be aware that spray cans don't hold nearly as much finish as they appear to. What looks like a 24oz can is probably only 4 or 5 oz of finish, 4 or 5 oz of reducer, and 14-16 oz of propellant. So, figure what you'll need and double or triple it.
 
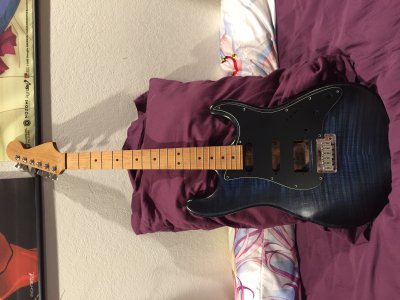
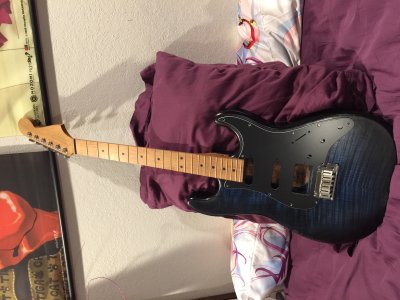
Finished with the top coat!  Not the best quality but I'm okay with a DIY-feeling guitar...

Not sure why but in this particular room, the Roasted Maple looks very light.  May be the fact it's all artificial lighting.  And the last picture was taken earlier with more light and is to show off the colors, but generally it's not that dark nor has as much contrast especially since I did the last coat as a Semi-gloss (which I generally prefer ever since I got a SG Special Faded, my first love).

Installed Hipshot locking tuners and a Fender American tremolo bridge system.  In regards to the pickguard, bridge humbucker and knobs doesn't fit with the rear-routed body but I am getting another that will (hopefully)... it too will be Matte 3-ply B/W/B.  Just waiting to hear back from the guy... 
 

Attachments

  • IMG_9444.JPG
    IMG_9444.JPG
    691.1 KB · Views: 28
  • IMG_9445.JPG
    IMG_9445.JPG
    701.2 KB · Views: 31
  • IMG_9407.JPG
    IMG_9407.JPG
    588.4 KB · Views: 36
Back
Top