Leaderboard

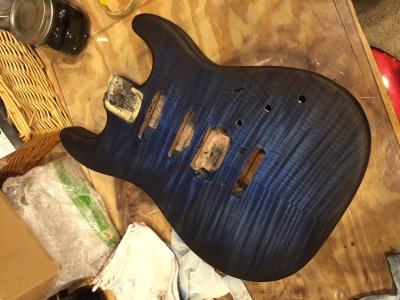
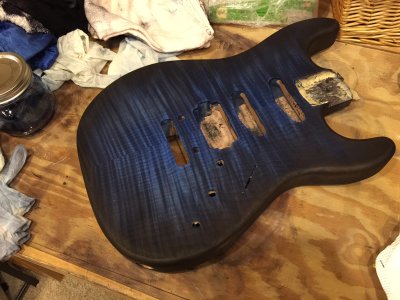
Finished dying Start body

AllHailDIO

Junior Member
Messages
83
Long time reader but I think this is my 2nd or 3rd post so hello everyone haha. Didn't do any progress pics since it was pretty quick job and nothing spectacular. First time dying in fact. Used Keda dyes with rubbing alcohol; just black and blue. Body is alder with flame maple top. Going to add pickguard even though its rear routed.

Pretty excited to eventually play this. Traded my Squier Start awhile ago so I've been Strat-less! *Shudders* The horror...
 

Attachments

  • IMG_9354.JPG
    IMG_9354.JPG
    717.5 KB · Views: 64
  • IMG_9353.JPG
    IMG_9353.JPG
    683.8 KB · Views: 47
Wow this is cool! I like it. How complicated was the finish to apply? (I have a poplar tele body I have sworn I will finish myself) What neck are you going to put on that body?
:headbang4:
 
I like what you're doing with the black/blue burst. Looking forward to seeing it with a clear coat on it.
 
musicispeace said:
Wow this is cool! I like it. How complicated was the finish to apply? (I have a poplar tele body I have sworn I will finish myself) What neck are you going to put on that body?
:headbang4:

Thanks!  No, it wasn't complicated at all!

I bought some small strips of flame maple as test strips.  I tried the dye with water which absorbed deeper into the wood but it had bleeding issues.  When I used 91% rubbing alcohol instead, the dye didn't absorb as much but it dried instantly and had practically no bleeding issues.

For the body, I first sanded it with 150 grit, wiped dust with microfiber towel, and then I applied the black on the entire body.  I used a cotton rag with a decent amount of dye; note, from the test strips, I had learned to not soak the rag or else the first place of contact will really soak in and things will get blotchy; not having enough dye is also as troublesome.  My suggestion is to get a good amount and fold & softly compress the rag a few times to let the dye disperse evenly throughout the rag.  I moved the rag at a moderate pace and just swiped left to right as uniform as possible; did it 3 times.  It was extremely chill process and not as technical as it may sound, if it does haha.  No blotching.

Waited 15 minutes to dry even though it appears to dry instantly.

Then I sanded with 150 grit again but avoided the edges completely for the black burst.  I sanded the center more than the rest of the body too to create a subtle gradient / fade.  Wiped dust.  Applied blue.  No blotching or bleeding.  Waited 15 minutes to dry.

This time, I used 220 grit to remove any scratches.  Wiped dust.  I applied blue one more time to make the color more saturated.  And that was that! 

Keep in mind that if you do use alcohol base for your dye solution that you don't have much room to sand because it doesn't absorb as deep.  I did not experiment with trying a water based dye first and then trying an alcohol base second so that may work.  Also, I used Keda dye.  Don't have much experience with dyes but first good experience; will be using them again. 

If you want specifics on "how" I sanded and a little bit more on "how" I dyed, just let me know; didn't wanna bore you.

Don't forget a sanding mask and latex gloves haha.  I also used short, wide mouth jars which is much easier to use than standard mason jars. 

rgand said:
I like what you're doing with the black/blue burst. Looking forward to seeing it with a clear coat on it.

Thanks!  Yah, I plan on applying a wipe-on poly finish.  Thinking 2 coats of gloss and then 1-2 goats of matte or semi-gloss.  Debating still...  Going to do this on my test strips first as I have yet to finish them. 
 
Love the colour.

You might want to take some steps to keep finish out of the neck pocket as you go further to ensure a good fit when it's assembled.
 
stratamania said:
Love the colour.

You might want to take some steps to keep finish out of the neck pocket as you go further to ensure a good fit when it's assembled.

Thanks!

Yep, I got the neck pocket taped up so no dye or finish will be applied.  Only place that I plan on having raw wood.

I also plan on dying the pickup cavities black. 

 
Ah good, I wondered if it was taped but could not quite make it out. What neck have you got planned to go with it ?
 
stratamania said:
Ah good, I wondered if it was taped but could not quite make it out. What neck have you got planned to go with it ?

Haha yah, I couldn't find my blue painters tape so I used plain ol' masking tape haha.

Haha oops, I forgot to answer that previously.  Roasted maple neck, nickel frets, compound radius, and SRV contour. 
 
stratamania said:
Nice the roasted maple should look good with the blue. Keep the pics coming  :occasion14:

Thanks!

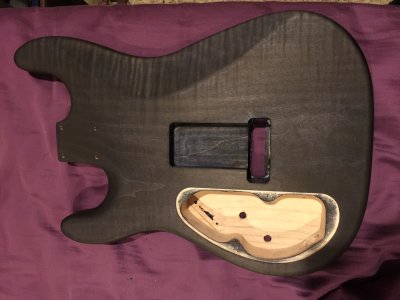
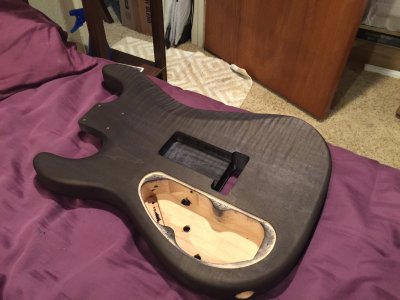
I found this interesting so I'm going to post some pics.  Even the Alder is flamed; haven't seen that before! 

Note: while dying, I messed up in the tremolo cavity because 1.) I think I forgot to sand it = blotchy, and 2.) dye solution was slightly different since I ran out from my test strip batch! But it's all good because I plan on using a tremolo cavity cover anyways (just hope it fits w/ the rear route cavity plate!)
 

Attachments

  • IMG_9358.JPG
    IMG_9358.JPG
    580.1 KB · Views: 27
  • IMG_9359.JPG
    IMG_9359.JPG
    630.6 KB · Views: 16
I think even if you didn't use a trem cover there is enough hardware that goes in there that it should not be a bother to gaze upon. I don't use trem covers on the back and it isn't hideous. Great choice on the neck. And the honey color of the roasted maple will go great with that finish. And thanks much for the details on how you applied the finish. Yours looks great. Good effort.
 
That's very nice indeed.  I have only used water-based dyes, but I have a fantasy about a clean-line natural binding on a quilt-maple topped VW body I have, and the prospect of bleed has really scared me off.  It didn't occur to me to use alcohol or some other vehicle that boils off rapidly.  Thanks for the insight.


peace


Bagman
 
The topcoat process is being a bit troublesome. I'm going to let it cure for 48 hours (starting yesterday).

I tried using 220 grit sandpaper between every 2 coats but it seem to cut thru too much and might have scratched the wood to my dismay. I tried 0000 steel wool but that was a terrible idea... Left little pieces of steel wool and being an amateur, didn't realize how very slightly tacky th finish will be after 3.5 hours (minwax said wait 2-3 hours but I didn't let it dry in the sun since I was worried the UV may fade the dye; so I waited the max time plus 30 mins since it was in the shade and it wasn't the warmest California day either, which may have been the culprit to some issues besides my stupidity haha).  Going to find some really fine sandpaper or just apply the finish thicker. I have to reapply some black along the edge too...
 
Yeah, 220 is a very aggressive grit for between coats.  GO with 320 or 400 non-stearated paper.  Sorry you're having trouble on that score.
 
I think 220 is too coarse between coats, I'd use 400 or 600. Leave it to dry for longer and you only need to lightly sand. Be sure to use a tack cloth afterwards before adding more finish.

Edit looks like Bagman and I posted almost at the same time :-)
 
Thanks everyone!  Yah, I def need a lighter sandpaper.  The instructions on the can was: 220 grit between each coat, 2-3 hours dry per coat, and third coat is optional.  Not going to follow that any longer!

Good news, the scratches weren't on the wood... I just assumed so since they looked so deep but the poly just highlighted them and got the better of my brain.  When I applied the next coat of poly, it filled in quite a bit of the scratches.  I'll sand it down even with 600 grit and after another coat, scratches should disappear.  Should also get rid of the steel wool flakes and I'll apply some black dye on my blemishes onto the sanded poly, and then build up from there.

Also, I think my coats are relatively thin.  I need to do about 5-7 coats, not 2-3 coats as recommended on the can.  I'm going to let each coat dry for 24 hours and work with 600 grit sandpaper in between each coat. 

Anyways, I'm confident it can be remedied!  Building isn't my favorite thing to do... Don't get me wrong, building is fun and I like looking at how beautiful it turns out, but I reeaaalllyy want to play and hear it!  :headbang1:  Just need to be patient though  :toothy10:
 
Bagman67 said:
I have only used water-based dyes, but I have a fantasy about a clean-line natural binding on a quilt-maple topped VW body I have, and the prospect of bleed has really scared me off.  It didn't occur to me to use alcohol or some other vehicle that boils off rapidly.

Actually, solvents like alcohol, mineral spirits, acetone, etc. are thinner than water and will sneak into the nooks and crannies of the wood grain more easily, so bleed is a greater concern. On the plus side, solvent-based stains won't raise the wood grain like water-based ones will.

Anyway, what you want to do is seal the wood before you stain it, using a wash coat, sanding sealer, shellac, etc. That will stop the stain from wicking around. Also prevents blotching. Then, if you want to mask off an area like you would for a natural binding, use a tape designed for that sort of thing rather than the paper masking tape like you'd find at most home improvement centers. That stuff is only good for masking high-viscosity finishes like household latex or enamel.

3M makes about a bajillion different kinds masking tape, but what you want to use is the stuff the automotive painters use. Something like this is thin, follows curves well, is solvent and temperature tolerant, and makes a nice seal so you get a clean line. Pinstriping tape is usually good for the same reasons.

 
AllHailDIO said:
Good news, the scratches weren't on the wood... I just assumed so since they looked so deep but the poly just highlighted them and got the better of my brain.  When I applied the next coat of poly, it filled in quite a bit of the scratches.  I'll sand it down even with 600 grit and after another coat, scratches should disappear.  Should also get rid of the steel wool flakes and I'll apply some black dye on my blemishes onto the sanded poly, and then build up from there. 

600 grit may be a bit too fine for between-coat sanding. The finish isn't hard enough yet. 320-400 will serve you better. Also, be sure to use a sanding block rather than your hands, or it'll come out wavy. Finally, you want to wet sand with mineral spirits. Otherwise, your paper will load up too fast and you'll just scuff the finish up. Along those same lines, don't scrimp on the sandpaper. Fresh stuff is more predictable/controllable.
 
Cagey, my experience was different.  Alcohol had practically no bleed.  Water based literally became like watercolors once in contact with a 2nd layer of dye.  Not sure what the general consensus is but before anyone does anything based on any sort of information, I highly recommend test strips first.  Please note: I am using "water based dye" but with alcohol instead.  I actually got the idea from Keda's website with their instructions + tips.

With that said, and more importantly, thank you for the info!  I'll use 400.  I think my issue with the scratching is actually from what you mentioned: paper loading up too fast.  I am new to this.  I remember reading about wet sanding but just forgot about it when I started yesterday.  So you recommend mineral spirits for wet sanding?  I thought mineral spirits dilutes the finish?  I know the can recommends mineral spirits for "clean up".

Thanks in advanced
 
I would compare a solvent vs. water based dye application to the difference between a fountain pen and ball point on paper. The fountain pen will look slightly fuzzy because the ink is thinner and bleeds out into the paper fibers, while the ball point will be concise due to the viscosity of the ink. Plus, you have the problem with water of lifting the wood grain. Only way to get rid of that is to sand, and you may not want to do that depending on the effect you're trying to get.

Mineral spirits or alcohol will dilute/dissolve an oil-based finish such as tung oil, danish oil, etc. and acetone (lacquer thinner) will dilute/dissolve a lacquer finish (but not poly), but mineral spirits won't affect lacquer or polyurethane. With those it just acts as a lubricant as well as keeping your paper from loading up. Once you're started finishing with poly or lacquer and have a couple/few coats on you could also use water as a lubricant, but it doesn't dry off as quickly as mineral spirits.

You do have to be sure to thoroughly clean the surface well between coats when wet sanding, whether you use mineral spirits or water. I usually use naphtha to do that, or more mineral spirits. Then, you need to wipe it down with a tack cloth to pick up any of the fibers from the cleaning cloth. Otherwise, you'll get little bits that'll telegraph through the next coat of finish as if they were little boulders.
 
Back
Top