Drilling Warmoth Transparent Finish - Tips to avoid cracking?

s1player

Junior Member
Messages
76
Hello everyone - I am considering a new Warmoth build but I want to add some additional pickup controls after the body is painted. Already talked to Warmoth, and they said they won't do the custom controls. So, one choice would be to order the body (soloist) and the paint job I want (transparent purple) and then drill the controls myself. Basically, I want 5, 1/4" holes for five "on/off" mini toggles for the pick ups.

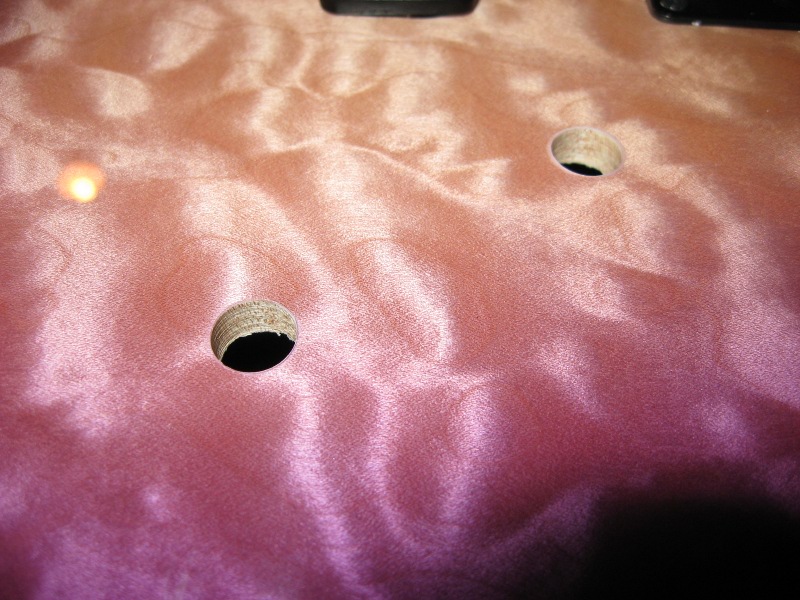
The problem - I have heard that when trying to drill warmoth finishes - there is a risk of cracking - spiderweb cracks and outright cracking around drill holes through the finish.

My question: how does one go about drilling warmoth body finish without cracking or chipping? Any special techniques?

My plan would be to:

1. Mark each hole with an Awl mark initially.
2. Using a small bit (1/8") and just my hand, I would just start the hole manually, again to avoid skipping.
3. Then - with a manual, non-battery powered drill - drill a pilot hole at the awl mark. This is to ensure that a 1/4" bill doesn't drift.
4. Then, use the 1/4" drill bit AND reverse drill initially, just to round out the edges of the finish to avoid "biting" the finish edge..
5. Then, forward drill with 1/4" drill bit.

Again, all drilling would be done with a hand crank drill, to avoid the drill bit skipping.

Appreciate any and all experienced feedback.
 
Definitely use Forstner bits, and avoid the hand-cranked drill. If anything is going to cause you to skip around and mar the surface, it'll be a hand-cranked drill. Too much off-axis torque and side pressure, not to mention a lack of torque where you need it most - at the bit tip - which is especially noticeable with things like Forstners, paddle bits and brad points. What you want is a variable speed drill motor (so you can start/end slow), preferably battery-powered so you don't have a cord either in your way, scratching things up or trying to guide things in directions you don't want to go. Drill from the beauty (finished) side. No need for tape or anything, although it sometimes makes it easier to make markings.
 
Hey guys...Sorry to bring up an old thread, but does the same advice given above apply to a dyed quilt maple laminate topped body with a rear route?
 
Yep. These holes...

IMG_1072_Sm.JPG

... were drilled in a dyed quilt maple laminate topped body with a rear route using a Forstner bit, drilling in from the painted side.
 
I know this is an old thread, but it sounds like the OP was really overthinking it! Drilling holes is straightforward.

I don't know why this hasn't been mentioned yet, but a drillpress is ideal. You definitely need an electric drill and a forstner bit, in any case. Pilot holes should also be avoided. Forstner bits rely on their brad points to center themselves. You don't want the point to wobble in a hole.
 
Well, and you certainly wouldn't need these for like 1/8" or 1/16" inch holes, I don't even think they make them.  So I guess the suggestion is for drilling larger holes.
 
For drilling small holes, I thought this guy's video was great.

https://www.youtube.com/watch?v=cFaaIN3RNxI

EDIT: might consider hitting the screw holes down in the thread area a second time with thin CA after cutting the threads in them to harden them and make them more durable.
 
Wish I had seen that video BEFORE I installed the jack plate on my strat! Would have made life a LOT easier. Thanks for posting the link.
 
Jesse said:
For drilling small holes, I thought this guy's video was great.

https://www.youtube.com/watch?v=cFaaIN3RNxI

Only change I'd probably make is run the screw in first to cut the threads in the wood, then hit it with the thin CA.  You're not only sealing it but making the threads much harder and more durable.

Jesse, this is the bomb.  Bookmarked.  I have countersink bits, but never thought of this.  Perfect.
 
No problem.  I used that method yesterday and it worked really well.  He is right though, cit the holes with CA before you put the screws in.

I was able to locate the holes decently well with an awl, but running the bit backwards, more than just being safe on the finish, REALLY located the hole for drilling.  I was able to get a Strat pickguard perfect, which I was really worried about.  If you're off on a few of the holes with one of those, you can be in trouble.
 
vikingred said:
Jesse said:
For drilling small holes, I thought this guy's video was great.

https://www.youtube.com/watch?v=cFaaIN3RNxI

Only change I'd probably make is run the screw in first to cut the threads in the wood, then hit it with the thin CA.  You're not only sealing it but making the threads much harder and more durable.

Jesse, this is the bomb.  Bookmarked.  I have countersink bits, but never thought of this.  Perfect.

Superglue is a magic elixr for treating drilled holes to strengthen them.  I use it for lots of things.
 
Stumbled across that video myself the other day. Took notes and bookmarked it for my upcoming JM pickguard extravaganza. Since we can, why not embed it here?

:

[youtube]cFaaIN3RNxI[/youtube]
 
Yep, that's the video I saw.  Excellent technique.  Worked well for me on the Canary strat.  Will be using that same technique on one of my next builds, the spalted maple strat.
 
Just to reiterate, for precise holes, a Forstner bit in a drill press is almost required. You could put one in an electric drill, but the bit needs to be held at the precise angle through the whole process, and it's tough to do that by hand. If you're worried about splintering on the exit side (not as much of an issue) you can cover it with blue painter's tape, which may or may not help. Some people put it over the entry point and peel it off once the hole is drilled- I usually do this myself, at least when using a hand drill.
 
There was a trick I used years ago when drilling through acrylic sheets, whereby you sandwich your intended material between two planks / blocks of wood before drilling. Obviously you measure and line up before drilling, but the compression of waste material either side prevents tearout and splitting - even with an standard drill bit.

I've not tried this with a finished guitar body and of course appreciate the fact it could be awkward to clamp up and align with a drill press etc, but the idea should work in this application too. A test is called for first though!

It goes without saying that Forstner bits are great, but you can do it with standard bits to, I'm sure.

Anyone else tried 'sandwiching' the target material?
 
Try using an awl. Heat it up with a lighter first, and it will melt through. For small screw holes, you will get the best results with a tapered drill bit, which will hold the threads better, as wood screws taper. Countersinking is a good idea, and a hand held c/s saves time from rechucking. A step drill will also do a good job in a drill press, but you'll need one that has deep enough steps.
 
Back
Top