Leaderboard

Drilling through a W finish

sdeeg

Newbie
Messages
24
So, W can't support my desire for LP style controls in a Velocity. I am thinking of getting one anyway with no controls and then drilling them myself, but beyond just the space available, what problems will I face with drilling through the finish? I'm thinking a small pilot and then a forstner bit should do the job, but does anyone have experience doing this with advice to share?
 
A punch to mark the center and then a small (1/16”) bit to start the hole, preferably in a drill press with a slow feed to avoid it wandering through the wood. Once the pilot hole is done a forstner or brad point bit is appropriate - for 3/8” holes either works.

The idea is to have a bit that cuts the perimeter of the hole first to avoid lacquer chips. A drill press is ideal here, otherwise your hand movements will potentially cause chips (though the knob/nut will probably cover anything small).

Drilling through a layer of masking tape can also help, but really your best bet is a good pilot hole and the right bit.

You can also center a bit in the pilot hole and run it in reverse to score the finish before drilling out any wood.
 
So, W can't support my desire for LP style controls in a Velocity. I am thinking of getting one anyway with no controls and then drilling them myself, but beyond just the space available, what problems will I face with drilling through the finish? I'm thinking a small pilot and then a forstner bit should do the job, but does anyone have experience doing this with advice to share?

You have a burning desire!!!
 
A punch to mark the center and then a small (1/16”) bit to start the hole, preferably in a drill press with a slow feed to avoid it wandering through the wood. Once the pilot hole is done a forstner or brad point bit is appropriate - for 3/8” holes either works.
...
Well, this all sounds pretty manageable. I have a drill press and good bits. Seems like so long as I'm careful everything should be fine.

You have a burning desire!!!
LOL ... Indeed I do!

Nothing ventured, nothing gained. Body and neck are in my W cart and a bunch of parts selected at StewMac. After I double check it 5 more times I'll pull the trigger. A few months from now when it's all done I'll post some picts.
 
For me, I just make sure the drill bits are sharp and I use masking tape. Knock wood never a problem. Some day I might get a reamer, but I haven't motivated myself yet.
 
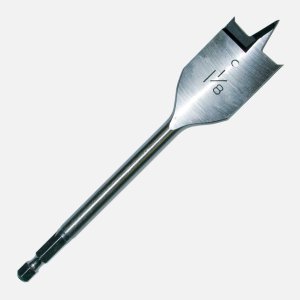
I use a paddle bit with points at the tips to drill mine.
Blue tape first to lay out

Push point into layout mark

Moderate speed with moderate down force to drill. Be careful as the points cut in. Once they do, they isolate the hole from the surrounding paint.

Peel the blue tape off at an angle

Done.


spade-drill-trucut-1_bf3102f8-8934-45b0-9927-22d80adfddf6.jpg
 
Forgive me a stupid n00b question: If I want the control knobs in my own special, perfect place, it's no big deal to drill holes through an unfinished body, right? No finish to mess up, I can just drill a dang hole, like one does?

Follow up: does it matter if I use a paddle bit like the pic above or a regular one?

thanks!
 
Personally, I think you're crazy if you use paddle bit, but others here have had success so YMMV.

As long as you use a sharp bit, and the tape method, you should be fine. I'd use a fine point object just to mark on the tape where you want the hole, and give the bit a place to start. Just sort of press it in there.

We don't you practice on some scrap wood and see what you works best for you?
 
I would not use a paddle bit either. Drill press, masking tape, nice sharp bit, drilling from the finish side inwards would be my approach.

But be aware (and it sounds like you've already been warned about this) that there is not enough space inside Warmoth's kidney-bean-shaped control cavity to do LP controls. You'll have to modify it on some way.

May the force be with you.
 
Better bits to use for this purpose would be a brad point wood bit.

If you drill from the top into the control cavity, you could also use a piece of scrap wood as backing to prevent or reduce tear out of the exit point of the bit.
Can you tell us more about who Brad Point was and why he invented this particular bit?
 
Can you tell us more about who Brad Point was and why he invented this particular bit?

Of course, Brad Point is best known for this useful contribution to the woodworking world. However, he was born in a small town in Yorkshire, near where the Bronte sisters grew up. He was the son of a blacksmith and later apprenticed as a farrier. Fate led him to study the arts at Leeds University. A keen amateur woodworker, he settled on creating the requirements for the bit named after him.

As we know, drill bits are a valuable tool in woodworking, offering precision and clean hole creation. Let’s delve into the requirements that Brad came up with:

Brad Point's bit requirements:
  • I need a drill bit that is a modified twist drill with a long, sharp point at the end
  • This central point will help position the drill accurately and prevent the bit from skating.
  • Additionally, two spur cutting edges of the brad point bit will produce clean holes with minimal splintering or tear-outs in wood.
  • To avoid self aggrandizement, due to their design, brad point drill bits will also be known as spur point bits or wood bits.
  • These bits will be primarily used in woodworking and for drilling other soft materials like plastic.
He worked with an engineer from Sheffield who he had met in Leeds, whose name has been lost in the annals of history. This engineer prototyped the design in Sheffield from fine steel that was once made there, and the rest, as they say, is history.

The above information may or may not be accurate from a historical perspective and may be imaginative; otherwise, the description is accurate.
 
Thank you good sir! Brad made a worthy contribution to woodworking that endures today. If he hadn’t been eclipsed by his scoundrel of a brother Ball, he would be widely celebrated.
 
Thank you good sir! Brad made a worthy contribution to woodworking that endures today. If he hadn’t been eclipsed by his scoundrel of a brother Ball, he would be widely celebrated.
Let us not forget their German grandmother Gettothe, who above all valued brevity and clarity.
 
I would not use a paddle bit either. Drill press, masking tape, nice sharp bit, drilling from the finish side inwards would be my approach.
100% My intention is to use a forstner bit (which also uses the innovations of Brad Point) on my drill press as well as the tape, pilot hole, and a block on the back.
But be aware (and it sounds like you've already been warned about this) that there is not enough space inside Warmoth's kidney-bean-shaped control cavity to do LP controls. You'll have to modify it on some way.
Oh sure. Now you chime in! :ROFLMAO:

Spike in customer service sent me rough dimensions, and while I understand it might not be exactly like a LP the cavity seems significantly larger than what's on the LP Studio. I'd have loved to have the switch on the upper horn, but was informed this was not possible on a Velocity (sadness). I'll be using a StewMac premium kit with the push/pull pots, and if I have to I'll drop one of the knobs. Any way you slice it though, I expect I'll be able to come up with some type of workable configuration and this is going to be a fun project (in 16-18 weeks when the parts get delivered).

BTW: I've really enjoyed your videos and found them very helpful. My only problem now is that I have 4 more projects rough spec'ed out in my head, and that's after the Velocity I just ordered!
 
Jeb Forstner was the chief competitor of Brad Point back in the day. Very much akin to Spacely Sprockets vs Cogswell Cogs. Old Jeb also invented the first construction hardhat with two beer cans and straws attached.
1712794849795.jpeg
 
Last edited:
Upper horn toggle on Velocity would be so nice

I went with PRS controls for mine. Honestly, I thought I’d hate the switch being that far back, but Velocity body is so small and the bridge so far back that it’s really still within pinky finger distance. It would be possible to put a second volume control in this scheme with little trouble.

IMG_6721.jpeg
 
Back
Top