Doing a Proper Masked Binding

I took a look at some more PRS videos. There's some useful ones on basecoat sanding and prep for top coat. At that point masking of the "binding" and other parts that won't receive topcoats is done.

Then here's the topcoat, where you can see prior to the clear coats the masking for the binding is removed and at that point a blade is used to clean up any seepage of topcoats.

[youtube]hNw73MUFZQI[/youtube]


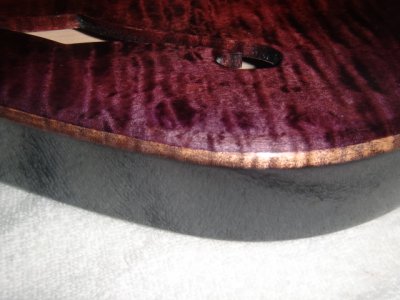
So we seem to have it "cut in" is sanding of any stain to clean it up. And blades are used for any colour seepage of spray under tape.


Another good video find, Strat. (Man, wouldn't it be nice to have a spray booth like that?!) I'll be putting my dye on by hand, but I do like the idea of scraping with a blade. The idea of using sandpaper makes me cringe a little. Maybe an emery board will help me keep a sharp line.

One thing I noticed on the PRS videos is that their edge/corner is much sharper than what I have on my Tele. Also, the thickness of the PRS top from the glue joint to the edge is a little more than my Tele. The PRS binding is mostly on the side with just a whisker showing on the top. My binding, even at about a quarter inch total, will extend more to the top. I'm fine with that, I'm just noting that I'll be working with more of a radius rather than the sharp corner. I'll make it work. I can tell I'm going to have to make sure I have lots of uninterrupted time so I can get it right.
 
Gemcutter said:
I'll be putting my dye on by hand, but I do like the idea of scraping with a blade. The idea of using sandpaper makes me cringe a little. Maybe an emery board will help me keep a sharp line.

If you're going to edge scrape, you may want to fab up a little tool like this...

IMG_2765_Sm.JPG

It's just a bit of dowel with a slot cut in it to hold a breakaway razor blade, with a 6-32 nut/bolt to squeeze the dowel to the blade and hold it firm. You set the depth you need, then when you scrape you won't get a wavy edge...

IMG_2769_Sm.JPG

 
Indeed a spray booth like that would be a luxury.

That's a good idea for a tool in Cageys pics. 
 
On the attached guitar image - I burst the maple then did a masked binding - but I think the same approach can be used for a completely masked binding with no burst or grain pop, because that is the use from which I stole the technique.

Basically, the "trick" is a bit time consuming, but gets the job done without spray booth. You can use a very dilute mixture of alcohol and sealer, which absorbs in to the binding area and "freezes" the binding so that subsequent dye does not seep back under or into the masked binding. Here's the detail of what I did:

1. Dyed dark (cordovan in this case).
2. Sanded the entire top back, including the binding (masked the back and sides). Here's where it gets time consuming.
3. I put (I think 1/8) 3M pinstripping tape where the binding was to be.
4. Then, I used 1/8 3m pintstripping tape above and below where the binding would be
5. Then, removed the tape from step 3. This just leaves the "burst" binding exposed between 2 pin strip tapes.
6. I used a dilute 50/50 mixture of alcohol and sealer and applied with a small hobby paint brush and let dry.
7. I removed the 2 stripes of pinstripe tape from around the binding.
8. Then reapplied the binding pinstripe, in preparation for the purple dye burst on the top.

This is not a complete finishing schedule - just the detail on how I did the masked binding. Remember at each step to fully mask off any part of the guitar you don't want the dye or sealer on.

I found this finishing technique online somewhere and adapted it for this build. I think the result looks very good. I am proud of it, but all the pinstripe masking was a lot of work and I'm not sure I'd do it again.
 

Attachments

  • BindingDetail.JPG
    BindingDetail.JPG
    258.1 KB · Views: 353
Back
Top