Cagey said:I'd be scratching my head, too. You'd have to wet it to activate the adhesive to slide it off the release paper, then let it dry before you could coat it with anything, at which point it would probably curl up. Then, if you coat the back, you mask the adhesive so it won't stick and will likely bubble. That can't be good. I can't see that working out well.
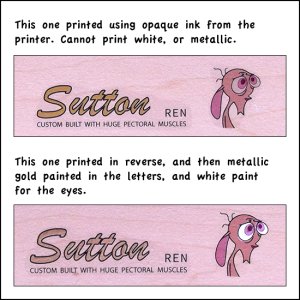
I think I figured out how to do this... the main issue as previously discussed is that only the ALPS printers can print white or metallic inks (which are no longer made). So I wanted to try and make my own decal instead of going the Rothko & Frost route. I practiced 2 methods on some scrap wood, and the attached pic shows the results. As I can't print white or metallic, the first decal shows a straight-up water-slide decal printed with a colour laser printer. The lettering for "Sutton" is just an opaque colour, and the eyes of Ren are an off-grey.
The second decal shows the same thing but with metallic gold letters (the pic does not do it justice ... looks awesome!), and Ren's eyes are white. So in order accomplish this, I printed the decal without any fill colour in the lettering or the eyes. I also printed the decal in reverse, so like a mirror image. This means that you are actually looking at the back of the decal when it is printed. So then you take some metallic paint (I used Testors enamel metallic gold) and paint in the letters. It doesn't matter if you go over the black outline as this will not show when the decal is applied. I actually painted it with a toothpick for super fine detail. I did the same with the eyes and used white paint. So then when you apply the decal, the paint is actually in the back and from the front it looks pretty good.
Here's a link I found showing this method: https://www.youtube.com/watch?v=aG2YvHgqERk
I actually didn't need the Elmer's glue in the water, the decal stuck just fine without it. No bubbles or anything weird, it looks really good. So I think this weekend I will use this method and apply the decal to the headstock.