A White Pearl Bound Black Satin Telecaster w/ Highly Figured Roasted Maple Neck

Cagey

Mythical Status
Messages
24,425
One of our own here, BRK303, (we'll just call him Daniel since it's pronounceable) asked me to put together a Telecaster for him, and maybe document it a bit for fun. Basically, it's as the title describes - a bound satin black Telecaster with a highly figured roasted Maple neck. It's going to have somewhat subdued hardware, along with a few custom mods to the electricals that will make this a pretty unique instrument while still keeping fairly close the Telecaster design. The combination of the satin finish and subdued hardware should give it a sort of "NOS" (New Old Stock) look, as if it had been built long ago, but never used.

Where to begin? Hmm... Well, let's see what we're starting with...

xqiGyLK.jpg

vOcvwsL.jpg

It's a roasted Swamp Ash body with a Strat neck pocket, black satin finish, and pearloid binding. The roasted Swamp Ash is meant to provide that wood's characteristic tone as well as lightening it up a bit, but it's still 4.5 lbs (2.06kg). Comfort cuts all around - forearm, belly and neck heel. Standard Tele bridge/neck pickup routes and bridge drill pattern. Additionally, a pickup selector switch option was cut in the upper bout, but that's not what it's for. We'll get to that later. An attractive piece. The white pearloid binding against the black is a really nice accent.

Then, a body without a neck doesn't give you much to bite on, so...

sl69DTA.jpg

OQl68y8.jpg

Where do they grow this stuff? Geez, that's pretty! One of the best examples of figured roasted Maple I've seen. And that's with ME  taking pictures. Imagine what it looks like in real life! The grain shimmers and moves under the light like a cat's eye gem.

I know I had "as delivered" fretboard pics as well, but I'll be damned if I can find them. Anyway, rest assured, it's every bit as lovely as the neck meat. We'll see more of it later, when we talk about fretting and whatnot.

The bridge is from Glendale Guitars and is a little different...

0670.jpg

...in that it's been cut down a bit from the traditional Tele design while still keeping enough of the sides to give it The Look, and it's made of unplated cold-rolled steel. I'm not sure how they do it - I suspect it's tumbled - but there are none of the rough edges you might expect with such a raw-looking piece, with no evidence of it having been sanded/buffed/polished/ground or anything like that. It didn't come with saddles - those came separately from...somewhere (I can't remember or find a packing slip). I think they're Gotohs. Anyway, compensated brass barrels like these...

intunebrass.jpg

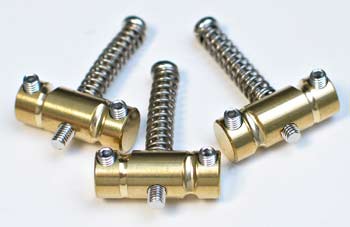
Of course, those are much too pretty as they sit, so we're gonna have to gracefully age them. We'll get to that later.

Knobs appear to be standard Tele knurled dome-tops, but they're made of cold-rolled steel as well for that "I found 'em in my long-departed great-uncle's workshop" look...

2mqSJEP.jpg

Most knobs like that are made of brass, then gold/chrome plated or painted black. Difficult to age gracefully with any kind of authenticity.

I don't have any shots of the control plate unassembled, but you'll see it later. It's the same deal as the bridge and knobs - cold-rolled steel.

Pickups are a set of Rumplestiltskin "Black Knight" units.

ETJnAVr.jpg

Never heard of 'em, so we'll find out later if they're worth the copper they're wound with. Nice box, though.

Tuners are a nice set of Schaller M6 mini-lockers, which I'm sure most of you are familiar with...

68___10020170.01.50.jpg

I use these quite a bit - they're high-quality parts. It hasn't been discussed yet, but I think a set of pearloid buttons would be nice on those. Match the binding, for one, and get away from the polished chrome that doesn't exist anywhere else on the instrument.

I'm sure I'm leaving some stuff out, but that should cover the major parts. Strap hangers, pots, switches, wire, etc. are all pretty much standard stuff. Although, just for documentation's sake, I should mention the switch going into the upper bout. One of these days, I'm gonna want another one and I don't want to have to search for hours like I did to find this one...

9bI7Z1b.jpg
aphBhIG.jpg

I got them at Digikey, PN 360-1829-ND. I know it doesn't look like much, but what's cool about it is that it's a full-size operator on a DPDT (on/on) mini switch. So, it'll fit into a standard Switchcraft location and look right, but it gives you a size and operation you can't get from Switchcraft.

Also, Danny found a nifty bezel for it...

rzwY8Ob.jpg

Kind like a coin, in that it's stamped rather than silkscreened or engraved. Nice little part.

The switch and bezel combined present much more nicely than the typical "accessory" or "option" mini switch buried down in the control cluster...

U3wj4XW.jpg

Stay tuned, there's more to come!
 
I see what you mean by "highly figured," Va-Va-Voom!

That switch and bezel look very cool together, I like it.
 
Oh my, that neck is just gorgeous!  Actually, the rest of it is pretty great, too.  But that neck!
 
Next, we're gonna install some string ferrules. I'm sure most of you have heard of or already do it this way, but just in case, let's review.

There are several ways of doing this, but this is the easiest if you have the tool, that tool being a (minimum) 12" swing drill press (pillar drill). Anything smaller won't do; you need the throat depth to reach the holes the ferrules are going to be pressed into. 12" swing means from the center of the spindle to the pillar holding the whole drill motor/armature assembly up measures roughly 6", so if you chucked a full-grown rat in by its tail, he'd just hit his head on the pillar when you powered the thing up. Wait... did I say that out loud? DON'T CHUCK RATS INTO YOUR DRILL PRESS BY THEIR TAILS!

Anyway, you unchuck anything you may have in the chuck, and adjust it until the little holder finger thingys extend to the point where they're the same diameter as the top of the ferrule...

ukZkJF2.jpg

Put your (properly protected) guitar body on the stage...

EaEEuTj.jpg

Remember when I said you needed a 12" swing press? This is why. We're only on the first ferrule, and we're already nearly touching the pillar with the body.

Now set the ferrule in one of the holes you need ferrules in, preferably one you can reach with the press. Hold it with one hand while you index the armature down until it just kisses the ferrule...

76SjfJI.jpg

Some of you may notice that:

1. there's a ring of finish beading over the edges of those holes and
B. I didn't do anything about it.

Yeah, I know. I'm an irresponsible icehole. The finish is surely going to be destroyed. But, look what happens when I index that armature down a 1/4" or so...

yKWCzIG.jpg

The ferrule sinks into the body without any drama or destruction. I would  say that's amazing, if I hadn't seen it already 43,812 times. Even in well-cured ancient brittle lacquer, pressing in ferrules this way is a non-event.

Now, even with a 12" press, you won't be able to do the whole string in one orientation. You'll have to turn the body 90 degrees to reach the D & G string holes, where it'll also be very close to the pillar, and 90 degrees again to get the E & A holes, but it's doable...

KMpR9oF.jpg

And there we are. All ferruled up snug as a bug in rug, no drama. Life is good.
 
Out-frikkin-standing! I love that neck. The satin black is a great way to show it off. Cool progress, there.
 
Yeah, that neck is a helluva thing. We'll see more of it upcoming as I go along here, although most of the time it's taped up so you don't see the wood. But, we'll get there. The whole thing is essentially done, I'm just documenting it now. Choosing/organizing/editing/resizing pictures, uploading them to the server, etc. is time-consuming.
 
Yes, this will be an awesome axe and clearly in good hands for the build  :icon_thumright:
 
What's an electric guitar without some electrical parts and robot veins? It's just a no-count, suck-egg biscuit-eater, that's what. We can't have that, so let's see what we can do.

Prime directive of electrifying electrical stuff is: first, do no harm. We want our pots to last more than a week, so we're not going to terrorize them by applying our 900°F soldering iron to their fragile little bodies. So, we need some solder terminals that'll fit on their mounting bushings. That'll let us ground them without doing anything radical. The ones I have come flat, which makes it difficult to attach wires and whatnot to them, so we have to prep them with a little bend...

eMKvDxR.jpg

They're easy. They're just tin-plated copper, so some pliers in one hand and the fingers of the other will get you there. If you need to find some of your very own, they sell them 4 at time here for a couple bucks.

While you're there, you may also want to pick up 1 or 3 of these little lovelies...

v_treb__93588.1470693258.1280.1280.jpg

It's treble bleed circuit that's not only already properly sized/spec'd/assembled, it's also variable so you can match it to the rest of your system. Since you're not going to be making a mess of the backside of your volume pot(s) by soldering to them like some kind of barbarian, it'll readily attach to that nice, flat surface with a bit of double-sided sticky tape, which is included at no extra charge.

They have a few other little odds and ends like that you might want to investigate, like low-pass filters, etc. But I digress.

So, once we've got our pots/switches/control plate/solder lugs collected in a convenient little pile, we assemble them sorta like this...

k4YvC04.jpg

GoKVVv9.jpg

Then, clamp it into some sort of holder. I had this nut vise handy...

3NGM2q2.jpg

...which is good because I only have 2 hands and trying to hold solder, a soldering iron, some wire or part, the assembly itself, etc. is like herding cats. Chances are you're gonna burn something you don't want burnt.

Time goes by and ground bus, tone cap, jumpers, treble bleed, and wires get installed, and we're here...

oDVELI1.jpg

It's complete except for the output jack, pickup wires and control override switch, which we'll do when we get the body over here. The switch is a 4-way wired to provide:

-Bridge
-Bridge+neck in series
-Bridge+neck in parallel
-Neck

When the override switch (the toggle in the upper bout) gets wired in, it's going to bypass the volume and tone controls so whatever pickup(s) are selected, they're going right out the output jack. It's sort of a "poor man's boost" that'll give a little bump in output when it's time to wank and crank.

One thing to note is anything that carries signal but cannot be shielded is as short as possible. Just little jumpers, really. The longer a signal-carrying conductor is, the greater the bandwidth of the noise it can pick up, so no spaghetti running all over the place.


Wow, what an awesome project  :blob7: and will be a stunner when the maestro completes it. Regarding Rumpelstiltskin pickups. For what it is worth I liked them and almost went with a set on my tele, I ended up liking the Tone Specific country for tele set the most. Fingers crossed the stiltskins will sound good in this build.
 
macegtr said:
Yes, this will be an awesome axe and clearly in good hands for the build  :icon_thumright:

Thanks. I'm looking forward to playing it myself. I'm particularly interested in how that "blower" switch is going to work, and what those pickups are gonna sound like. Couple/few more days on the rack and I'll pull it off and find out.
 
musicispeace said:
Fingers crossed the stiltskins will sound good in this build.

They seem to be high-quality parts. I don't know what to expect. For some reason, I couldn't get the sound clips on their site to play on my computer (I tend to go overboard on security) so I don't have a clue. But, we'll find out soon enough.
 
I know we've been over this before on other projects/how-tos, but I don't think I was this thorough so I'm gonna show it again anyway because I think it's important. I'm talking about wiring the output jack.

It's really surprising how much noise the little 4 to 8 inch run from your controls to your output jack can pick up. You can use noiseless pickups and conductive paint covered by copper foil covered by magic dust and blessed by the pope, but if that little run isn't shielded, you're gonna hear things. Bad things. Things you wouldn't want your amplifier or recording system to hear, let alone you or your audience's ears. Of course, this guitar's got single coil pickups so all bets are off anyway, but still. You should always do the Right Thing. No sense tempting fate.

Rather than do the traditional Tele jack, we're putting a square jackplate on this one. They're just better no matter how you look at them, unless you've got a hard-on for some "vintage" silliness. So, first things first. Mount the jack on the plate. It'll make everything from that point forward easier. Then, solder on a bit of buss wire to the sleeve (ground) terminal...

SHRP4DV.jpg

Then, cut off about 8" or so of shielded cable, strip about 3/4" of the shield off one end to expose the inner conductor, strip about 1/8" or so off the end of that, and solder it to the hot (tip) terminal of the jack. Also, put the insulation back on the ground wire you soldered on in the last step...

iRsaZ2j.jpg

That braid is not attached in any way to the inner wire, so it can move. In fact, some call this "push back" wire for that very reason, because rather than strip it like a good little doobie, you can push it back off the inner conductor and seeming save yourself a bothersome step (stripping braid is no fun). Don't do that!  It's just springy enough that it's liable to creep back forward later on and short out your "hot" (signal) connection. Then you'll be all sorts of pissed off, having to take everything apart and figure out why your guitar won't make a peep. Then, just because we hate taking guitars apart that we just put together, we're gonna go the extra mile and see to it that braid won't move. This is as simple as just sliding a bit of heat shrinkable tubing over it and shrinking it, as per so...

3opB0Iq.jpg

This will hold the braid in place, plus it keeps it from fraying and perhaps letting a little whisker of wire touch something with signal running through it, like the plug tip (once it's in).

Why am I so paranoid about the braid? Because it's the shield, and we're gonna ground it. Otherwise, it won't work as a shield. So, anything that it touches is going to ground, where all signals go to die - even (and especially) the ones it picks up right out of the air. That's the magic of it. If it picks up signals out of the air and sends 'em to hell where they belong, the inner conductor will never see them. Presto! Quiet signal line!

We're almost there. We could just ground the shield now. The ground line is sitting right there just rotting. But, first let's do one more thing in the interest of longevity - heat shrink the terminals while there's still nothing in the way...

VWy91S3.jpg

This may seem like overkill because just about all risk of spurious unwanted connections has been eliminated. But, heat shrink tubing has an interesting property besides insulating - it also stiffens up when it shrinks. So, those coverings act like strain reliefs. You're gonna be plugging and unplugging that jack repeatedly over the life of the instrument, not to mention all your gyrations while playing, so you want those wires to stay put. Otherwise, they might work harden and break, or the solder joint could get stressed out and become intermittent. I know, I'm nuts, but while we're here and everything's exposed and we have the material - why screw around? Doing it right the first time is always easier than doing it over.

Ok, we've made, insulated, and relieved all the jack connections, all that's left now is attaching the ground to the shield, insulating that, and it's Miller time. Simply wrap the ground wire around the shield, and solder it in place. It's a good idea to have a fairly robust soldering iron for this step...

P897X2Q.jpg

...because while it's difficult to harm the inner wire due to its cloth insulation having a much higher tolerance to heat than thermoplastic insulation, it still takes a lot to get the braid hot enough to accept solder and other things could happen. Like the heat being conducted along the braid, and affecting all that lovely insulation we just put on there.

As you can see, the braid got enough that it split the heat shrink I used to hold the braid back in the first step. Fortunately, it doesn't appear to have split all the way under the second bit of heat shrink that I used as strain relief for the terminal, so I'm gonna let it slide.

In the next step I just put some insulation/stiffener over the ground connection, if for no other reason than cosmetics and completion...

pnl7kUL.jpg

So, there you have it. Your signal is gonna get our reliably and unmolested by neon signs, dimmer switches, distribution transformers, etc. and you've got the start of a ground bus because you've got a shielded cable running into your control cavity.

 
Looks good.

Just as an idea to avoid splitting the shrink tubing perhaps it would be possible to attach the ground wire to the shield first, then slide on the various insulation and shrink tubing, then solder to the jack and then put the shrink tubing into place and shrink it.

In any event very neat work and good to see.
 
Cagey said:
musicispeace said:
Fingers crossed the stiltskins will sound good in this build.

They seem to be high-quality parts. I don't know what to expect. For some reason, I couldn't get the sound clips on their site to play on my computer (I tend to go overboard on security) so I don't have a clue. But, we'll find out soon enough.

I have Rumpelstiltskin pickups in one of my Teles and in my Jazzmaster, I've been quite happy with them, good stuff.

As always Cagey, your wiring is a work of art.  :icon_thumright:
 
Looks great, Kevin. Fine stuff. I like the way you put the shielded wire on that jack. My current project won't have a side jack but it's probably not the last one I'll do.
 
How did I miss this thread for two whole days? Beautiful wiring work, (as usual), and a great selection  of parts too. Not to mention that neck, and the look of the pearl binding against the black satin! I certainly hope "Daniel" likes it as much as I do, but if he doesn't, please give him my address so I can help him dispose of it......  :icon_jokercolor:

Thanks for the detailed build pix Kevin!  :icon_thumright:
 
Back
Top