Warmoth Chambered Strat body. Dye process has begun. Wish me luck!

War_in_D

Senior Member
Messages
239
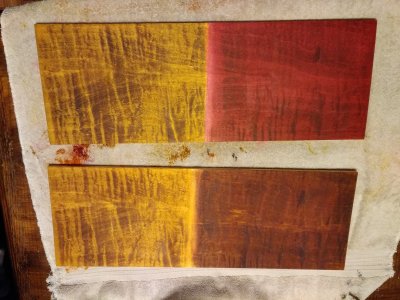
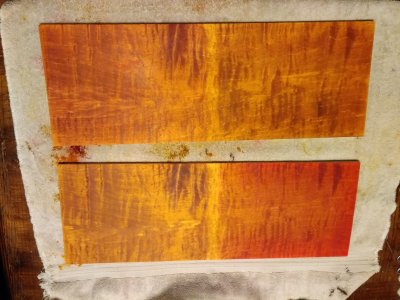
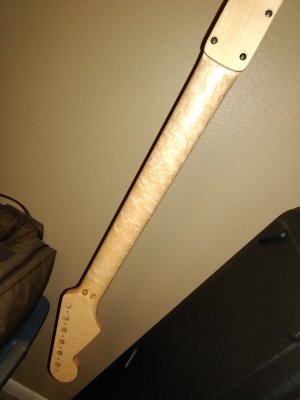
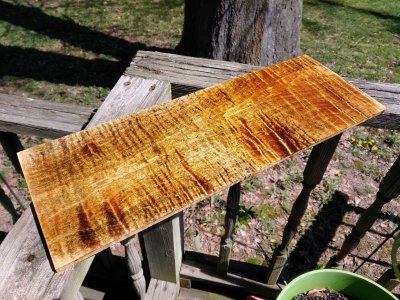
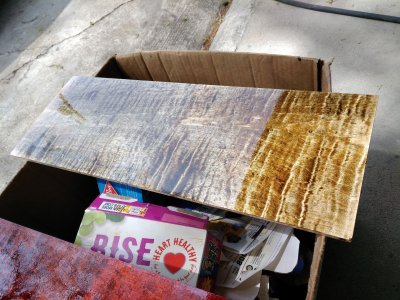
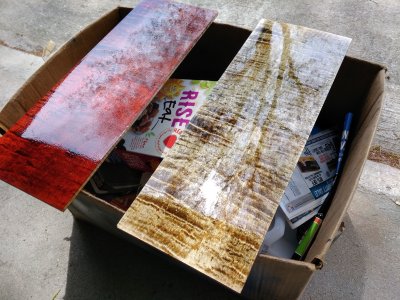
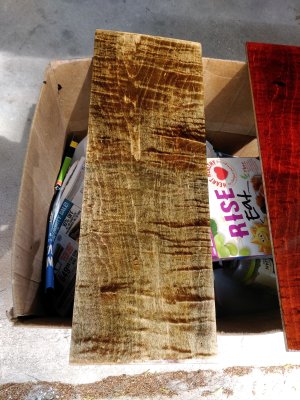
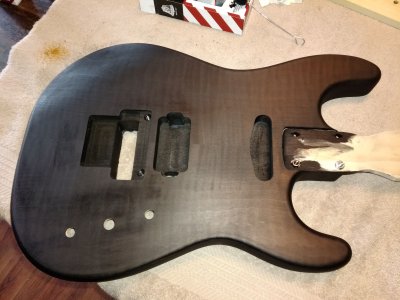
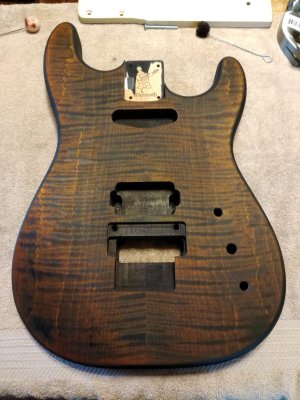
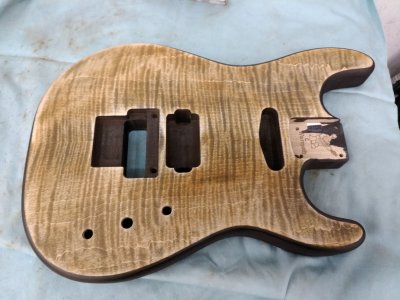
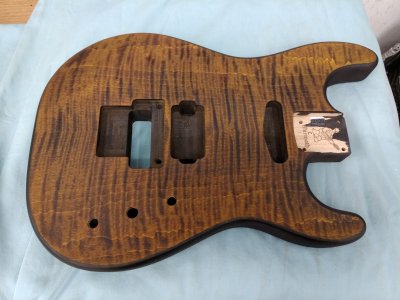
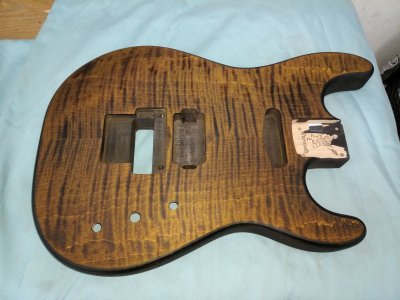
Been working a bit on the latest.  Mainly just doing some color testing, and drilling the neck for Sperzels and getting Tung Oil applied to the neck.  This will be my first attempt at a dyed finish on the body, so I've been playing a bit.  Michaelga hooked me up with the bookmatched top, and some different dyes (Angelus Leather Dye, and some water based dyes as well).  These are all test panels of the Angelus stuff.  Originally, I was going to try to recreate something along the lines of the Joe Perry Boneyard finish, and got some results that are in the ballpark, but I just can't get the darker shades to "pop" like I'd like.  I'm sure they will come to life a bit more once sanding sealer/clear coat has been applied. 

Here are a few pics.  First is my attempt at the "Boneyard" recreation, and some of the playing around I did with different color combinations and a pic of the neck.


Attachments

  • IMG_20190406_195727 (1).jpg
    IMG_20190406_195727 (1).jpg
    3.2 MB · Views: 24
  • IMG_20190406_234354.jpg
    IMG_20190406_234354.jpg
    3.3 MB · Views: 16
  • IMG_20190406_234416.jpg
    IMG_20190406_234416.jpg
    3 MB · Views: 22
  • IMG_20190406_234315.jpg
    IMG_20190406_234315.jpg
    2.3 MB · Views: 17
Looks promising! It looks like the colors are a bit lighter than the pictures I've seen of the Boneyard guitar. The dark brown might give you the contrast you're looking for.

Michael
 
Ok, so I stumbled upon this kinda by accident and I think this will be pretty close to the finalized look I'll be going for.  I'm calling it a "faded" version of the Boneyard finish.  I did some experimenting with the the dark brown and jet black base colors last weekend.  The black bases were then sanded back, and I added some dark brown over half and medium brown over the other half just to see what would happen.  Well, it came out really dark, with little to no definition in the grain.  So, I hit it again with the sander thinking I would take it back to bare wood and try again.  It was taking forever to get the color off there, so I stopped and went on to something else and planned to come back later and do some more sanding.  Well, this morning I thought I would hit some of my color samples with some sanding sealer to see what would happen, including the sanded back jet black/brown and this is what I got.  The sanding sealer really made the grain pop!  I think I might possibly try to add some "honey" color to it, and do a light sand back on that before hitting it with sealer and clear for the final product.. but I think I'm on the right track.  At this point, I'm pretty much of the mind that "whatever happens, happens"..  LOL 
 

Attachments

  • Faded Boneyard.jpg
    Faded Boneyard.jpg
    999 KB · Views: 31
RoboNarples said:
That looks incredible.

Thanks!  Hopefully, it turns out decent when I actually put it on the body.  I guess, when it's all said and done, there isn't any "wrong" way to do this.. you just might not get what you're expecting at the end.  LOL  I have to be honest, I'm a little nervous.
 
Shot about 5 coats of 2K automotive clear over it today to test the compatibility of my clear with the Zinsser Shellac I used as a seal coat.  So far, no reactions.  I also tested a thinner coat of Shellac, with no sanding (the red/brown panel) vs. several coats and sanding smooth.  I think the several coats and sanding came out a little nicer.  Going to let this cure out, make sure that nothing happens and then I'm going to start on the real thing..  I hope it goes well.
 

Attachments

  • Faded Boneyard5.jpg
    Faded Boneyard5.jpg
    849.1 KB · Views: 18
  • Faded Boneyard4.jpg
    Faded Boneyard4.jpg
    905.9 KB · Views: 26
  • faded Boneyard3.jpg
    faded Boneyard3.jpg
    940.9 KB · Views: 16
I wouldn't expect shellac to give you any trouble.  The alcohol vehicle boils off really fast and really completely, and there's nothing reactive about the film. 


That 2K is a heck of a thing, ain't it?  I'm on the fence about whether to give it a try since it's so deadly, but it's tremendously attractive as a shoot-it-in-a-day-and-you're-done-for-good option.
 
Bagman67 said:
I wouldn't expect shellac to give you any trouble.  The alcohol vehicle boils off really fast and really completely, and there's nothing reactive about the film. 


That 2K is a heck of a thing, ain't it?  I'm on the fence about whether to give it a try since it's so deadly, but it's tremendously attractive as a shoot-it-in-a-day-and-you're-done-for-good option.

Good to know on the shellac.  I've never tried to do a dye finish, so this has all been one big experiment for me. LOL  I wanted to test everything, before shooting the actual body just to make sure.  The only thing I might try differently with the shellac is to get the bulk stuff in the quart, and try to spray it with the gun.  I'm thinking I could get it to lay down a little better, and require less sanding.  These were sprayed with the can.

With regard to the 2K stuff.. I just try to spray in a well ventilated area, with some fans going and a respirator of course.  With guitar bodies, it's not like you're spraying anything too large and with a good HVLP gun set to about 10 lbs at the cap there really isn't that much overspray. 
 
So, I started on the finish on the Chambered Strat body.. One thing I learned?  That no two pieces of wood will react the same, even when using the same dye. LOL  But, I have to say that I'm pretty happy with the results so far.  First I dyed the entire body black, since that will be the back color.  I then sanded back the top of the guitar, and applied a medium brown.  That is the point I'm at right now.  I plan on sanding that back, and then adding lighter dyes (going to try yellow and honey) to hopefully accentuate the black/brown highlights in the flame.  We'll see how it goes!  More pics to follow as I progress. 
 

Attachments

  • Warmoth Body Dye.jpg
    Warmoth Body Dye.jpg
    580.3 KB · Views: 23
  • Warmoth Body Dye2.jpg
    Warmoth Body Dye2.jpg
    643.2 KB · Views: 28
"no two pieces of wood will react the same, even when using the same dye"
I found that out as well when I dyed my bass with light blue Angelus dye. It came out just like I'd hoped on the pieces of ash wood that I practiced on. When I stained the swamp ash body, it came out much darker, kind of the color of a blueberry and you can barely see the grain. I still love the way it looks, but I wasn't expecting such a dramatic change in color! When you sand it back and add some yellow/ honey, it should be close to what you're looking for! Good luck!

Michael
 
Michaelga said:
"no two pieces of wood will react the same, even when using the same dye"
I found that out as well when I dyed my bass with light blue Angelus dye. It came out just like I'd hoped on the pieces of ash wood that I practiced on. When I stained the swamp ash body, it came out much darker, kind of the color of a blueberry and you can barely see the grain. I still love the way it looks, but I wasn't expecting such a dramatic change in color! When you sand it back and add some yellow/ honey, it should be close to what you're looking for! Good luck!

Michael

I'm glad it worked out, I wouldn't want to have to think about sanding all that back out and starting over!  LOL

I got up early this morning (well.. early for me, since I work nights) and sanded back the top again and hit it with two coats of the Angelus yellow and then several coats of the Angelus honey until I got what I felt was the right top color.  Looks like this one will come out a little darker than the test panel I did but that's ok.  Next will be sealer and clear.  Sealer will probably get sprayed this weekend but we had some pretty good rain here yesterday so I think I'm going to wait until we get a good stretch of sunny days to let the humidity kind of dry out a bit, then I'll hit it with clear and post the final results. 
 

Attachments

  • Warmoth Body Sandback.jpg
    Warmoth Body Sandback.jpg
    459.4 KB · Views: 26
  • Warmoth Body Dye Finished.jpg
    Warmoth Body Dye Finished.jpg
    510.6 KB · Views: 23
  • Warmoth Body Dye Finished Flash.jpg
    Warmoth Body Dye Finished Flash.jpg
    546.9 KB · Views: 28
Michaelga said:
Looks good! It'll be interesting to see what it looks like with the clear coat!

Welll...  I can tell you after a few coats of shellac, it's a lot darker than I thought it was doing to be.  And, I think that Angelus medium brown has a bit more red in it that I first anticipated. LOL  With the few coats of shellac, it's taking on an almost "tiger eye" appearance but without a real pronounced yellow shade.  It's not bad though, just different that what I was thinking.  It's hanging up to dry now, I'll try to get some pics in the sun a little later. 

If the weather holds out (they had called for rain tomorrow, but it's supposed to be nice and about 80 degrees now), I may shoot the clear tomorrow afternoon.
 
 
Those dyes can be a bit strange - I tried to go by BigD guitars videos on youtube for colour sampling. The Tan one is more like an orange. I used Dark Brown, Tan and Gold on my strat body. I also had a bit of an issue with fading in the sun when I was trying to get the finish to dry more. I'm happy with the way it turned out although I was aiming for darker brown around the edge.
 
Tomatonator said:
Those dyes can be a bit strange - I tried to go by BigD guitars videos on youtube for colour sampling. The Tan one is more like an orange. I used Dark Brown, Tan and Gold on my strat body. I also had a bit of an issue with fading in the sun when I was trying to get the finish to dry more. I'm happy with the way it turned out although I was aiming for darker brown around the edge.

Yep, agree 100% with the tan.  Much more of an orange-y cast to it.  I think I did some tests with the gold as well, but decided to use the yellow.  I found, after actually spraying the clear on, that it tends to darken up the colors quite a bit.  It seems to me that if you start with a color that you feel is what you want prior to the clear coat, it's going to be much darker after.  At least it was in my case.  I think on the next one, I'm going to tone back the color quite a bit before I hit it with the clear.
 
Back
Top