graceshredder
Junior Member
- Messages
- 58
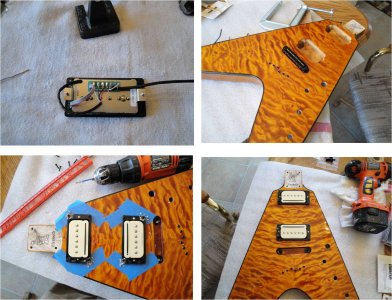
All right - Saturday. I was able to complete the soldering of the Triple Shot mounting rings. These are really cool. You wire the pick-up's output wires to the small circuit board attached to the TS. (Which you stick to the underside of the pick-up) The TS then has a three conductor wire that runs to your control cavity. If you look closely at the bottom right of photo #4 and focus on the pick-up mounting ring (the Triple Shot) you can see the two little slide switches that control the pick-up's configuration. With the P-Rails, I'll have my choice of a series humbucker, a parallel humbucker, a P-90 single coil, or a rail single coil from each pick-up.
Next, I pressed in the bridge posts using the same set-up as I used for the ferrules. Again, it worked very well. However, after I had pressed them in I realized that, in a fit of total cranial/rectal inversion, I had forgotten the ground wire!! :doh: Talk about an instant case of the screaming red ass! So I had to carefully pry the post back out and install the ground . . . moron! But, in the end, no blood - no foul. It turned out fine.
It was time to install the pick-ups and I remembered that fateful sentence my great grandmother told me as a child. She said: "If anybody in this family dares to drill holes in the face of a quilt maple flying V without protecting the finish against chips and scratches, then they're gonna get a napalm enema!" :toothy11: So, seriously wanting to avoid a case of the flaming bunghole, I carefully masked off the areas where I would be drilling. I lined up the mounting rings with a straight edge and carefully drilled the 8 mounting holes with the drill bit taped for depth control. Whew!! No chips . . . no scratches . . . thanks, great grandma!
Today, Sunday, I'll endeavor to complete the build . . . we'll see!")
Next, I pressed in the bridge posts using the same set-up as I used for the ferrules. Again, it worked very well. However, after I had pressed them in I realized that, in a fit of total cranial/rectal inversion, I had forgotten the ground wire!! :doh: Talk about an instant case of the screaming red ass! So I had to carefully pry the post back out and install the ground . . . moron! But, in the end, no blood - no foul. It turned out fine.
It was time to install the pick-ups and I remembered that fateful sentence my great grandmother told me as a child. She said: "If anybody in this family dares to drill holes in the face of a quilt maple flying V without protecting the finish against chips and scratches, then they're gonna get a napalm enema!" :toothy11: So, seriously wanting to avoid a case of the flaming bunghole, I carefully masked off the areas where I would be drilling. I lined up the mounting rings with a straight edge and carefully drilled the 8 mounting holes with the drill bit taped for depth control. Whew!! No chips . . . no scratches . . . thanks, great grandma!
Today, Sunday, I'll endeavor to complete the build . . . we'll see!