Leaderboard

SixString's Hollow VIP

SixString

Junior Member
Messages
115
Work has technically commenced, so figured it was time to initiate the thread.

the SPECS
BODY:  Hollow VIP, BK laminate, Mahogany back, 2-Fhole Strat controls, Black binding

NECK: Warmoth, Conversion Angled 24 3/4", Standard thin, Mahogany shaft, Ebony fretboard, SS6230 (Stainless) frets, 10-16" radius, GraphTech Black TUSQ XL nut, 11/16" nut width, 24-3/4 in. conversion scale

Bridge: Gotoh 510 bridge
Pickups: SD Jazz (neck), SD JB (bridge)
Tuners: Gotoh 510 locking
Knobs, Wires, Pots, etc: Still to be decided

This is my second build (http://www.unofficialwarmoth.com/index.php?topic=16754.msg246452#msg246452), however first attempt at the finishing...well successfully completing the finishing. My re-finish job on my old cheap-o strat was met with disaster...twice.  Utterly perfect newbie mistakes :doh: So I got impatient and bought a showcase body.  But lessons learned.

A big thanks in advance for any/all help that I'm sure will come...and that I'm sure I'll need!

Cheers-
 

Attachments

Sealer coats prior to grain filling.  I did one light coat and one normal coat, using DEFT Sanding Sealer.

Question 1:  The front will definitely be getting black grain filler (Timbermate), but what do you all think for the back....dark brown or black?  I've been leaning towards black...

Question 2:  To really keep the wood from getting stained by the black filler, should I do another coat(s) of sealer, or am I good to go as is?  EDIT: I put one more coat of sealer on, figure if nothing else it will help seal up the pores some more.
 

Attachments

I can't answer for certain on the grain filler staining the body.  I don't really know how many coats other people do before grain filler.  When I did my walnut guitar I only did one coat, but walnut is a darker wood than your korina so staining would not be as noticeable if it happened.
As far as grain filler, definitely black on top, but I would do brown for the back.  I think Timbermate has a filler specifically for mahogany.  I think black would just make it look dirty since there is no darker streaking in mahogany to begin with.
 
No need to worry of the top being stained by the grain filler, as you will sanding it down. Thus removing the grain filler from the top and just leaving it in the pores.

And I'd go black grain filler on back also... :icon_thumright:
 
Made some progress over the last week...slow but steady.

Grain filling with Stewmac's cake batter, I mean Timbermate.  Mahogany for the back (which looks pink when dry) and ebony for the front (which is more of a charcoal color once dry).  Lot's of sanding to be done :sad1: ...but the stuff really does come off very nicely, especially on the Korina.
 

Attachments

Finally able to move onto the next step, which was staining the back/sides to better match the neck.  I wasn't going for "absolutely exact", but just something close so that the two different shades of mahogany weren't so noticeable.  I think I got pretty damn close on the first try.  I'll wait to see how it looks totally dry tomorrow and apply another coat if necessary.
 

Attachments

After doing some close inspection, I'm seeing some light scratches at the base of the body (you can see in the pics).  This seems to be the only place and you really need the right light to make them out...but still, they're there.

Did I jack up the sanding here?  The stain recommended using up to #220...

Fixable? Will they disappear with the sealer coats?
Ideas and/or suggestions welcome :help:
 

Attachments

Nothing like some sun light to really let you know where rushed the sanding...
But everything finally smoothed out, re-stained and sealer coats on. 

Now on a weather hold due to rain & cold temps coming for the next few days....yup, even in SoCal.
 
Oh to be a novice.  Apparently sanding will be the death of me with this build...

Finished putting on the sealer coats, went to level sand, and then sanded through the stain on one of the horns on the back.  Tried to touch it up with stain but it just wasn't going on evenly from all the sealer.  So ended up completely sanding down the back and restained.  Problem solved and looks good.

Now I'm in the process of spraying the color coats on the front (using Mohawk toner), and have noticed a couple of more issues.  A few scratches have presented themselves to me via the toner behind the bridge screws.  They're noticeable now which means it will only get worse with the gloss finish....so I'll be sanding that down tomorrow and reshooting with more Toner...and hopefully I can get things even looking.

The other issue is that my grain fill has shrunk way more than I realized (maybe due all the waiting for the weather to improve?).  I noticed it a bit, but now with the toner on there it's very apparent.  So I'm faced with the decision to either start over or just keep going and let the clear coats fill in the remaining pores space.  [Yes I know this means many more coats to get level]  I definitely want a mirror finish on this thing, so one way or another those pores are getting filled!

What would you guys do...start again and get it properly filled, or keep going and just increase the clear coats?

:help:
 

Attachments

Maybe a clear grain filler on top of the toner?


Not sure whether this is do-able, but worth some investigation.
 
>>What would you guys do...start again and get it properly filled, or keep going and just increase the clear coats?

It depends on what you started with. You might want to review the video from Behlen that Bagman posted earlier. They talk a bit about solvent vs. water-based fillers/sealers and how you can stack them successfully. If it turns out to not apply to your situation, you can always enter the sand/fill loop with sealer/clearcoat until you get the thing level. I'd use a finer paper, though. 320 grit works best for me. Be careful of those high points and corners on that body. Sanding through them is surprisingly easy.
 
right on, thanks fellas.  need to look at it properly in the daylight today and decide on a course of action...
 
RESURRECTED!!!

Now that all those life distractions have been dealt with, time to finally finish this build.  And no sense in recapping at this point, lets jump to the present...

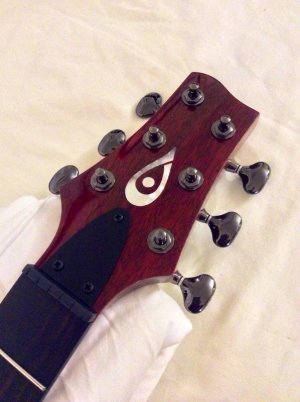
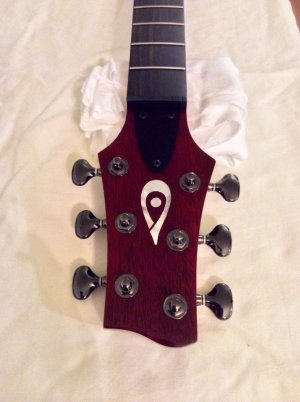
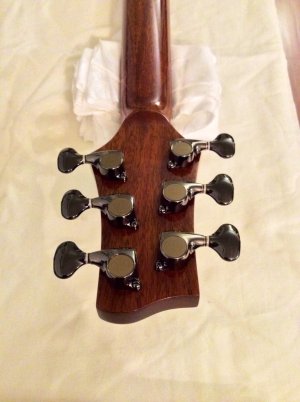
Neck finishing complete and assembled.  It was my first inlay job ever, and although my original design had to be greatly simplified I'm happy with how it turned out.

The body is wet sanded and ready for polishing, which I can hopefully finish before the weekend.

Also waiting on my knobs and wiring kit to come in, but that's the easy stuff :)

Cheers
 

Attachments

  • photo 1.JPG
    photo 1.JPG
    139.4 KB · Views: 18
  • photo 2.JPG
    photo 2.JPG
    126.3 KB · Views: 10
  • photo 3.JPG
    photo 3.JPG
    122.7 KB · Views: 16
Back
Top