Quilt top dying strategies

Megatron

Junior Member
Messages
90
Hello! I'm going to be embarking on my first DIY finishing of a quilt maple tele body (pics to follow). I'm pulling inspiration from this guitar I found online. I'm aiming to finish with gloss nitro. Any pro tips for achieving this kind of purple-pink burst finish? Also, any pointers on best practices for the masked "binding"?

Thanks!

Screenshot 2023-01-06 153201.jpg
 
Bumping with some specific questions:
  1. To achieve this sort of finish, do I need to dye the top with a dark color first and sand back to increase the contrast of the figuring?
  2. What is the best way to achieve the burst here? Do I use a rag and blend dyes, or do I dye the entire top the lighter color and then use an airbrush to add the darker color(s)?
  3. How do I preserve a natural "binding"? From my preliminary research, I've found that you have to mask the entire body except that edge, then spray the edge with sealer (nitro?), then remove all tape, then retape just that masked edge, then dye the top

Thanks!
 
To get the clearcoat faux binding, I'd recommend filling the sides and back first, before you stain. You can do that with ZPoxy or superglue. Then, spray a few coats of clear. That tells you exactly where the low and high spots are of your porefilling steps, so you can fix that. You really, really want the sides to be no longer porous.

Then, the color.
I'd start with a very dark purple or magenta, or a very sharp crimson red. Sand that largely down, then add a magenta coat on top, then the fade/burst. I'd do that with an airbrush with a water-soluble dye. That way, it will all blend together neatly. Use a wet rag to blend it even further.
Super helpful, thanks! I have a one piece mahogany body with a quilt maple lam top, so I purchased mahogany grain filler. Is this compatible with your recommendation to fill back and sides first?

Also, I will be practicing all of this on flame maple craft wood pieces before attempting on guitar body, to ensure the sealing/taping strategies work and to be happy with the color.
 
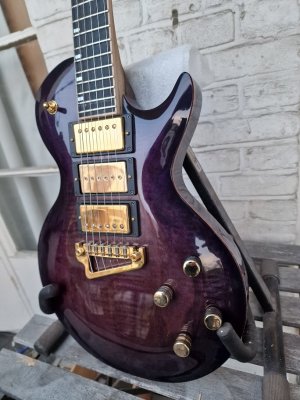
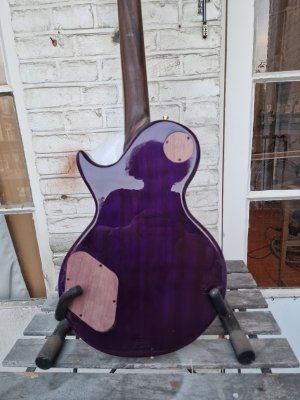
That guitar's finish is almost more of a PRS Dragon Breath staining pattern than a Glow pattern (PRS term for effectively doing a dye-based burst effect ).
I did a few when I got bored during the 'COVID years':


You would use an airbrush if you were using translucent paint, which is an option for replicating this look.
For wood dyes though you apply them with a folder paper towel/cloth; it needs to be wiped off or it'll leave an unsightly mess as it drys.
Pat Wilkins Guitars, for example, could surely do that with a mix of box techniques.

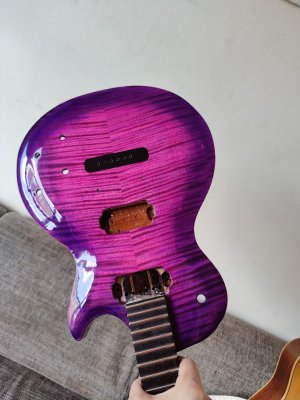
You can indeed make several mixes of the colors from dark magenta -> magenta -> red ->pink, and then stain in the desired pattern and blend colors in.
The more you mix and overlap colors on the body, the more colors loose vividness and turn 'muddy' as they mix together.
That's what happened with that green one above; it still had a nice color but it was completely different than what I intended.
Best to practice, a lot, on spare wood first.

This will however most likely not give you the high contrast/color separation you see on that guitar around the horns.
For this you would have to stain, sandback very lightly, stain again. In the last step you would not use the darkest stain you used at the first stage (dark magenta) but instead apply the lighter magenta onto the dark magenta you just sanded back.
It's not terribly more difficult to do, but again: practice a lot if you go this route.

Leather dyes like Fiebing's Red and Light Blue/Dark Blue would have incredible vividness for this color scheme but they fade so quickly I would not recommend them if you intend to leave the guitar exposed to light (natural or artificial) all day long.
TransTint is very lightfast but when it comes to vidid pink or vivid light blue it's been fairly useless.
I tried Keda liquid dyes and doing a pink by diluting their red is do-able but it will be a fairly warm pink that doesn't have the colder/magenta hue you see on that guitar. I haven't tried their powder based ones, the tutorial he makes with those seem quite compelling though.
 
Last edited:
Thanks for the detailed response @docteurseb! When I finally have some time, I'll be attempting some of these strategies and will report back in the work in progress group :)
 
Also, I've found this to be the most informative video on grain filling and masked edge "binding"

Please note that the reason it works so well in this case (or on the violin carve on your ref guitar or PRS guitars) is because the top hasn't been radiused at all along the edges. With a typical Tele, or worse (larger radius) Strat, body it will be much more difficult to keep the already radiused edge clean.
 
yes, that method, of the mahogany color paste, works, but be careful to tape off the faux edges first!

So, I'd do it like this:

*tape off edges
*apply the mahogany filler paste
*remove tape and sand
*apply again if necessary OR go to Zpoxy
*cure, sand, fill, cure, sand, fill
* few coats of clear

And now the top.
 
FYI. For the backs, if it needs color, I don't use a waterbased dye after I've done the zpoxy. I use an airbrush paint, thinned down so it sticks to the layer I already have sprayed (hence the clearcoats). That's a transparent paint.

Here's one I made; you can see that my paint is still transparent :)
And the other one is one I made a few years back, bursting magenta to purple on flamed maple. Recipe, as given above :D
 

Attachments

  • 20220522_212617.jpg
    20220522_212617.jpg
    129.4 KB · Views: 19
  • 20220522_212639.jpg
    20220522_212639.jpg
    138.3 KB · Views: 24
  • IMG_20210306_095803.jpg
    IMG_20210306_095803.jpg
    147.4 KB · Views: 24
Thanks for the details @Orpheo! Also, love that color! How did you stain/dye/paint the top?
The 3 pickup lp or the other?

3pup guitar: first a black dye, sand. then purple dye. The wood had a rosy color so it turned out a touch more brown than I had wanted.

The 2 pup lp: dark purple first until it is almost black. Sand. Magenta. Same purple as before but a bit diluted in the airbrush for the burst. Done! :D
Thanks! What airbrush paint do you recommend?
 
I use a paint by schmincke. Transparent, can be diluted with thinner, dissolves in water and alcohol.

And I have dyed by a Dutch brand called ecoline.
 
Back
Top