Quilt maple soloist & birdseye neck build

Sadie-f

Senior Member
Messages
427
Here's the plan for this guitar:

I'm settling in on a headboard design, a couple of my ideas will be challenging, that's ok. The pickups I want are neodymium Q-Tuner HBs. Those are not available until 2022, I'm not at all sure how long the construction will take, however I'm game to put in something temporary if I finish ahead of the pickups shipping.

Wiring will be a freeway 3b3-01, completely straight forward to what I wanted, the down position selecting B, N&B, N and up side selecting same positions split to the outer coils. There's an alternate setup where the up side selects HH out of phase parallel, out of phase series and in phase series, I'll trial that in building and  maybe prefer it to the split option, tbd :).

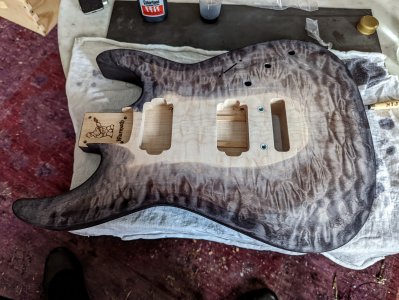
The bridge is a Gotoh 510, I kinda wish I'd gone with that on the first build, rather that the Fender American Std. Tuning machines will probably be graphtec ratios, open gear style.

I may wait until I can hear the axe fully assembled to decide on whether to install piezos in the bridge. I use these a lot in my rosewood>mahogany build, often to roll in more bass response along side the bridge HB, it's been the most satisfying combination in that guitar.

Meantime, it occurred to me I could easy enough borrow a neck and mini HB p/u from.my Fender strat and do a quick assembly to give her a spin before I dig in to finishing and assembly.

She sure sounds good at first blush! If my rosewood > mahogany W-strat has warm ringing tones, this shows off a brightness that's overwhelming! Before I start building, I'll move the pickup to the neck position and see how that feels.

I also expect the Warmoth neck to show a difference, the strat neck I bent on is super chunky, so about 50% stiffer than the 59 profile I'm using for the soloist. That means the one I'm using should resonate more, probably add some harmonics.

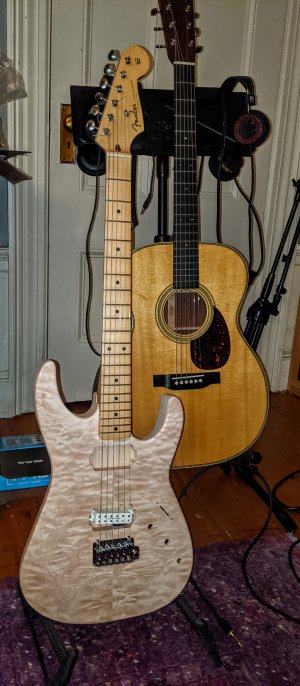
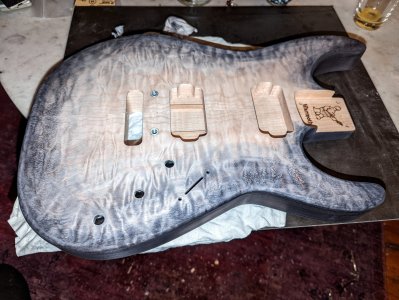
I'm really glad I took this detour on the way to the build proper. Here's the body bare, with temporary neck and a cheap set of strings bent on. Side benefit, I have the action and intonation dialed in, as well as a good setting for the trem springs.


Attachments

  • PXL_20211114_020948816.jpg
    PXL_20211114_020948816.jpg
    2 MB · Views: 121
Heh, so it took a long time to get started, here we go with the black dye for a flavor of burst. It's going to be a challenging finish, what goes on next will be a rainbow, with red -> violet progressing from the heel to upper bout. Like my W-strat, color will be rubbed in artist's pastels locked in with tung oil.

The edge is going to remain solid black, maybe there will be the smallest bleed of color where the flat edge joins the faces of the body.

I'm leaving the back dye pretty rough, because it's going to be largely covered over with pigment for a more opaque and saturated rainbow, so sweating the details is probably a waste of time.

The front needs a tiny bit more sanding, but it looks pretty close now.

I'll be mixing in the body finish work with carving the headstock, once that's done, the neck will also be getting a rainbow, violet meeting violet at the body, progressing to red at the nut.

Finally, I'm leaving open the possibility of finishing in nitro, over the tung. I don't think I can get the colors I want in dyes, where in pastels I know I can get more exactly the blends I want, and drying (polymerizing) oils are the way to work that. Otoh, I have to see if the quilt maple pops enough in tung .. probably, I was happy with my test work in figured maple. Anyway, cross that bridge when we're there.
 

Attachments

  • front-fresh-dyed.jpg
    front-fresh-dyed.jpg
    1 MB · Views: 41
  • back-sanded-back.jpg
    back-sanded-back.jpg
    1 MB · Views: 21
  • front-sanded-back.jpg
    front-sanded-back.jpg
    1.1 MB · Views: 30
  • front-dye-corrected.jpg
    front-dye-corrected.jpg
    1.1 MB · Views: 42
This project has been sitting for 5 months for a few reasons. Not the least, I've so much enjoyed playing my W-strat, then there's some others.

Pickups I want are unobtainable for foreseeable future.

Trepidation over cutting into the paddle to create the headboard design. I may ease that by doing a practice version in basswood.

Ongoing depression, finally that's passed.

So now it's started, gonna be a fun project.
 
Great, that you are getting started on the project again  :icon_thumright:

I look forward to seeing it progress.
 
stratamania said:
Great, that you are getting started on the project again  :icon_thumright:

I look forward to seeing it progress.

Thanks, this one's going to be interesting.

When I worked out this technique working color and oil over rosewood and mahogany, I quickly found that if it's touchy and easy to go wrong, I could also easily sand back the color to redo a mistake .. time consuming, but also never fatal.

Now having applied dye, I immediately see it's penetrated far deeper. That's mostly a good thing, as I work on the color layers, I have decent margins to ensure the black isn't removed.

On the other hand, once tung has been applied, there's no going back to dye unless I sand quite deep.

Now it's about getting down colors without losing the lustre of the quilt :).

p.s. I am so glad I didn't proceed with my original plan of a W carved top. When I was thinking of that, I had no idea they were using such a thin veneer, I don't think this plan would work, certainly there'd be zero margin for mistakes
 
Cool, sometimes with projects I think it is also about enjoying the journey and not just finishing...

Unintended play on words with finishing versus finalising the project  :)
 
Quilt maple is the coolest wood there is. It gives one so many possibilities for finishing, that I'd be overwhelmed on where/how to start :)

I hope you are able to channel the depression into some positive energy with this build (been there...)!!! First pics look awesome!

Also, those pickups LOOK amazing. How's the sound?
 
alexreinhold said:
Also, those pickups LOOK amazing. How's the sound?

I can't get them at all as splittable 4 wire for the foreseeable future, and I don't know how long it would take to get them as 2 wire. My fallback will be either Lollar DBs or winding my own neodymium pickups. We'll see!
 
Looking good! I gather you like super high output pickups.
 
Spud said:
Looking good! I gather you like super high output pickups.

I would not have said high output as much as good frequency response all the way up into the overtones.  I usually prefer humbucker sound to single coil, however I'm not sure that connects to this.

The tx special and JB Jr middle and bridge pickups in my strat are much higher output than the Lollars (also SC & HB respectively) in my warmoth strat In the same positions.

The tonal difference is the Fender sounds muddy while the Lollars in my W-strat are clear as a bell. I can't much hear this as  much if everything else in the signal chain isn't really well done; with my Milkman amp it's like night and day.
 
Sadie-f said:
Spud said:
Looking good! I gather you like super high output pickups.

I would not have said high output as much as good frequency response all the way up into the overtones.  I usually prefer humbucker sound to single coil, however I'm not sure that connects to this.

The tx special and JB Jr middle and bridge pickups in my strat are much higher output than the Lollars (also SC & HB respectively) in my warmoth strat In the same positions.

The tonal difference is the Fender sounds muddy while the Lollars in my W-strat are clear as a bell. I can't much hear this as  much if everything else in the signal chain isn't really well done; with my Milkman amp it's like night and day.
The Lollars I have tried have only been Imperials and Blackface single coils. To me they sort of sounded very "Hi-Fi" and balanced. However, I generally don't play pristine clean. There is always a little hair coming from my Marsh Buffalo Reverb (14 watt brownface princeton style with master) or a Quilter Mach 3 I am still getting to know. I just saw the JB jr you were using and thought the Lollar DB's were higher output than they are. What do I know!? :laughing7:
 
Spud said:
Sadie-f said:
Spud said:
Looking good! I gather you like super high output pickups.

I would not have said high output as much as good frequency response all the way up into the overtones.  I usually prefer humbucker sound to single coil, however I'm not sure that connects to this.

The tx special and JB Jr middle and bridge pickups in my strat are much higher output than the Lollars (also SC & HB respectively) in my warmoth strat In the same positions.

The tonal difference is the Fender sounds muddy while the Lollars in my W-strat are clear as a bell. I can't much hear this as  much if everything else in the signal chain isn't really well done; with my Milkman amp it's like night and day.
The Lollars I have tried have only been Imperials and Blackface single coils. To me they sort of sounded very "Hi-Fi" and balanced.

The Blackface neck pickup is the best pickup I have ever played (in my opinion).
 
Sadie-f said:
Heh, so it took a long time to get started, here we go with the black dye for a flavor of burst. It's going to be a challenging finish, what goes on next will be a rainbow, with red -> violet progressing from the heel to upper bout. Like my W-strat, color will be rubbed in artist's pastels locked in with tung oil.

The edge is going to remain solid black, maybe there will be the smallest bleed of color where the flat edge joins the faces of the body.

I'm leaving the back dye pretty rough, because it's going to be largely covered over with pigment for a more opaque and saturated rainbow, so sweating the details is probably a waste of time.

The front needs a tiny bit more sanding, but it looks pretty close now.

I'll be mixing in the body finish work with carving the headstock, once that's done, the neck will also be getting a rainbow, violet meeting violet at the body, progressing to red at the nut.

Finally, I'm leaving open the possibility of finishing in nitro, over the tung. I don't think I can get the colors I want in dyes, where in pastels I know I can get more exactly the blends I want, and drying (polymerizing) oils are the way to work that. Otoh, I have to see if the quilt maple pops enough in tung .. probably, I was happy with my test work in figured maple. Anyway, cross that bridge when we're there.

Always cool to see this started.

One note regarding the dye application for the future, you'll notice the spotty areas here:
4tiL6YU.jpg

This is caused by letting too much dye (too wet) sit on the wood and dry without wiping off the excess.
If you dye it again it should go away easily, but if it's going to be painted anyways then that may not matter at all.

To try avoiding this as much as possible I use a rag / paper towel rubbed on the body to absorb the excess and force it to dry (I use a heavy/wet dye application too so that tends to happen if I don't do that).


Generally it's good to do another pass of dye (with or without sandback) to blend the pattern and get more dye penetration.
I find the PRS-style "Glow" (stained burst basically) pattern to be more challenging to do than say a "Dragon breath" pattern so good job doing this !
 
DrSeb said:
Sadie-f said:
Heh, so it took a long time to get started, here we go with the black dye for a flavor of burst. It's going to be a challenging finish, what goes on next will be a rainbow, with red -> violet progressing from the heel to upper bout. Like my W-strat, color will be rubbed in artist's pastels locked in with tung oil.

The edge is going to remain solid black, maybe there will be the smallest bleed of color where the flat edge joins the faces of the body.

I'm leaving the back dye pretty rough, because it's going to be largely covered over with pigment for a more opaque and saturated rainbow, so sweating the details is probably a waste of time.

The front needs a tiny bit more sanding, but it looks pretty close now.

I'll be mixing in the body finish work with carving the headstock, once that's done, the neck will also be getting a rainbow, violet meeting violet at the body, progressing to red at the nut.

Finally, I'm leaving open the possibility of finishing in nitro, over the tung. I don't think I can get the colors I want in dyes, where in pastels I know I can get more exactly the blends I want, and drying (polymerizing) oils are the way to work that. Otoh, I have to see if the quilt maple pops enough in tung .. probably, I was happy with my test work in figured maple. Anyway, cross that bridge when we're there.

Always cool to see this started.

One note regarding the dye application for the future, you'll notice the spotty areas here:
IMG
This is caused by letting too much dye (too wet) sit on the wood and dry without wiping off the excess.
If you dye it again it should go away easily, but if it's going to be painted anyways then that may not matter at all.

To try avoiding this as much as possible I use a rag / paper towel rubbed on the body to absorb the excess and force it to dry (I use a heavy/wet dye application too so that tends to happen if I don't do that).

Generally it's good to do another pass of dye (with or without sandback) to blend the pattern and get more dye penetration.
I find the PRS-style "Glow" (stained burst basically) pattern to be more challenging to do than say a "Dragon breath" pattern so good job doing this !

@Seb, cool, I was hoping for just this sort of feedback, and what you describe is indeed what I did, this was my apparently not too swift understanding of how to apply dye.

What must have caused this would have been repeated washes with a low-pigment mix to attempt smoothing out application.

I may attempt corrective action, however by good fortune, those areas will be receiving respectively red and blue / indigo which are pretty dense and also, my plan is for those colors to be maxed out near the edges, where the problem is the worst.

So it may not matter, and on the other hand, I can work to replicate it in some test figured maple I have handy and work on it with the specific pastel / pigments I'm adding, to see how visible this flaw may be in the finished production.

Thanks for the catch here!
 
Sadie-f said:
DrSeb said:
Sadie-f said:
Heh, so it took a long time to get started, here we go with the black dye for a flavor of burst. It's going to be a challenging finish, what goes on next will be a rainbow, with red -> violet progressing from the heel to upper bout. Like my W-strat, color will be rubbed in artist's pastels locked in with tung oil.

The edge is going to remain solid black, maybe there will be the smallest bleed of color where the flat edge joins the faces of the body.

I'm leaving the back dye pretty rough, because it's going to be largely covered over with pigment for a more opaque and saturated rainbow, so sweating the details is probably a waste of time.

The front needs a tiny bit more sanding, but it looks pretty close now.

I'll be mixing in the body finish work with carving the headstock, once that's done, the neck will also be getting a rainbow, violet meeting violet at the body, progressing to red at the nut.

Finally, I'm leaving open the possibility of finishing in nitro, over the tung. I don't think I can get the colors I want in dyes, where in pastels I know I can get more exactly the blends I want, and drying (polymerizing) oils are the way to work that. Otoh, I have to see if the quilt maple pops enough in tung .. probably, I was happy with my test work in figured maple. Anyway, cross that bridge when we're there.

Always cool to see this started.

One note regarding the dye application for the future, you'll notice the spotty areas here:
IMG
This is caused by letting too much dye (too wet) sit on the wood and dry without wiping off the excess.
If you dye it again it should go away easily, but if it's going to be painted anyways then that may not matter at all.

To try avoiding this as much as possible I use a rag / paper towel rubbed on the body to absorb the excess and force it to dry (I use a heavy/wet dye application too so that tends to happen if I don't do that).

Generally it's good to do another pass of dye (with or without sandback) to blend the pattern and get more dye penetration.
I find the PRS-style "Glow" (stained burst basically) pattern to be more challenging to do than say a "Dragon breath" pattern so good job doing this !

@Seb, cool, I was hoping for just this sort of feedback, and what you describe is indeed what I did, this was my apparently not too swift understanding of how to apply dye.

What must have caused this would have been repeated washes with a low-pigment mix to attempt smoothing out application.

I may attempt corrective action, however by good fortune, those areas will be receiving respectively red and blue / indigo which are pretty dense and also, my plan is for those colors to be maxed out near the edges, where the problem is the worst.

So it may not matter, and on the other hand, I can work to replicate it in some test figured maple I have handy and work on it with the specific pastel / pigments I'm adding, to see how visible this flaw may be in the finished production.

Thanks for the catch here!

It's always hard and scary to decide whether to do another pass, or a 3rd, ...
Whenever I stained a top I always found myself tweaking things over and over again, and having a hard time let it go and knowing when to stop before you do more harm than good.

If you do decide to do another pass you will have a good short at fixing those and making the 'glow' effect smoother.
 
Thanks @drseb, your maple work has been inspirational, hence I take your feedback gratefully! I'll give this a go tonight.
 
Sadie-f said:
Thanks @drseb, your maple work has been inspirational, hence I take your feedback gratefully! I'll give this a go tonight.

The good thing is that since it's using all black dyes there is no danger of over mixing colors from multiple overlaps and ending up with muddy/non-vibrant colors.

The only danger here is to avoid putting dye at the center of the body if you want to leave it natural. It's easy to darken wood with dye, but next to impossible to lighten it up without having to sand too much.
 
Thanks again @drseb for tips! While still not perfect, I felt I made improvement and definitely got ride of 90% of that bad patterning!

Here's the dye done and a first pass on the back with pastel before the first layer of tung oil. I know the front will be a lot harder to get right, so starting @ back. Bursting a rainbow in pastels is probably going to be hairy, will see!


Attachments

  • 16495365362420~2.jpg
    16495365362420~2.jpg
    760.1 KB · Views: 32
  • 16495365966711.jpg
    16495365966711.jpg
    919.5 KB · Views: 38
First layer of tung oil laid on (diluted 1:2 with isopropanol to make it sprayable).

My objective with this first layer is to sink as much pigment into the grain as possible. If I wipe on at this step, the pigment will mostly be moved around on the surface (the light blue at the waist is the most trouble with this, and it's also a spectacular color).

So removal of excess oil will be by blotting, not rubbing, again, not wanting to minimize pigment movement.

... As always, the wood absorbed more than I expected, I've sprayed on a bit more.


Attachments

  • 16496001360050.jpg
    16496001360050.jpg
    1.3 MB · Views: 45
Back
Top