Leaderboard

Paint Front of Headstock Black

I did a couple quick and dirty samples. 3 heavy coats sprayed before everything was fully set on wood that wasn't sealed but they told me what I wanted to know. I also took a black scrap of leather and sealed it with both satin and gloss There were interesting results on that but certainly workable. It looks, at least for now, satin with a leather pickguard. A leather pickguard is not something I would have ever thought I'd want. I won't be able to do anything on it for a few weeks so I'll let that decision mellow to see if is what I really want to do.
 
I've thought about it and stick to my decision. The neck will get a black finish on the headstock face and satin clear over the whole thing, including the black. I did a search to see how to best finish a maple neck with a rosewood fretboard but couldn't find anything.

When I tape off the fretboard for the clear coat, do I tape just the face and spray the sides or the whole thing down to where it meets the  maple? If the whole thing, how do you get the finish on without a tape line you can feel where the finish stops? This can't be rocket science but I don't want to have to do it a second time.

Thanks for any input on this.
 
Just tape off the face of the headstock, after the finish is, err, finished including any buffing you do then remove the tape.

Then take some fine abrasive paper and feather the edge of the fingerboard side and fret side face. Then do any fretwork and then use something to clean up and condition the board.
 
stratamania said:
Just tape off the face of the headstock, after the finish is, err, finished including any buffing you do then remove the tape.

Then take some fine abrasive paper and feather the edge of the fingerboard side and fret side face. Then do any fretwork and then use something to clean up and condition the board.
Thanks for the explanation. That will be the way I approach it.
 
You know, this is all fairly simple stuff but if you haven't done it before, it's not as easy. Yeah, I built an electric mandolin with a rosewood fretboard on a maple neck from scratch years ago but don't remember the details of how I finished it. I probably just sprayed the whole thing with clear Varathane and called it good. When you're young, a little bit of ignorance goes a long way. :icon_biggrin:
 
Thats the great thing about forums such as this, you can get answers quickly and usually useful to what you want to know.

 
OK, then. I have the neck holes filled and sanded flat. I've also marked where the pilot holes go and will drill them prior to finishing unless there's a reason to wait until after. I know to use beeswax on the threads when I first run the screws in.

Now, a couple of questions about the holes themselves:

What size pilot hole is best?

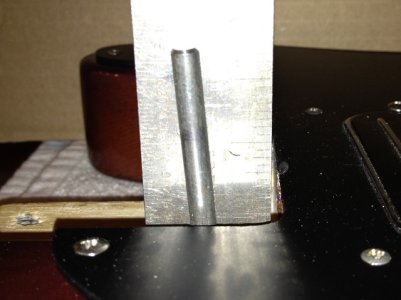
The holes that go through the body measure 4° off vertical. Should I drill the pilot holes at the the same angle or will the screws flex enough to go in without a problem if I drill them straight? Fortunately, all four holes are at the same angle so whatever I do, all four will be the same. Here's a photo with a machinist's scale stood behind an alignment pin to show what I'm talking about.
 

Attachments

  • IMG_0811 - Copy.JPG
    IMG_0811 - Copy.JPG
    81.8 KB · Views: 390
Here's a chart for drill sizes to match wood screw sizes.

The typical neck screw is a #8, so you'd want a 1/8" bit for hardwood, which is gonna be what you're drilling into.

I'm not sure why those body holes are angled. Pretty unusual. Even on bevelled/contoured/lowered neck pockets, they always go in perpendicular. Might want to double check that - an angled screw is liable to pull the neck out of alignment.

edit: fixed link
 
Thanks for the reply, KG. The link didn't work right but I was able to find everything I needed from where it took me. Actually, I found a screw size chart and a pilot hole chart. I measured the major thread diameter of one of the screws. It was ±.200 so according to the size chart they're #11 screws. The pilot hole chart shows 9/64" for #10 and 5/32" for #12. That would mean 19/128" or, for practical purposes, 5/32". They are huge. I guess the manufacturer didn't want that neck going anywhere.

I double checked all the holes in the body and yes, all four of them are angled the same. At least they would tend to pull toward the heel into the pocket. It worked fine with the original neck so I'd expect them to also work with the replacement. I wonder if someone had the idea that they would make the neck nice and tight into the pocket.

I ran the screws into the original neck and they are all off a little but only one was in there at that much of an angle. Three of them were angled off perhaps half that much. I have a set of new Fender screws and they measure as #8's like you mentioned. I might just go get a Fender neck plate and use Fender screws through those angled holes. That would allow the screws to go in at a more reasonable angle, possibly even straight. The hole pattern on the original plate is the same as a Fender plate, just larger holes in it.

 
I re-drilled and plugged the holes with the 5/16" hard maple dowel I got, thanks to you, KG. One shot with a well-placed 5/16" drill took out all the softer dowels and the previous holes. After the glue dries I can sand them flat and start over.

Since all the holes in the body are done at a 4° angle, I'm still thinking about just running a drill down through the body to straighten them out. The verdict is out on that yet. Since it's funky to begin with, I can't screw it up too much more than it already is. This is a testament to how much things can be off and still work. Worst case scenario, Warmoth is just a phone call away. :icon_biggrin:
 
Angled holes might not be the end of the world, but I wouldn't trust them. If you're using wood screws, there's some forgiveness because they'll screw a snake if you'll hold its tail. They'll go anywhere without concern, is what I'm saying. They just dig in. Take apart many Fender necks, and you'll be surprised at how sloppy they are. Might even see extra holes for no apparent reason, but I suspect it's because they're just driving those screws in with a 3/4 HP driver and calling it good. If not, try again. Never mind if it is good - theoretically, nobody's ever going to see it.

My concern would be that they'll pull funny. I know when I do threaded inserts in neck heels, I go to a great deal of trouble to make sure they're exactly perpendicular to the neck and body, both. Otherwise, they'll cross-thread and you're stuck inventing a new batch of cuss words to go along with the ones you already know to express your anger and consternation.

If I used wood screws to hold the neck on, I'd want those to pull perpendicular as well. You want the neck joint to be tight as possible and angular fasteners just aren't going to get you there. Same as with shims. Neck joint just isn't tight enough. So, use a drill press to make straight holes, and don't use shims.
 
Cagey said:
If I used wood screws to hold the neck on, I'd want those to pull perpendicular as well. You want the neck joint to be tight as possible and angular fasteners just aren't going to get you there. Same as with shims. Neck joint just isn't tight enough. So, use a drill press to make straight holes, and don't use shims.
Yeah, that definitely sounds right. At this point the holes in the neck aren't drilled yet so it's an easy thing to do. Then when I mount the neck, it will be as good as it can be. The reason it worked before was probably the fact that they used #11 screws to hold the neck on. The larger screws probably overcame any weakness in the alignment. This sounds like a good time to switch to a standard Fender neck plate and screws. I thought about using the Fender screws with the old plate but the holes in it are too big and I wouldn't trust them to not pull thorough. A couple bucks on ebay will get a plate on the way. Thanks for the help.

A few minutes later: I have a plate on the way. I just scrolled down and took the first blank one that was from a US seller. It might still be made in China or Korea but it won't take a month to get here and I'm supporting an American business.
 
Typical neck screws (for a non-contoured body) are 1 3/4" long oval head #8 wood screws. The bit you need is 1/8". If you have a contoured neck pocket on the body, two of the holes will be the same screw, but at 1 1/2" long rather than 1 3/4".
 
The neck pocket is not contoured so they should all be the same length. The original screws are 1 13/16". I'll check how thick the guitar body is before I put it together.
 
Back
Top