Leaderboard

Newbie's first Warmoth arrived last night, Hardtail Strat

  • Thread starter Thread starter PK
  • Start date Start date

PK

Newbie
Messages
9
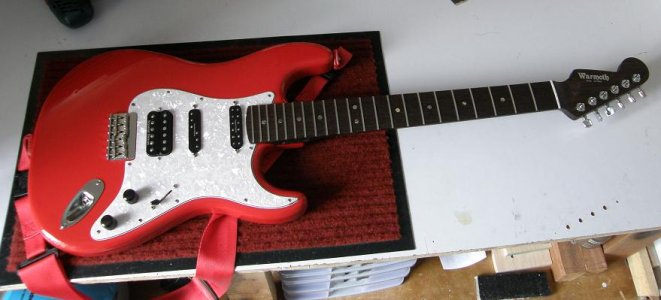
Hi people!  I've been lurking around here off and on a couple of years, and I finally decided to take the plunge during the recent big sale.  I'll be taking the pieces of the puzzle to a luthier, so my only part in this build is the specs and color combo.  I'm getting exaclty what i think I want ( I hope). Specs: Alder body drilled for Vintage Hardtail bridge, Vintage Modern neck, satin finish, 6105 frets, white corian nut. I'll also be getting a loaded PG from Callaham with the H/SRV Fralin set, and when she's done I'll post more pics. To say I'm excited is an understatement :)  I've always loved the look/feel/vibe/tone of a strat, but all I've owned (3 or 4 I think) have ended in a whammy bar hatefest. I've never played a hardtail, so hopefully I get enough of the strat classic tones while staying in tune for a change :).

warmothbox.jpg


warmothpieces.jpg


warmoth.jpg


PK
 
You're going to love a hardtail Strat if that's your past experience.

Welcome to the board!  :occasion14:
 
It's the bright red finish, which is sorta between Dakota & Fiesta red.  Here's a stock photo from Warmoth showing the white PG look:

warmothstrat.jpg


I'm resisting the temptation to start screwing things together.  I'm good for a string change and intonation, that's about it when it comes to setup ability. It must be very satisfying for those of you that do the build yourself. 

PK
 
Hardtails rule... :headbang1:
Best of luck on your first build and welcome to the forum.
:rock-on:
 
Well, if you want to have a small part in the build there are a few things you can do to be more involved yet not get too technical.

1. Put the pickups on the pickguard.....make sure the wires are coming out in the direction of the back end of the scratch plate.

2. Put the switch on.

3. Put your volume and tone pots on and adjust the height of them.

4. Put the tuning keys in their respective holes......save the drilling for the tech.

5. Put the jack onto the jack plate.

6. Screw the bridge onto the body......although there may be a ground wire that will needs to be soldered on there, but still, you can unscrew it at that time.

I think that's about all for now. Once you get those things done all your tech needs to do is solder the wires and drill some holes. I would suggest, if you can, staying with your guy while he's doing the soldering and maybe getting some tips from him so when you get your next build you can be more involved. It really is more satisfying holding something that you did yourself.
MULLY
I also recommend practicing on a beater guitar while waiting for that next build :headbang1:
 
+1 on witnessing/helping with the construction process - nothing like the bond of a geetar you work on, yourself 
niceaxe.gif
 
Totally agree with the previous two posts - if I can assemble a guitar, anyone can do it.  And it's toally worth the effort. 
 
Thanks for the replies.  Maybe a free beer or 6  :occasion14: will help be my ticket to hang around his shop while he works  :sign13:  The neck slips into the pocket sooo tight and perfect, the saddle lines up well with the drilled holes, Warmoth installed the nut, Callham will do the heavy lifting on the electronics, & I do have a good drill and small bits for those tuner holes  :icon_scratch:  I think the next one will be all mine  :binkybaby:  Thanks again,

PK
 
I ordered my loaded PG today! :)  Callaham has a preloaded Fralin H/SRV PG & I'm having having them do the blender pot thing. I've never played with a blender pot, but since I never touch my tone knob much anyway it might be nice to have tonal options built in.  With any luck I'll have her fully assembled within about 3 weeks.  :guitaristgif:

PK
 
I have a bright red hardtail, and its one of my favorite guitars. Welcome to the Warmoth club.

What's your next one going to be?

I'd second watching your tech, though he might not care for someone over his shoulder, training them to live without him!

But thinking about that gave me an idea/recommendation for the forum members. Has anyone done a Warmoth assembly video? 90% of stuff, short of nut height adjustment, is pretty straightforward, but for people who've never done it, it is understandably intimidating. Pictures are helpful, but videos would be even better.

I don't have a video camera, but for someone who does, think of it as a humanitarian gesture, and best of all an excuse to buy another Warmoth!!!
 

Attachments

  • R5.JPG
    R5.JPG
    60.8 KB · Views: 378
whitebison66 said:
Has anyone done a Warmoth assembly video? 90% of stuff, short of nut height adjustment, is pretty straightforward, but for people who've never done it, it is understandably intimidating. Pictures are helpful, but videos would be even better.

+100 to the video.  :headbang1:
I had several years of woodworking and electronics in school and I am still intimidated by some aspects of guitar building.
A video would be great...
 
Back
Top