Leaderboard

New Build - Carved Top Soloist Super-Blues-Strat

Nice work! That's the way to do it. Mil-Spec wiring for the WIN :-)
Heh - next time, I’ll lay in a stash of -999 connectors and really hit the MIL-SPEC button hard! (but…it would definitely be a weird but cool look to attach the guitar to the amp with a triple-niner connector screwing onto the guitar!)
 
Good write up, but it may also be worth posting the part numbers / specs of the DuPont connectors.
I didn’t research these connectors by part number and spec; I did some online searching about what kind of connectors EMG uses and eventually got to the phrases “DuPont connectors” and “Molex connectors”. It turns out there is some overlap between the two, but if you’re trying to create connectors that will work in an EMG solderless environment, or could be used for your own solderless interconnections, and work with the same wire gauges that EMG uses in their solderless system, you want DuPont 0.1 inch pitch connectors, and they’re easy to find without needing detailed part numbers and specs.

That said, this site has more information than you probably want about these things:

These things are used all over the place in Arduino and other home brew electronics stuff. You can find dozens if not hundreds of kits on Amazon that have hardware that appears indistinguishable from what EMG uses. Here’s an example of a representative kit from Amazon:


Many kits come with a generic crimping tool that works well enough, but if I were doing much more than the handful of interconnect cables I’m doing, I would try to find a better crimping tool; that said, really good crimping tools for these can apparently cost into the hundreds of dollars. The cheap one my kit included does tolerably well for the cost.

And as I said earlier, you can find plenty of informative videos on how to best crimp these things; here’s an example:

Immobilization of the connector in the crimping tool, prior to feeding in the wire, is the key step.
 
Last edited:
Next steps this weekend: verify continuity of the interconnect cables I built, solder the free ends of the connector wires to the appropriate pot lugs or grounds, then put the new pots in, connect them to the existing EMG interconnects, and test it out!
 
@mycroftxxx thanks for posting the additional information. The reason I was asking was not because I need it, but rather as a resource for others who may need it.
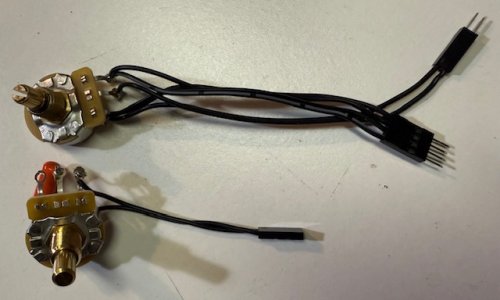
 
Here’s a picture of the new volume (top) and tone pots with the DuPont connectors attached:

IMG_1679.jpeg
Got it all hooked up and playing, after the inevitable one connector plugged in backwards causing a short to ground; took me about 15 minutes to run that down and fix it.

Lessons learned:
  • Always get cable that is black and white (or black and red, or black and something distinctive), no matter how hard you have to look. I wanted black and white for this job because it would match EMG’s cable, and EMG uses red for the active control’s +9V. Admittedly, I only searched on Amazon because I didn’t want to pay exorbitant shipping costs from someone else, but still, I was not able to find black and white 24 AWG stranded cable, so I settled for black and black-with-dot-matrix-looking-dull-white appliqué. There were multiple situations where I nearly had a polarity screwup, and one where I did (per above).
  • That said, the 24AWG silicone-clad cable was very easy to work with and didn’t melt if the soldering iron got too close.
  • And, as always, a good soldering iron is worth its weight in gold. The Hakko 888 that I bought a few years ago is just marvelous.
  • Plan out your cabling and identify all connectors and how long the wires have to be, then build your cables in one batch - you’ll be far more productive. Crimping the connectors isn’t hard but there is a learning curve and you can take maximum advantage of it by doing them all at once. And don’t hesitate to throw away any subpar crimps; it will save you aggravation in the long run.
  • The DuPont connectors work well but I wish the diameter of the male connectors were slightly larger; I ended up taping the connectors together to make sure they won’t work loose over time. Next time, I’ll see if there are slightly oversized connectors. EMG has those circuit cards that use a slightly larger prong; it would be perfect if they made that size in the DuPont connector.
So…how does it sound? Well…the tone control with the 0.015uF capacitor does just what I was looking for. The Mojotone volume pot…it’s better than the EMG pot, but still more abrupt than I really want. I now suspect that I’ll need a reverse audio taper pot to get to the end state I’m looking for, but I do have the active clean boost I can play with as well. I’m willing to call it great, and if I find that reverse audio taper pot, then that will get it to perfect :cool:
 
I’m curious about your search for volume control pots. Have you tried using a linear taper volume pot, and how did it wok for you?
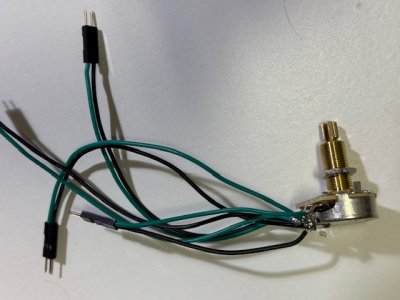
I haven’t tried a linear taper pot although I may try one at some point. I also want to try a reverse log taper, which would basically be a left-hand normal taper but swapping the hot and ground lugs. I’ve also kicked around taking an EMG left hand volume pot and rewiring which lug goes to which side; the advantage there is that I wouldn’t have to build connectors for it. But since I know how to build the connectors now, a high quality CTS reverse audio taper aka a left hand volume pot is probably the next step. Not for a while though!
 
IMG_1680.jpeg
A CTS 500k audio taper left handed pot, with the wiring I need attached, and long shaft to boot; with the rear rout, I’m tired of having to leave off the lock washer to get enough bite on the shaft nut so the long shaft is the way to go (a customer service person from Warmoth told me short shafts would be fine with this rear route carved top, but I like this one better). Found a place called Nacho Music in Redlands, CA that had done a special order with CTS on these pots, and by wiring the output from the 5-way to the rightmost lug (looking down the shaft with the lugs at the bottom), and using these as RH pots, I get the reverse audio taper I was looking for, so with the knob at full clockwise, I can make fine CCW adjustments to the volume without having a volume cliff where it suddenly falls to almost nothing. Very happy with these results!
 
Back
Top