ThisIsHuhWow404
Junior Member
- Messages
- 141
It begins.


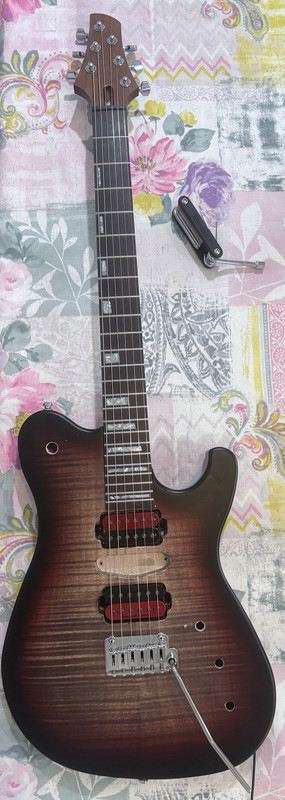
Awesome ! Love the finish on that, and the trem choice.It begins.
We accept You, We accept You……One of us, one of us, one of us!
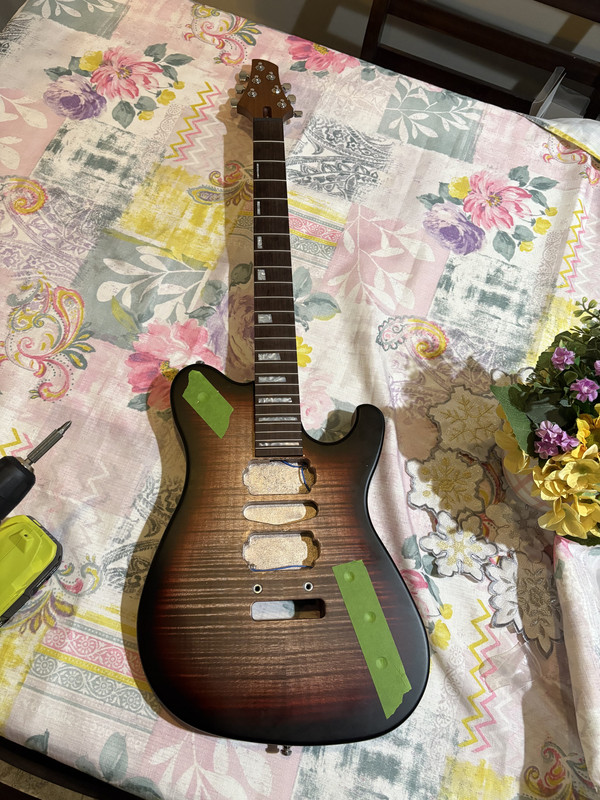
Mounting the middle pickup directly to the wood wasn’t working the way I wanted it to. Decided on using threaded inserts for it. Waiting on them to arrive.
The Free Way Switch didn’t have a schematic for exactly what I wanted. I ordered a custom diagram from GuitarElectronics.com. They explained I can’t have two different tones, only a master tone, but can use the third knob as a high pass filter. Waiting on that schematic.
Given how the routs work, I’m going to need to remove the Sentient when it comes time to actually wire everything.
The drill slipped and created a little ding by where the volume knob is. Hopefully I can buff that out.
For now I’m just giving it a rough setup. I understand why it would, but is the truss rod supposed to be as loose as possible when the neck arrives? I’ve probably given it a full two turns and the neck relief still seems kind of high.
") Then I will dress the fret ends and roll the fretboard, and do the fret polishing while everything is straight. Then obviously adjust relief after assembled.
Then I will dress the fret ends and roll the fretboard, and do the fret polishing while everything is straight. Then obviously adjust relief after assembled.I ordered a custom diagram from GuitarElectronics.com. They explained I can’t have two different tones, only a master tone,
Love the look, reminds me of the Gibson Voodoo series but with a beautiful flame top.Mounting the middle pickup directly to the wood wasn’t working the way I wanted it to. Decided on using threaded inserts for it. Waiting on them to arrive.
The Free Way Switch didn’t have a schematic for exactly what I wanted. I ordered a custom diagram from GuitarElectronics.com. They explained I can’t have two different tones, only a master tone, but can use the third knob as a high pass filter. Waiting on that schematic.
Given how the routs work, I’m going to need to remove the Sentient when it comes time to actually wire everything.
The drill slipped and created a little ding by where the volume knob is. Hopefully I can buff that out.
For now I’m just giving it a rough setup. I understand why it would, but is the truss rod supposed to be as loose as possible when the neck arrives? I’ve probably given it a full two turns and the neck relief still seems kind of high.
Basically the same pickup options as the Guthrie Govan Charvel, except with an extra option to have bridge and neck Humbuckers together, with one tone knob for Neck and the other for Middle+Bridge, and a master volume.You have paid for a diagram, but what you explain to have been told doesn't make sense. It is perfectly possible to have two different tones.
What wiring are you trying to achieve?
Basically the same pickup options as the Guthrie Govan Charvel, except with an extra option to have bridge and neck Humbuckers together, with one tone knob for Neck and the other for Middle+Bridge, and a master volume.
They wound up sending me two diagrams, one where there’s a bass cut and treble cut, and another where both tone knobs work normally but control different pickups depending on which position the switch is in.
I’m leaning towards the bass and treble cut version.
Free Way Switch bottom row:Please describe the wiring you are actually trying to achieve.
Free Way Switch bottom row:
Neck (Humbucker)
Neck (Humbucker) + Bridge (Humbucker)
Bridge (Humbucker)
Top Row:
Neck (Split to Outer Coil) + Middle
Neck (Split to Outer Coil) + Bridge (Split to Outer Coil)
Middle + Bridge (Split to Inner Coil)
3x3-05Which Freeway switch will you be using?
Please be specific. If it is a toggle switch, they do not have upper and bottom rows, but rather have six positions in two banks of three.
Earlier you mention the same as Guthrie Govan, but if you are using a toggle switch it works differently than a Super Switch in the Govan model.
")
