Mahogany body: stain or dye?

Steve_Karl

Hero Member
Messages
1,676
Greetings,

First let me say I'm a total novice when it comes to finishing. The only 2 finishes I've ever done were: 1) a brush on clear, on a ' 62 p-bass ( yea, I'll bend over and you can kick me ) and my current Warmoth neck using Master Gel.

The master jell is really nice and much better than the water based finish that was on the neck originally. It feels raw yet smooth and is very very easy to keep clean, unlike the body, which is still the old water based and is always either sticky, smudged or just plain nasty, and is very hard to clean.

So ... I'm ready to order parts for a new strat and it will be a mahogany body and I would like it to look similar, in color, to this one:
strat_2_c_290.jpg

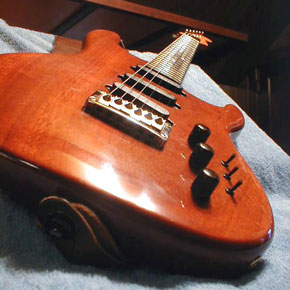
Not so much the shine, I can live without that, and I'm going to use master gel again, but the color.
I'm guessing that it was dyed before the water based finish was applied.
Can someone recommend something easy to apply that will give this gentle orange brown look, still showing all the grain, and work well with master gel?

Also, is there any prep. necessary before dye or stain or the new, unfinished mahogany body?
And I'd like to avoid, if possible, products that are difficult to clean up after.

Eventually, I'll also be stripping the body on the one in the pic, ( all it takes is some windex and light steel wool and paper towels ) and will be then using master gel, so it would be good to get a dye or stain that is close to the original in case I have to touch up some areas after removing the old finish.

An other thing I'd appreciate some advice on is how aggressive to be in the removal of the old finish. Can I get away with just getting it all to look consistent and flat, and feel smooth?

With the neck, I just steel wooled it down to where it felt good and no longer tacky, but it's a maple and had no stain or dye under or mixed with the original finish. I'm happy with how it turned out.

Thank you!
 
That might be natural mahogany with no stain or colorant or it might be lightly stained/toned.  Unfortunately the only reliable way to color match something like that is with test scraps.

A simple option for warming up mahogany is some amber shellac. (although my personal favorite is garnet shellac, but this is typically not available premixed so it is a more onerous option.)  Amber can be bought premixed in a can.  You can brush it on easily, it dries fast, and it is also an effective way to seal the wood prior to any grain filling.  Shellac is also compatible with most any top coat.  It is very safe, and easy to clean up (you do need ammonia.)

Refinishing is often more complex and problematic, so I need to ask what is your reason/goal for refinishing the guitar in the pic? 

Yes there is a possibility the wood is stained (it is also possible that any coloration present is actually a clear coating of toner) either way if you cut through the color and reveal bare wood it is highly unlikely you will ever match the repair unless you have access to exactly whatever was origianlly used.  Finish repair/matching is a highly skilled art and is an order of magnitude more difficult than basic finishing or refinishing.

Generally when doing a refin it is best to plan on stripping down completely and starting over from bare wood.
 
The reason for refinishing ( and it will be the whole body ... not a repair of sections ) is that the current finish is just bad ... as in often sticky to the touch ... easily smudged and very hard to clean to a consistent look. I think that will all be cured by getting the bad stuff off of there and re doing with master gel. The neck is really nice now that I did it with master gel.

The neck pocket area which is unfinished in the one in the pic is obviously lighter in color than the finished area.

Also, there is a small ding near the rear straplock that is almost down to raw wood which is somewhat lighter.

I just went at that dinged area with a small pen knife while watching with a magnifier and I can see the layers now.
The top coat is clear and brakes up into little clear flakes when I scrape, almost like crystals, and under that is a light orange layer that comes off as a fine dust when I scrape, and then the obvious raw wood.
I suspect, Ideally, what I want to do is get the top coat off and not the color, so I'll just have to be careful.
If I find that I'm taking off color also then I'll just work until it looks consistent.
Windex / water 50% / 50% and steel wool is what I used to get the neck clean and it was pretty easy, so I'll try that with the body unless you tell me it's a bad idea. Comments and direction are appreciated.


On the new guitar:
Amber shellac sounds good.
Can you give me a simple over view of "grain filling"?
And then the master gel or tung oil goes on after that?

For simplicity's sake would it be ok to just use master gel alone? Will that seal it and make it "safe" ... so to speak?

Edit: Seeing JerryJg's re: the tung oil looks like a better choice than master gel.

Thank you!

 
If you want to learn from the guys who know, then heed the advice of the two repvious guys. If you just want to make it look cool and never want to get much into finishing, then I can say without a doubt that Tung  Oil Finish, Like Cabots , which is the one I used for my Mahogany Strat, or like frombys..and I mean the stuff you wipe on, then leave on for about 10 minutes , then wipe off before it gets tacky, is definityl the wat to go.
The wood will trun a sweet ass pumpkin colour of its own accord. You do not need a stain.
Now, If you want a smooth finish ( I chose to just feel the grain) then youll want to wet sand the Tung OIl and this will fill the grain after 3-4 coats..then another couple of thin coats t just with steel wool in betwixt.
 
Thanks Jerryjg!

I found the Cabots Tung Oil and bookmarked it as a potential.

I've been doing some more reading this morning.
One interesting idea / product I've come across is called micromesh.
http://www.stewmac.com/shop/Finishing_supplies/Abrasives,_polishes,_buffers/Micro-Mesh_Finishing_Abrasives_Kit.html

An other thing I read is that the initial preparation of the wood can make a big difference in the final result.
Sanding to 600 grit was one recommendation I saw. Can anyone comment on this first step? Is there any reason or benefit to sand to a finer grit and what would you recommend I use as a product?

Thank you!
 
Initial prep sets the stage for everything that follows. 

Bare wood should be sanded smooth to the touch (trust your finger tips as much as your eyes) up to about 220, maybe 320 grit.  Ideally you should 'wet' the wood (typically with mineral spirits or denatured alcohol) for final inspection prior to proceding.  Wetting the wood helps identify any hidden scratches of roughness/surface irregularities that might be noticeable or cause problems later.

In general there is little benefit sanding with any higher grits at this point.  Using 400 grit or higher on bare wood is more like polishing and can actually cause problems; highly polished woods tend to resist staining and you can even have adhesion problems with top coats.

Subsequent steps will better determine yout final appearance.

Open grained/pored woods (e.g. mahogany) need some sort of grain filling in order to acheive a smooth/glass type surface texture.

This can be accomplished using either

a dedicated grain filler prior to top coating (these are available clear or colored), or

by multiple application and 'knocking back' of a surface finish that 'builds' (e.g. Tru-oil or other varnishes - but not something like pure tung oil, which does not build) until the finish has built up in the pores to the point where it is level with the surface of the wood.  On something like walnut or mahogany this is perfectly appropriate, but is darn time consuming.  Also, over time some finishes will tend to shrink, and you may find what was once a glass smooth surface now has the texture of those pores.

Dedicated grain fillers are designed to not shrink appreciably over time.

Procedures for grain filling vary slightly depending on the exact products used (so be sure to read and follow their directions) and the desired outcome, but in a typical finishing schedule will have these major steps.

1.  Prep the wood (including surface sanding)
2.  Apply direct colorant (i.e. staining) if any.
3.  Seal the wood (e.e. sanding sealer or shellac)

4.  Apply the filler, often by hand manually working the stuff into the pores.  Allow it to set briefly, then squeegie or scrape off the gross excess.  Allow the remainder to haze, then buff off the fine excess surface film.  Allow this to dry completely, then lightly fine sand (400 - 600 grit) to a physically smooth surface being careful to not sand through the sealer or stain. 

Often you will need to repeat this process once or twice more.  Do not rush this job - the smoother your grain filled surface is, the thinner you can apply your topcoats while still acheiving a glass smooth appearance.  Time spent getting this step right will save you significantly more time later that would be spent dealing with the consequences of incomplete grain filling.

Note:  Here is a side benefit of just using amber shellac as your only colorant/seal coat.  If, in the process of smooth sanding the grain filled surface you accidentally cut through the shellac to reveal bare/uncolored wood, you can just apply some more shellac over the bare area, allow it to dry, then lightly feather sand the area to even out any color variation (used in this manner shellac is like any colored toner - the exact depth of color corresponds directly to the dried film's thickness - sand the film to an even thickness and you'll get a fairly even coloration.)

5.  Sealing filler if necessary, and toner (transparent color coats - usually need to be sprayed on, e,g, bursts) or paint if an opaque finish.

6.  Top coating and final sanding/polishing.  This is where micro mesh type products are typically used.
 
An afterthought.

If you are just going to use a grain filler and shellac for coloration you can flip the order slightly, applying filler first, then a seal coat of shellac for the coloration.  With a couple caveats.

If you use a colored grain filler on bare (unsealed) wood the coloration can get into the wood.  Especially of you use an oil based filler, at that point the filler will also be acting like a stain (not necessarily bad, but bad if you don't want the wood stained dark.)

If you use a clear filler this will not be an issue, but your pores will also be transparent.  Again, not necessrily bad, but it is a rather atypical look (most pored woods you see, eg, ash, walnut, mahogany, tend to have the pores filled with a darker substance, highlighting their appearance.)

But by applying grain filler first you can be as aggressive as you want when smooth sanding the surface (and repeat the process ad nauseum if desired) without making a mess of the shellac coloration.  Then, once you have acheived a smooth surface texture, apply the shellac cleanly to acheive a nice coloration.  Then procede with top coating.
 
Keyser ... Thank you!

I'll need to let this sink in a bit and while that's happening will be looking through this sub forum for relevant info.
You've opened my eyes to many possibilities and information that I never knew of.

Much appreciated!

Steve

Next Morning: - I had a real good look at my current mahogany strat body and wanted to confirm with you ( see the pics ) that the dark dots and sometimes longer lines are the pores that we're sometimes talking about. It looks like these were filled with something darker than the natural wood color? Would that be your evaluation also? And the idea of "grain filling" ... see the 3rd pic.

http://sightsea.com/renders/finish/pores_2.jpg - - - smallest pores?

http://sightsea.com/renders/finish/pores_1.jpg - - - small grain or elongated or grouped pores?

http://sightsea.com/renders/finish/grain_1.jpg - The dark strip going through the low A's ferrule . . . that darkness is accomplished by grain filling?

Thank you,


Steve
 
Back
Top