

You are using an out of date browser. It may not display this or other websites correctly.
You should upgrade or use an alternative browser.
You should upgrade or use an alternative browser.
Lacquer + Preval Question (Refinishing the Purple SSB)
- Thread starter davegardner0
- Start date
davegardner0
Senior Member
- Messages
- 240
Cagey said:To me, that's a do-over. Not sure it's repairable, and pretty sure the prep was insufficient. Prep is everything with lacquer. Also, you don't have to use water to wet-sand. You can use naphtha, and it won't have that effect on the wood.
I'm curious, what do you see in the photos that leads you to think the prep was insufficient? I'm thinking 100% of my error was the water while sanding but I could be missing something. Do you think I did something wrong before spraying?
Since I posted, I've done a few things to try to fix the issue. First I took some retarder and wicked it into the cracks. It definitely went in, hopefully it closed them up. Then while the cracks were soft from the retarder I drop-filled lacquer into them. Then I finished by spraying two "flash coats" of 4:1 thinner to lacquer (with a little retarder) over the whole body.
Now I'm waiting for that to cure before I can sand again. Some but not all of the cracks are still visible on the surface, but it's hard to tell if that's just a surface feature left over from the drop-fill or still a crack. My plan is to sand those areas and see if the cracks are still there, then decide what to do next. I could always re-do the finish, but my thought is that it's worth trying to fix it first, I have nothing to loose. And I'm learning a lot about lacquer!
I have about a week left to wait before I can sand, so I'll know more soon. Oh, and I got mineral spirits to wet sand with now!
Cagey
Mythical Status
- Messages
- 24,425
The cracks appear to have been there prior to finishing, and appear to be stress cracks. Certainly the washer indentations were. Lacquer finishes tend to exaggerate surface imperfections. If it looks off now, just wait a month or two when the lacquer shrinks a bit. It's surprising what will show up. Grain fill and some sand/fill coats to get the surface level are critical.
davegardner0
Senior Member
- Messages
- 240
Well it's been a while but I've been working on this project some and seem to have hit a roadblock...
I was able to fix the cracks I mentioned earlier by wicking retarder into them. I drop-filled any depressions, and then sprayed four more coats of lacquer. Then I waited a while, and recently I've been re-doing the sanding this time using mineral spirits instead of water.
I was able to get a good shiny gloss this time, but unfortunately there are a ton of tiny scratches on the surface too. I switched the direction of sanding with each grit, and there are scratches present from each stage. Which means I added scratches with each sandpaper grit. I'm really frustrated!!!!!
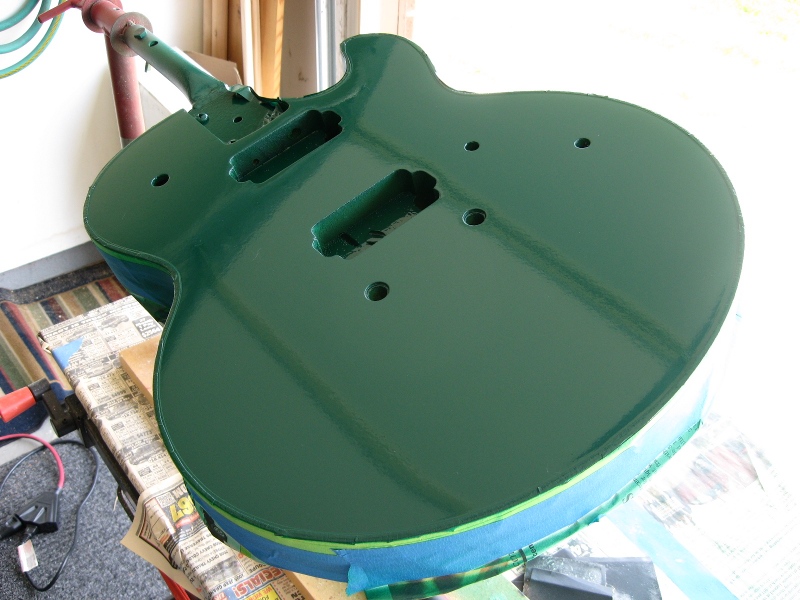
Here's a photo, the white bar is the light above my workbench:

My process was, after spraying, sand with 1000/1500/2000 wet/dry paper using mineral spirits. Then I used the 3 micron and 2 micron versions of this paper:
https://www.stewmac.com/Materials_and_Supplies/Sanding_and_Polishing/Sandpaper_and_Finishing_Papers/3M_Flexible_Polishing_Papers.html
Last I hand-polished using the Stew-Mac medium compound.
I was really careful about cross-contamination! (or at least I thought I was) but I suspect I got some grit/contamination in between the sandpapers and the lacquer. So I'm curious what you guys do to avoid this?
I was able to fix the cracks I mentioned earlier by wicking retarder into them. I drop-filled any depressions, and then sprayed four more coats of lacquer. Then I waited a while, and recently I've been re-doing the sanding this time using mineral spirits instead of water.
I was able to get a good shiny gloss this time, but unfortunately there are a ton of tiny scratches on the surface too. I switched the direction of sanding with each grit, and there are scratches present from each stage. Which means I added scratches with each sandpaper grit. I'm really frustrated!!!!!
Here's a photo, the white bar is the light above my workbench:
My process was, after spraying, sand with 1000/1500/2000 wet/dry paper using mineral spirits. Then I used the 3 micron and 2 micron versions of this paper:
https://www.stewmac.com/Materials_and_Supplies/Sanding_and_Polishing/Sandpaper_and_Finishing_Papers/3M_Flexible_Polishing_Papers.html
Last I hand-polished using the Stew-Mac medium compound.
I was really careful about cross-contamination! (or at least I thought I was) but I suspect I got some grit/contamination in between the sandpapers and the lacquer. So I'm curious what you guys do to avoid this?
Toulouse_Tuhles
Senior Member
- Messages
- 236
See if you can stabilize the cracks from the inside of the cavity. I saw a YouTube recently where a talented repairman repaired a neck crack at the heel with thin Krazy Glue... reason being the "hot" super glues dried too quickly to penetrate.
Lacquer over shellac is generally ok, but a washing with naphtha is always a good thing to remove all oils and waxes, grunge, arm mung, etc...
After the cracks are treated, you can drop fill the finish side .... wait a long long time for curing.... then level and polish. You can probably do the drop fill, and reassemble... play the instrument for a month while the fill really sets up, then pull the knobs and have leveling it on a lazy afternoon.
Cagey
Mythical Status
- Messages
- 24,425
Those are deep scratches, likely there from much earlier in the sanding process. As you get finer with the abrasives, the scratches they're able to remove must be progressively finer as well, or they go essentially untouched. It's difficult to say how far at this point and I know it seems counterintuitive, but you need to go backwards a bit to coarser papers. Perhaps a coat or threee of clear, leveling between coats with 320, then gradually going through the finish sanding process again with the progressively finer grits until you're ready for buff/polish.
I know it's a pain in the shorts, but at this stage of the game you gotta do it.
Something else you may want to get is some "tack cloth". When you finish a sanding step, wipe it down good with naptha and let that flash off, then just before sanding again wipe it down with the tack cloth to be sure ALL contaminatioin is off the surface. Somehow, wherever you're working is a allowing for a lotta particulate matter to settle on the surface and your subsequent sanding is just grinding it in.
Also, when sanding, don't be afraid to change papers to fresh perhaps more frequently. Sandpaper is cheap in the grand scheme of things. After all that work, you don't want that stuff loading up and marking your surface.
davegardner0
Senior Member
- Messages
- 240
Cagey said:Those are deep scratches, likely there from much earlier in the sanding process. As you get finer with the abrasives, the scratches they're able to remove must be progressively finer as well, or they go essentially untouched. It's difficult to say how far at this point and I know it seems counterintuitive, but you need to go backwards a bit to coarser papers. Perhaps a coat or threee of clear, leveling between coats with 320, then gradually going through the finish sanding process again with the progressively finer grits until you're ready for buff/polish.
I know it's a pain in the shorts, but at this stage of the game you gotta do it.
Something else you may want to get is some "tack cloth". When you finish a sanding step, wipe it down good with naptha and let that flash off, then just before sanding again wipe it down with the tack cloth to be sure ALL contaminatioin is off the surface. Somehow, wherever you're working is a allowing for a lotta particulate matter to settle on the surface and your subsequent sanding is just grinding it in.
Also, when sanding, don't be afraid to change papers to fresh perhaps more frequently. Sandpaper is cheap in the grand scheme of things. After all that work, you don't want that stuff loading up and marking your surface.
Man, finishing is really hard!!! Not to sound like a whiner, but I'm finding this much more difficult to master than a lot of other instrument-building tasks. I'm shocked at the level of meticulousness that's needed.
Anyway, they're deep scratches, but I don't think they were necessarily from early in the process. They are in the direction that I sanded with the coarser papers, but also the final papers so I think whatever contamination happened was present throughout the process.
That being said, two things you mentioned really stand out to me:
-I didn't really clean the body between sanding grits. I just did a cursory wipe-down to remove the "sawdust" but it sounds like I really need to clean everything carefully with naptha. I do have some tack cloth that I used between coats of finish so I'll use that here too.
-I didn't switch to new sandpaper soon enough, I remember it got really loaded but I thought it would be fine. Lesson learned.
I think a 3rd issue is that the body might be picking up sanding grit from previous stages on the workbench. I have some kitchen drawer liner material for the body to sit on, but I didn't clean that between stages (and it would be pretty hard to clean). Just wondering what you do - what sort of non-marring surface do you put the body on for sanding? Is it something that can be cleaned easily?
After the last spraying as the body cured I did also get some new, pretty wide cracks in the top (not on the back though, how annoying). So my plan is to drop-fill them and then spray a few coats of lacquer on the whole body. I know the cracks may be unavoidable as they could be from soft shellac underneath (like I mentioned earlier) but I think it's worth a try.If nothing else, I'm learning a lot about finishing through this process...
Cagey
Mythical Status
- Messages
- 24,425
You're right - finishing IS hard. That's why it's so expensive. There's just no getting around some of the detail/tedium involved. It's why I always recommend people take advantage of Warmoth's finishes. Unless the finish you want is not something Warmoth does, passing on what they offer is false economy.
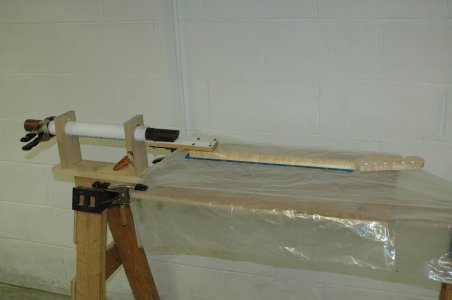
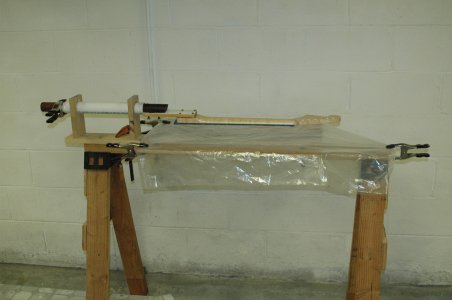
I think I know the drawer liner you're talking about, and it's great for a work surface to protect instruments from gross damage when you're doing mechanical/electrical/setup work. But, any flat surface is going to be a collector of dirt, grit and other small contaminants that are death for finish work. You need to have that body touch nothing. Some sort of fixture/stand/holder jig is in order, so you can work more or less in midair. This isn't a great shot of my fixture, but you get the idea...
The body is held up so it never touches anything, and I can sand/spray/whatever. Plus, it lets me rotate the body for easy access/convenience. A member here was making them some time back and I bought that from him, but StewMac makes a similar thing...

...or you can fab something up on your own. Bottom line is - don't let the body touch anything.
I think I know the drawer liner you're talking about, and it's great for a work surface to protect instruments from gross damage when you're doing mechanical/electrical/setup work. But, any flat surface is going to be a collector of dirt, grit and other small contaminants that are death for finish work. You need to have that body touch nothing. Some sort of fixture/stand/holder jig is in order, so you can work more or less in midair. This isn't a great shot of my fixture, but you get the idea...
The body is held up so it never touches anything, and I can sand/spray/whatever. Plus, it lets me rotate the body for easy access/convenience. A member here was making them some time back and I bought that from him, but StewMac makes a similar thing...
...or you can fab something up on your own. Bottom line is - don't let the body touch anything.
Cagey
Mythical Status
- Messages
- 24,425
I wish I had bought two or three of them. I leave the one I have set up all the time because it's good for working on necks as well as bodies, and sometimes you just want to leave things set while you do other stuff. But, yeah. A gotta-have jig. Can't imagine working without one.
davegardner0
Senior Member
- Messages
- 240
Ah, that jig is really cool! And you're right, it's way better than having the body touch anything, so I definitely need to put something together like that. Right now I have a long wooden holder that I used to hold the body while spraying. I'll have to see if I can adapt that, or if I should build something from scratch.
One question - on your jig the guitar body is basically hanging on the end of a long lever arm. So does it end up being "springy" when you're doing the sanding work? I'm just imaging what sanding a body in mid-air would feel like vs. on a solid surface. It might be kind of weird but definitely sounds worth the annoyance/effort.
And I definitely agree with you about the false-economy of DIY finishes, especially if you're going for a gloss! Maybe satin/tung oil isn't so bad but anything gloss really shows any imperfections and therefore you can't make any mistakes.
Like I've said I'm shocked with how hard it is compared to other guitar-building tasks. For instance I've done a few refrets now that came out really nice, I never would have thought that finishing is this much harder.
On the other hand, I really do want to learn how to do finishing as I'd like to get into building instruments from scratch instead of kits. So I think that's my motivation here, as frustrating as it may be!
BigSteve22
Hero Member
- Messages
- 2,798
Cagey
Mythical Status
- Messages
- 24,425
It is a bit "springy", but it's not the hardship you might imagine. It's definitely not the sort of thing you'd use to hold things for routing/drilling/assembly - for those operations you'd want your parts held in place much more solidly. But for sanding/painting you're never really applying a great deal of pressure anyway, and you can always grab on to the mount point with a free hand to more or less hold things in place.
Also not pictured above is the B&D "Workmate" I mounted the jig to...
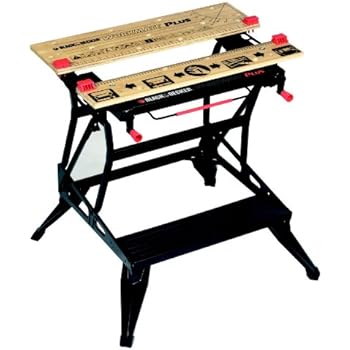
Very sturdy (550lb load rating) and good for a lotta other things. Plus, it'll fold up so you can stash it in a corner easily and free up shop space, plus you can walk 360° around it while working so you always have up-close easy access to your work piece. They're usually only $75-$100, depending where you shop.
Also not pictured above is the B&D "Workmate" I mounted the jig to...
Very sturdy (550lb load rating) and good for a lotta other things. Plus, it'll fold up so you can stash it in a corner easily and free up shop space, plus you can walk 360° around it while working so you always have up-close easy access to your work piece. They're usually only $75-$100, depending where you shop.
davegardner0
Senior Member
- Messages
- 240
Well....
While strategizing my next move, the cracks came back with a vengeance. And I just kept seeing more and more every few hours. So, I decided to do what everybody said at the start of this thread, and just strip the body and start over. :-( :-(

On one hand, it's really sad and I'll have to re-create the purple burst. But, on the other hand, it feels nice to have a clean slate. I think the shellac under the lacquer was just too old and undercured (the cause of my original problems), and nothing I did was going to help the hard lacquer on top of the old shellac. Plus I can fix all of those bumpy spots in the surfaces mentioned earlier in this thread (like around the control knob holes).
I stripped the body with some CitriStrip I had around the house. It worked really well! My only concern is that it left some sticky gooey crap on the wood. It easily came off with sanding, but there is some sticky gunk that I just can't get out of the pickup and control cavities. Based on some internet reading, I think the citristrip has some wax in it to help it to not dry out while it's working. Not sure if that's going to be an issue? You can't see any of the insides of the pickup cavities when the bass is assembled so I don't care how it looks. Plus I'm going to be spraying some (new) shellac to seal in the new dye. And shellac sticks to anything so it'll hopefully create a barrier. I'm hoping I don't have any issues around the edges where the top meets the pickup cavities, for instance.
And on another note I definitely need to get one of those workmates! I see them on the local Craigslist from time to time, but I didn't realize what they were for. I have a "clean" workbench in my basement for assembly, etc., but one of those would be great in my garage for dirtier tasks. Good tip!
Edit: here are some photos of the pickup cavities. You can see a little of the gunk in there, and this is after my best efforts to clean it out. It's just really sticky! It's possible the finish is a little sticky in there too. In retrospect, I should have masked the cavities off before using the stripper. I did so for the neck pocket, but not the rest.


While strategizing my next move, the cracks came back with a vengeance. And I just kept seeing more and more every few hours. So, I decided to do what everybody said at the start of this thread, and just strip the body and start over. :-( :-(
On one hand, it's really sad and I'll have to re-create the purple burst. But, on the other hand, it feels nice to have a clean slate. I think the shellac under the lacquer was just too old and undercured (the cause of my original problems), and nothing I did was going to help the hard lacquer on top of the old shellac. Plus I can fix all of those bumpy spots in the surfaces mentioned earlier in this thread (like around the control knob holes).
I stripped the body with some CitriStrip I had around the house. It worked really well! My only concern is that it left some sticky gooey crap on the wood. It easily came off with sanding, but there is some sticky gunk that I just can't get out of the pickup and control cavities. Based on some internet reading, I think the citristrip has some wax in it to help it to not dry out while it's working. Not sure if that's going to be an issue? You can't see any of the insides of the pickup cavities when the bass is assembled so I don't care how it looks. Plus I'm going to be spraying some (new) shellac to seal in the new dye. And shellac sticks to anything so it'll hopefully create a barrier. I'm hoping I don't have any issues around the edges where the top meets the pickup cavities, for instance.
And on another note I definitely need to get one of those workmates! I see them on the local Craigslist from time to time, but I didn't realize what they were for. I have a "clean" workbench in my basement for assembly, etc., but one of those would be great in my garage for dirtier tasks. Good tip!
Edit: here are some photos of the pickup cavities. You can see a little of the gunk in there, and this is after my best efforts to clean it out. It's just really sticky! It's possible the finish is a little sticky in there too. In retrospect, I should have masked the cavities off before using the stripper. I did so for the neck pocket, but not the rest.
Cagey
Mythical Status
- Messages
- 24,425
If you have any suspicions of residue on the body, don't screw around - get an aggressive solvent like acetone or MEK to clean that body off. There can be chemistry issues between what was there and what you're applying that can end up making you very angry. The marks that show up in the pic above indicate exactly that. Those aren't body cracks - wood doesn't fracture/break that way. That's material separation.
If you still need to remove residual finishing material, acetone will strip lacquer nicely. If it's anything else, see if you can find some of Klean-Strip's "Premium Stripper" That stuff will even eat poly, and that's no mean feat. Just be careful with it - it's wicked toxic, so be sure to observe the warnings about getting it on you or breathing the fumes. They're not kidding. That other sissified crap that's "environmentally safe" and good enough mix drinks with or bathe your kids in is useless. You want something that'll that'll kill you :laughing7:
If you still need to remove residual finishing material, acetone will strip lacquer nicely. If it's anything else, see if you can find some of Klean-Strip's "Premium Stripper" That stuff will even eat poly, and that's no mean feat. Just be careful with it - it's wicked toxic, so be sure to observe the warnings about getting it on you or breathing the fumes. They're not kidding. That other sissified crap that's "environmentally safe" and good enough mix drinks with or bathe your kids in is useless. You want something that'll that'll kill you :laughing7:
Similar threads
- Replies
- 5
- Views
- 390
- Replies
- 4
- Views
- 2K
- Replies
- 35
- Views
- 3K