Is it alright to post non-Warmoth projects here?

Stilgar138

Junior Member
Messages
41
I do still intend on doing the Switchback I asked questions about, life has simply continued to get in the way. I probably should have saved and waited until I could do it than do these two but I really got the bug to want to do something with my star inlaid Strat neck. I was going to get a purple sparkle Epiphone Flying V from Zzounds but it was on back order and that gave me extra time to think things over and I decided I wanted to do this instead.

Neck from Wish or something to that effect that my dad got me a few years ago. Body and pickups from GuitarFetish, red Floyd Rose Special Vibes Series, red jack plate and strap buttons from Forney Custom on Reverb/Ebay. I went with the Brian May inspired pickups and wiring harness, needed the pickguard custom made(went with Pickguard Planet/Chandler Music)using a GFS one as a template for the control layout but with a Floyd cut in white/red/white. Not pictured as I just haven't taken the time to do it, satin chrome locking Sperzels and GraphTech Unlock nut. I intend on getting red tuner buttons whenever they come back in stock to finish this bad boy off. So far, I love it! I wouldn't say it sounds super Brian May but this is a very different guitar to the Red Special but it gets some really cool sounds! The Jazz Bass to the right is my first parts-o-caster, using a body my dad got me from wish or something that I stained and put together largely using GFS parts and a Squire neck.

100-0170.png


Showing off the wide bevel of the pickguard, giving a nice red stripe around the whole thing. The bridge hadn't come in yet but I had it ready to go when it did haha. You can see I changed the knobs and I've actually changed them a third time, I'll get some better pics in general to show that.

100-0136.png


Another pre-bridge shot that I feel shows off the paint really well.

100-0129.png


Showing off the red Floyd and jack plate...
100-0181.png


I wasn't about to put a Fender decal on it but I had this idea and turns out I ain't the only one since I found a decal for it lol. Currently, this is the only pic of the headstock I have.

20240602-200102.jpg


Project number two was pretty spur of the moment. I got to really wanting a neon green body from GFS and decided to take the neck off my sunburst MIM Strat to put on one. I'm using largely GFS parts, including pickups(VEH, their EVH inspired ones) and bridge. I have it decked with 5 springs, I basically play it as a hardtail. I would have simply gotten a hardtail but they don't have this color with that option, either Strat or Floyd. Matte black pickguard from WDMusic with master volume/master tone. 8-Ball "gear shifer" switch tip from Kinnatone on Etsy and skull knobs that reminded me of valve stem caps I had on my car a while back haha. Mopar inspired decals with a fender decal made to be used to restore a Plymouth Duster. I call it the DusterCaster haha. The color reminded me of Chrysler's Sublime and that made me want to add some car related decals, I ultimately chose the Duster due to simply liking the graphics the most. One day I may do a Superbird inspired guitar but that I'd want Petty Blue lol.

100-0211.png


The Duster decal is also reflective, which I think is really cool. A shot with flash...

100-0220.png
 
Last edited:
I don't know why that's happening, they're all on the same server and all work when getting the post ready but some won't show up in the post. Seems I got two of 3 to work though. I thought I'd share some more pics and try the first one again here to see what happens...

100-0170.png


In the beginning when all I had was the neck and body haha.

100-0054.png


Took the body outside to get a shot of the sparkle in the sun. I've been lazy and it's been really rainy so I haven't gotten any outside shots of it together yet.

100-0071.jpg


And a shot with flash...

100-0175.png
 
Those are some fun guitars. And yes, non-Warmoth stuff is always welcome as long as it's reasonably within the bounds of guitar-enthusiast nerditude.
 
Thanks! They are out there but I like em haha. I have my subdued guitars too but it's a lot of fun to go crazy with some. I thought it'd probably be ok to post non-Warmoth as long as I didn't post in the specific Warmoth sections, I ain't gonna lie and say I used any Warmoth parts in these but I certainly will be using them in the future.

Just for the halibut, here's the Jazz Bass AKA The Purple People Eater lol. I used a wipe on poly, had never done anything like this before and rushed it, I learned enough that I think I could do a much better job if I were to use this stuff again. I don't see it very likely though.

Finally-Done2.jpg
 
Those are some fun guitars. And yes, non-Warmoth stuff is always welcome as long as it's reasonably within the bounds of guitar-enthusiast nerditude.

Well alright then....

A new project being worked on.....

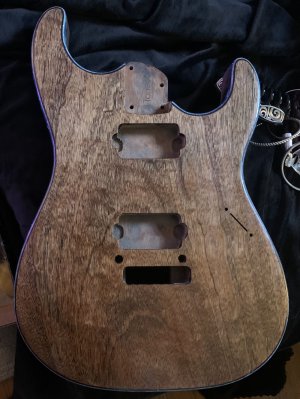
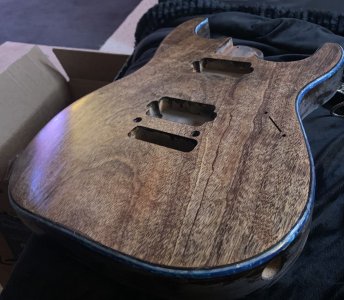
Mahogany body. On my last project (Warmoth Velocity), I wanted my own binding and had to create a jig (took 10 prototypes) to allow the router to follow the contour of the forearm cut. It worked perfectly on the last build. On this one, I didn't realize that a little piece had broken off while I was routing, and it created some havoc. Due to the power of wood fill, a sharpie marker and black dye, I corrected it, but if you look carefully (you'll see it at the bottom of the 1st pic where the binding meets the body if you look close), you'll see the errors.

Body was lightly sealed and then hit with a high concentration of black dye, and then sanded back. Then, hit the whole body with the dye (without sealer) and sand back. Currently has 2 coats of Tru Oil, that was more of a "what will this look like" vs going to the finishing process.

I'm debating hard on doing something with wood burning / carving small shallow lines and filling with colored epoxy, or just leave it alone and continue the finish process.

MuseCaster Front Small - 7.30.24.jpg

MuseCaster Angeled Side Small - 7.30.24.jpg
 
Well alright then....

A new project being worked on.....

Mahogany body. On my last project (Warmoth Velocity), I wanted my own binding and had to create a jig (took 10 prototypes) to allow the router to follow the contour of the forearm cut. It worked perfectly on the last build. On this one, I didn't realize that a little piece had broken off while I was routing, and it created some havoc. Due to the power of wood fill, a sharpie marker and black dye, I corrected it, but if you look carefully (you'll see it at the bottom of the 1st pic where the binding meets the body if you look close), you'll see the errors.

Body was lightly sealed and then hit with a high concentration of black dye, and then sanded back. Then, hit the whole body with the dye (without sealer) and sand back. Currently has 2 coats of Tru Oil, that was more of a "what will this look like" vs going to the finishing process.

I'm debating hard on doing something with wood burning / carving small shallow lines and filling with colored epoxy, or just leave it alone and continue the finish process.

View attachment 62539

View attachment 62540
I like it as is. Unless, you want to wood burn designs with a tool, I wouldn't burn it with a torch. Then again it is all up to you and dependent on what you are going for.
 
I like it as is. Unless, you want to wood burn designs with a tool, I wouldn't burn it with a torch. Then again it is all up to you and dependent on what you are going for.

Yup, this is kind of where I am too. I have a black Tele control plate that I'm going to add at an angle for the knobs. Bridge (Floyd) is black, and I'm planning on black pickup rings too. My concern is going with some kind of wood burning thing (which I've never done before) will make it too busy.

As an aside, I've been watching YT vids on how to acid etch aluminum. I'm thinking I might get a cheapie Tele control plate raw aluminum and create some subtle pattern using etching.
I always knew you were an etcher!
 
That sounds like an awesome build!

I love how you combined different parts and really made it your own. The Brian May-inspired pickups and wiring must give it a unique character. Can't wait to see it with those red tuner buttons—bet it'll look even cooler!
 
That Purple J-Bass is the BizNiz!


Thanks! I kept my expectations realistic and it was a very budget build, I'm still really happy with it all and all haha. I got to really wanting to get it together and got impatient with the finishing and I'll do better on the next one I finish myself. Still no need to expect perfection but I do want to do a better job.

Well alright then....

A new project being worked on.....

Mahogany body. On my last project (Warmoth Velocity), I wanted my own binding and had to create a jig (took 10 prototypes) to allow the router to follow the contour of the forearm cut. It worked perfectly on the last build. On this one, I didn't realize that a little piece had broken off while I was routing, and it created some havoc. Due to the power of wood fill, a sharpie marker and black dye, I corrected it, but if you look carefully (you'll see it at the bottom of the 1st pic where the binding meets the body if you look close), you'll see the errors.

Body was lightly sealed and then hit with a high concentration of black dye, and then sanded back. Then, hit the whole body with the dye (without sealer) and sand back. Currently has 2 coats of Tru Oil, that was more of a "what will this look like" vs going to the finishing process.

I'm debating hard on doing something with wood burning / carving small shallow lines and filling with colored epoxy, or just leave it alone and continue the finish process.

View attachment 62539

View attachment 62540


Ooooo, that is looking great! I like it as it is but I'm definitely curious to see how it develops!


That sounds like an awesome build!

I love how you combined different parts and really made it your own. The Brian May-inspired pickups and wiring must give it a unique character. Can't wait to see it with those red tuner buttons—bet it'll look even cooler!


Thanks! It was fun to search around and actually find the parts I was after. I knew I could get a red Floyd after rediscovering the Vibe series but I didn't know I could actually get a red jack plate until finding Forney Custom on Reverb. The red strap buttons weren't remotely necessary but once I saw em, I had to have em haha. I was going to get full red Sperzels but couldn't find them in stock anywhere, I decided red buttons would be enough to give it the crazy look I'm after lol. The pickups are great, I can't compare them to real TriSonics since I've never used them but I really like what these can do. I'll try to do some recording sometime.

Here's the buttons I'm going to get. I think the cylindrical shape will be really cool looking. I don't think a winder will work with them but they are locking so not much cranking needed to get to pitch. I hate cranking completely by hand when first getting to pitch lol but I don't see it being a big deal on these. Another thought is 3 red and 3 blue and alternating them if both colors come back in stock at the same time haha. I think I'll stick with just red though.

 
Thanks! I kept my expectations realistic and it was a very budget build, I'm still really happy with it all and all haha. I got to really wanting to get it together and got impatient with the finishing and I'll do better on the next one I finish myself. Still no need to expect perfection but I do want to do a better job.


Ooooo, that is looking great! I like it as it is but I'm definitely curious to see how it develops!


Thanks! It was fun to search around and actually find the parts I was after. I knew I could get a red Floyd after rediscovering the Vibe series but I didn't know I could actually get a red jack plate until finding Forney Custom on Reverb. The red strap buttons weren't remotely necessary but once I saw em, I had to have em haha. I was going to get full red Sperzels but couldn't find them in stock anywhere, I decided red buttons would be enough to give it the crazy look I'm after lol. The pickups are great, I can't compare them to real TriSonics since I've never used them but I really like what these can do. I'll try to do some recording sometime.

Here's the buttons I'm going to get. I think the cylindrical shape will be really cool looking. I don't think a winder will work with them but they are locking so not much cranking needed to get to pitch. I hate cranking completely by hand when first getting to pitch lol but I don't see it being a big deal on these. Another thought is 3 red and 3 blue and alternating them if both colors come back in stock at the same time haha. I think I'll stick with just red though.

You're welcome, I'd love to hear how it all comes together when you get around to recording!
 
What's your overall impression of the xgp body? It sure looks great in photos. Any flaws in the finish? Are the routes all the right size, i.e. the neck pocket is nice and snug?

That Mahogany body almost looks like limba with the dye. The finish even looks good as-is. I say build it and play! If you want to do the wood burning / or carving, remember that you don't have to do the entire body that way. The Electra Tree of Life only covers half the body: https://reverb.com/item/29999-electra-2247-electric-oak-tree-of-life-early-1970s-walnut

Or carve a paisley pickguard design directly into the body. Fake pickguard, bro! It'll look quite Stratty that way. You could also not dye the wood there for contrast with the rest of the guitar.
 
All seems good to me. I did have to sand away some paint "overhang" on the green one to get the neck in the pocket but it only took around 5 minutes and ended up with a really tight fit. The hardware and electronics all fit just fine with both as well. Getting the Floyd stud inserts in was interesting and took a while, I hammered them in with a wooden dowel(no drill press and from what I read, that sounded the best way to go. I thought of that myself as well but wanted to make sure that'd work before actually doing it) and it seems like I got them in good and straight. I thought I should be fairly gentle with it and didn't hit very hard so it did take a while but so far, so good.
 
All seems good to me. I did have to sand away some paint "overhang" on the green one to get the neck in the pocket but it only took around 5 minutes and ended up with a really tight fit. The hardware and electronics all fit just fine with both as well. Getting the Floyd stud inserts in was interesting and took a while, I hammered them in with a wooden dowel(no drill press and from what I read, that sounded the best way to go. I thought of that myself as well but wanted to make sure that'd work before actually doing it) and it seems like I got them in good and straight. I thought I should be fairly gentle with it and didn't hit very hard so it did take a while but so far, so good.
It’s always satisfying when everything fits just right after some careful adjustments. Using a wooden dowel for the Floyd stud inserts sounds like a smart approach—glad to hear it worked out well. Keep up the good work!
 
Getting the Floyd stud inserts in was interesting and took a while, I hammered them in with a wooden dowel(no drill press and from what I read, that sounded the best way to go.
I've had good luck with sandpaper wrapped around a dowel to remove the finish coat inside the post holes, then pressing (which sometimes counterintuitively works much better than hammering!) the posts in using a skateboard wheel and my body weight 🤣 Glad you got those suckers in!
 
Back
Top