Leaderboard

First Warmoth

LoxFL

Junior Member
Messages
76
So I decided instead of spending 1999.99 on a US made Fender Thinline which would have bla wood for the body and neck I would get a body and neck from Warmoth then use all US made Fender parts for the rest. I have not received then neck yet, should ship next week, but here is my body. It is a Swamp Ash with a quilt maple top. It has routes for a Tele Bridge as well as a neck and bridge pickup. I had Warmoth install the string ferules for me.

The neck is a 1 piece roasted Maple 22 fret with stainless 6105 frets. I will be putting on Fender Deluxe Locking Tuners because I have them on all my Fenders and love them. 

enhance


enhance


enhance


enhance


enhance


enhance
 
Beautiful body. You'll be more than pleased when that one is together. If you don't already have them, be sure you get the staggered, locking tuners. You should be able to get by without a string tree.

Welcome to the forum.
 
LoxFL said:
Rgand said:
Beautiful body. You'll be more than pleased when that one is together. If you don't already have them, be sure you get the staggered, locking tuners. You should be able to get by without a string tree.

Welcome to the forum.

Yes definitely I always buy the Fender Deluxe Locking Tuners that are staggered. The set is 3 tall and 3 short.

https://www.musiciansfriend.com/accessories/fender-deluxe-locking-machine-heads
Those are great tuners. I have them on one guitar.

Looking forward to your build pics as it goes together.
 
LoxFL said:
I had Warmoth install the string ferules for me.

Out of curiosity, what was their upcharge for installation? I have read some stories about their ferrules not fitting properly and I don't have access to a drill press.
 
That's going to be one sweet guitar! I have a tele with a roasted maple neck and SS frets too, you can't go wrong with a neck like that!
 
AcrylicSuperman said:
LoxFL said:
I had Warmoth install the string ferules for me.

Out of curiosity, what was their upcharge for installation? I have read some stories about their ferrules not fitting properly and I don't have access to a drill press.

20.00
 
I didn't even know they would install ferrules. That's a helluva deal, considering if you don't have a good-sized drill press the chances of screwing up a ferrule installation are higher than is comfortable. Plus, if they screw it up, they get to fix it  :laughing7:
 
Yes, but honestly how does one live without a drill press?  Most useful tool in the shop. :rock-on:
 
There is an option.  Not anywhere near as good as a drill press but better than a handheld drill is a Dremel with the plunge router attachment.  You can set depth and keep it vertical, as long as your working on a flat surface.
 
Along those same lines, which allow for more power, are any of a number of drill guides you can get these days...
71jBx-1khLL._SL1500_.jpg
That top nib just chucks into a regular drill motor, and adjustments to the jig allow you to control depth and/or angle. Poor man's drill press that takes up very little room. That one's only $33 at Amazon, but just searching "drill guides" will turn up a number of choices/sources.
 
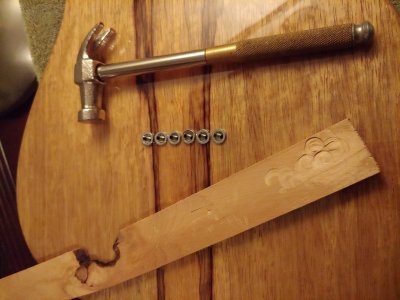
All these years I've been using a hammer! (But admittedly, putting a dab of wax on the end of the ferrule, using a small hammer, putting a thin block on top, and just going tap tap tap, checking if it's straight, then tap tap, checking, tap tap tap, checking, it work(s)(ed))
 
Rick said:
All these years I've been using a hammer! (But admittedly, putting a dab of wax on the end of the ferrule, using a small hammer, putting a thin block on top, and just going tap tap tap, checking if it's straight, then tap tap, checking, tap tap tap, checking, it work(s)(ed))

This is how I have always done it, although usually accompanied by a steady stream of swearing alternating with promises to various dieties....
 
Installation tools
 

Attachments

  • Ferrules Installed..jpg
    Ferrules Installed..jpg
    237.7 KB · Views: 264
Yepp, that's the way I do it too. Here' how I did it on my Mustang. I made sure that I countersunk the holes. It helped with removing the finish that I imagined might otherwise crack.
Here's how it looked :

150988056977505200_resized.jpg


150988056866919400_resized.jpg


150988057239556400_resized.jpg


150988056773784900_resized.jpg


150988057354093700_resized.jpg


Back
Top