Custom Gecko Medium 5 with Ziricote pickguard

HCodi

Newbie
Messages
13
Hi guys,

First timer here and first Warmoth build. I wanted a 5 string bass tuned in High C that was light so it wouldn't hurt my back. I always have enjoyed building things but building a bass from scratch seemed way too challenging for me. So ordering from Warmoth seemed like a great choice!

After months and months (perhaps even years...) of going through the Warmoth website trying different combinations and going through numerous threads in this forum, and ultimately bothering the guys at Warmoth with many questions...  I finally decided to pull the trigger. This is what I ordered:

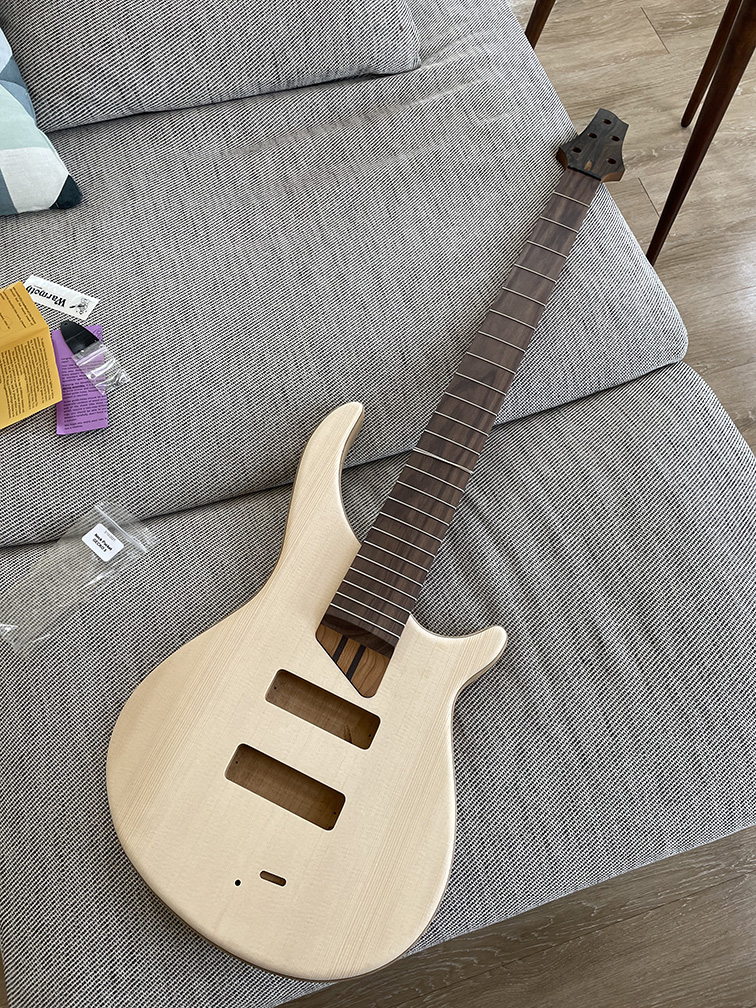
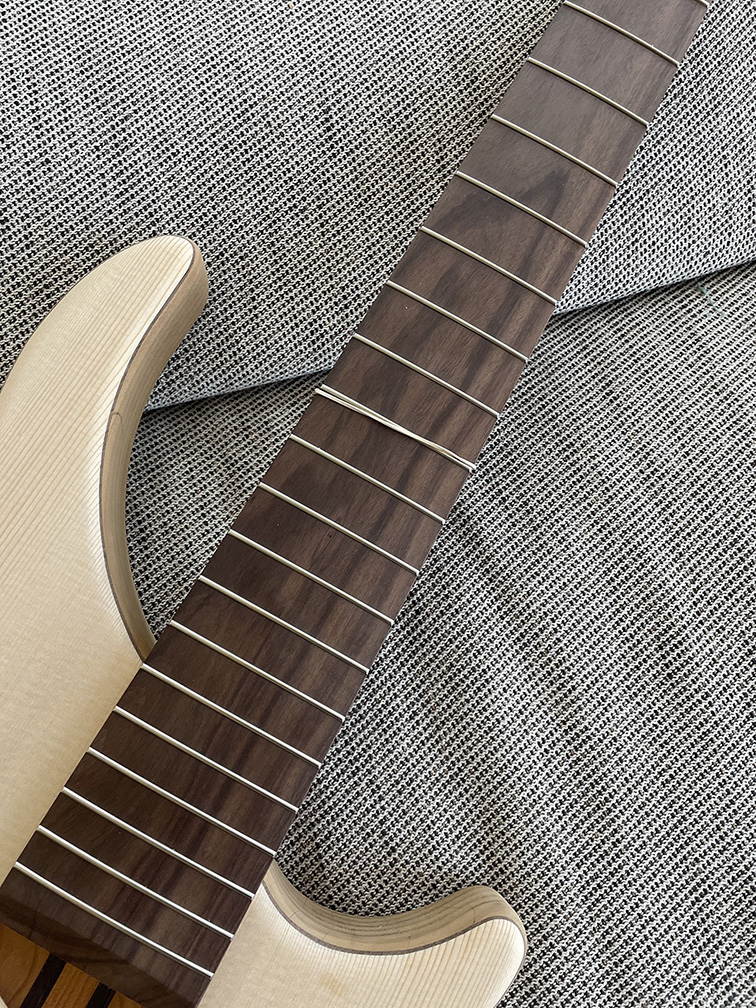
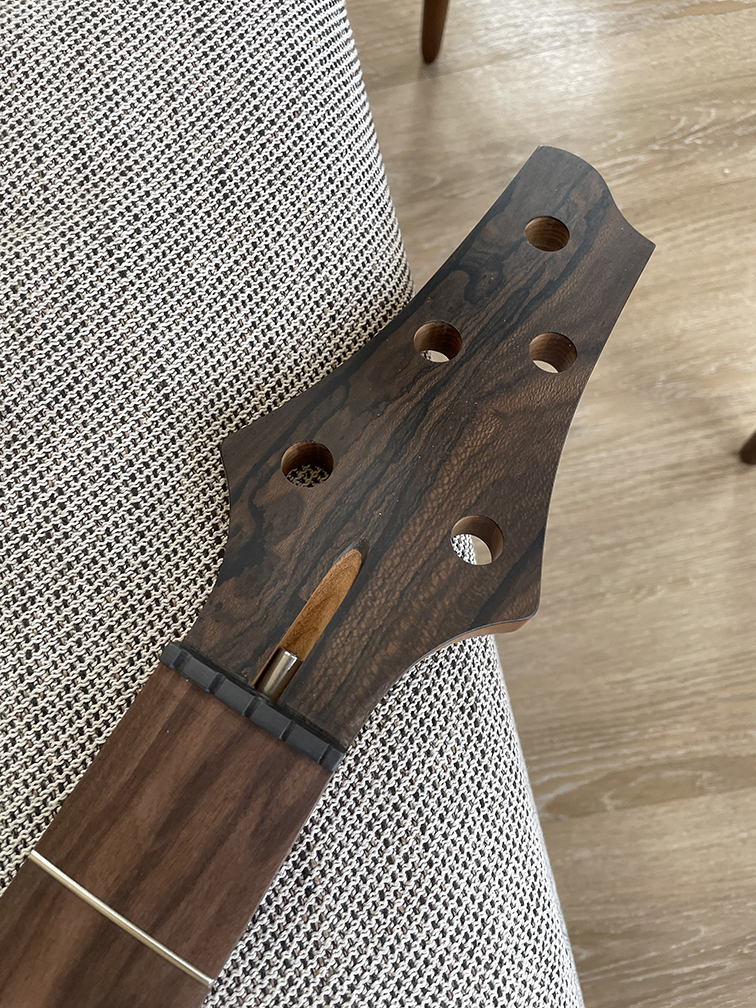
-Roasted Maple neck with Wenge laminates and unique choice of Pau Ferro Fingerboard. Ziricote Headstock veneer and Graphite Rods. No inlays, I would install my own.
-Extra Light Roasted Alder body with Walnut laminate accent and Spruce top.

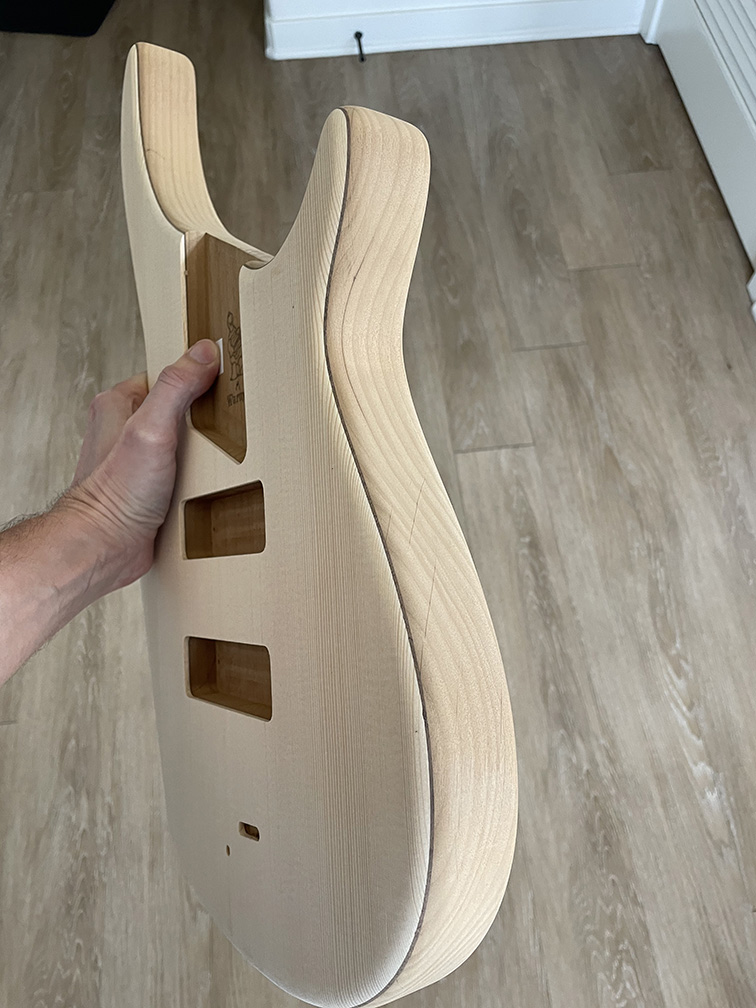
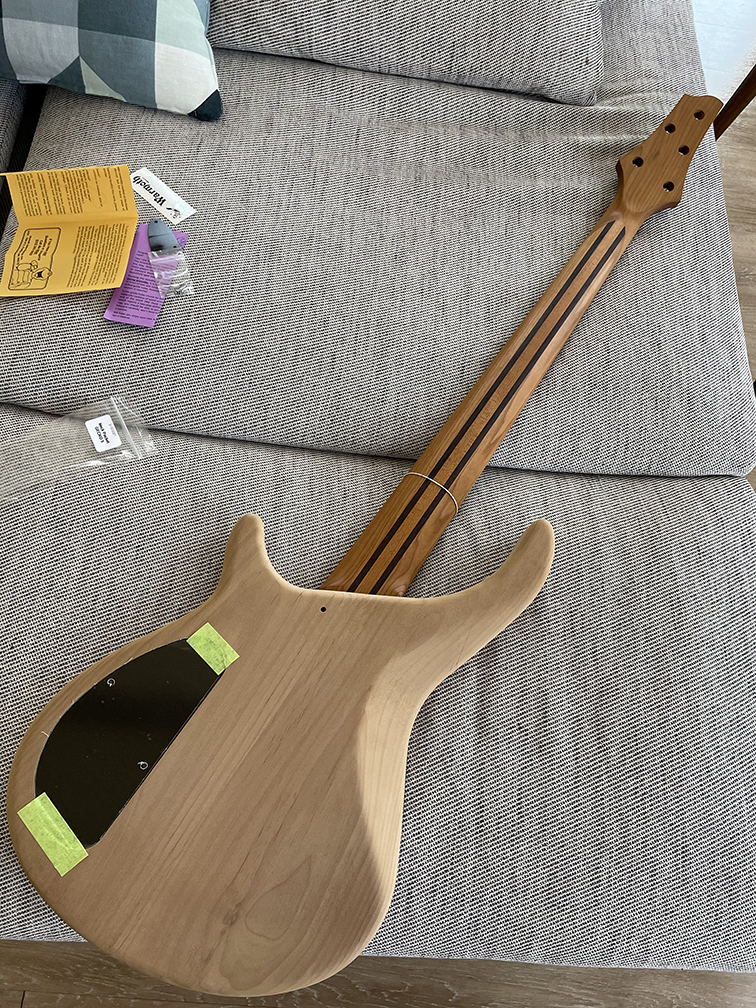
This is what the body and neck looked like when I received them. It took longer than usual because of Covid, but the wait was way worth it!

uc

uc

uc

uc

uc


The body weighs 3.6lbs and the neck weighs 2.9lbs. Pretty light setup so far!

These are the electronics & hardware:
-Gotoh Res-o-Lite in black nickel Tuners.
-Ray Ross 5 string bridge with 19mm string spacing in black nickel.
-Delano SBC 5 HE/S Driver Dual coil pickups.
-Trickfish Flex Core 4 band preamp (formerly Mike Pope preamp). Vol (w Push/Pull Active/Passive), Blend, Passive Tone, Stacked bass/treble and Stacked hi mid/lo mid.
-It will be tuned in High C with Fodera light 5 string set (28, 40, 60, 80 and 100).

These are the parts I will be making:
-Custom wooden knobs with Luminlay dots.
-Custom Ziricote pickguard, which will be held with magnets.
-Custom Ziricote electronics back cover with magnets as well.
-Custom Ziricote truss rod cover with magnets as well.

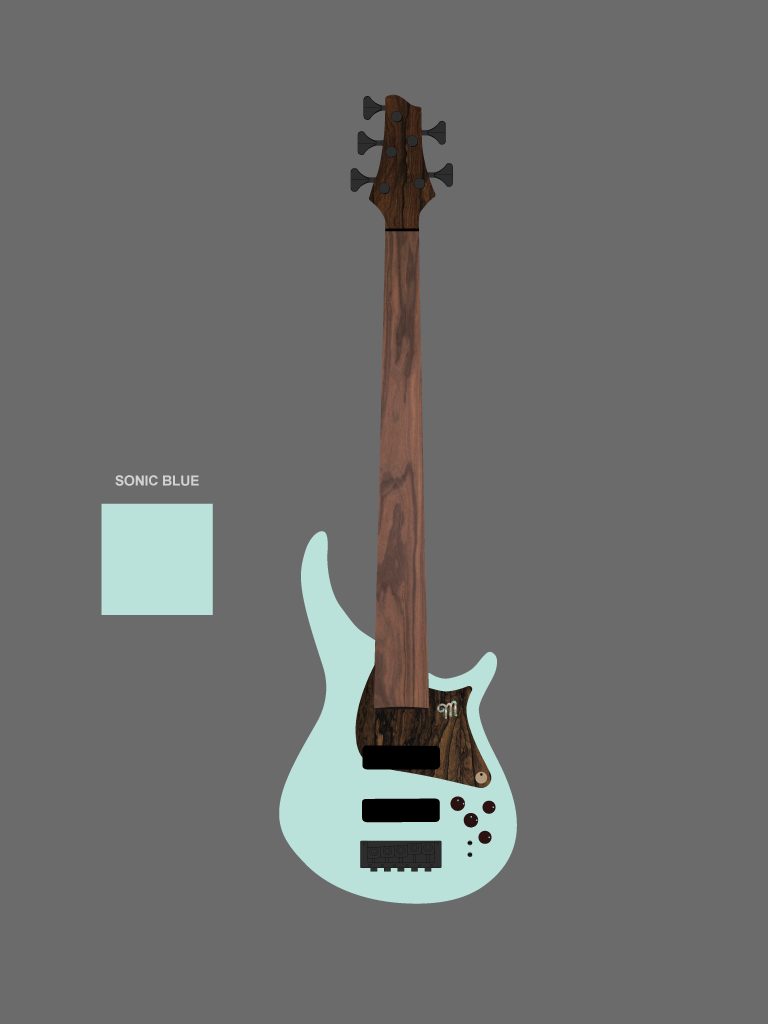
And this is my initial sketch/design. The solid color paint will go only on the top, basically the spruce, and the rest will be left transparent. All in satin finish:

uc


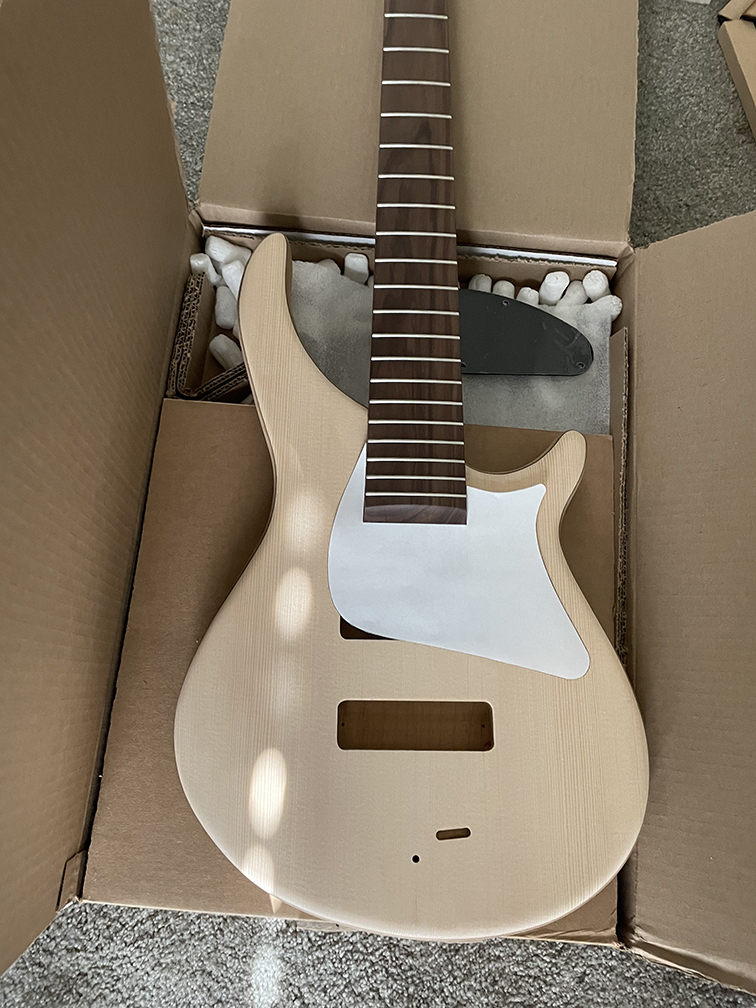
A quick and dirty mockup for the placement of the pickguard:

uc


I have already made quite some progress, but it takes a while to prepare and upload stuff, so hopefully I will be updating this thread soon.

I hope you like it!
 
Same here, can't see anything but very eager to see something.

Pictures are from your Google Drive based on your post's source code, so that's most likely just a permission issue.  If not there's always Imgur.
 
I am so sorry guys, it has been a while since I posted on a forum and forgot to change the permissions on Google Drive.

Is it working now?
 
Just a note about that interrupted pickguard. You can certainly do that, but try to make sure you can fit a screw in the ends of the pointy bits to hold things down. I've seen modification/restorations where they were unsupported and are prone to lifting/breaking.
 
swarfrat said:
Just a note about that interrupted pickguard. You can certainly do that, but try to make sure you can fit a screw in the ends of the pointy bits to hold things down. I've seen modification/restorations where they were unsupported and are prone to lifting/breaking.

Totally, already accounted for :icon_thumright: I will actually be using 1/8 diameter magnets. They are small enough that shouldn't interfere with the pickups. I just do not like seeing screws. The knob at the bottom right will also help to keep the pickguard in place. I might still modify the shape and location of the magnets (there are a couple that are a bit too close to the pickup), but here is another mockup:

uc


Completely related to this, when I got the body and neck, I soon realized that the bottom of the neck was not flush with the body. This was probably done this way by Warmoth to account for the body finish, but in any case, I wanted to make sure there would not be any interference with the pickguard. This is one of the very first things I did. I was very nervous working on it, but I have a very high-quality chisel that worked beautifully for this:

uc

uc


It didn't look very pretty after I was done with the chisel, but a bit of careful sanding and it looked pretty good after I was done. I started with 150 and moved to 220 and then 320.

uc

uc

uc


I could not find a final picture with the body, but it is all flush now.

 
Very cool, beautiful bass, I like it, and I really like all the ziricote, it's an awesome wood. I have several necks with ziricote fretboards. I 've also made some bridges and truss rod cover from ziricote... :kewlpics:
 
DangerousR6 said:
Very cool, beautiful bass, I like it, and I really like all the ziricote, it's an awesome wood. I have several necks with ziricote fretboards. I 've also made some bridges and truss rod cover from ziricote... :kewlpics:

Thank you! I agree, Ziricote is an awesome wood. I actually wanted the top wood to be Ziricote but it was not possible.
 
Here are a couple of pictures of the Ziricote veneer I got from veneersupplies.com. Like I mentioned I will be using this for the pickguard, back cover and truss rod cover:

uc

uc


I am very excited about this!

.
 
Moving on, for the neck mounting screws I wanted to use thread inserts and screws with flat hex heads. This is the first time I started encountering problems, and some mistakes were done. But it's part of the learning process! I ordered the following parts from McMasterCarr:

Brass Tapping Inserts for Hardwood M4 x 0.7 mm Thread Size
https://www.mcmaster.com/95631A075/

Brad Point Bit for Wood Uncoated High-Speed Steel, 17/64" Size (this is the bit size recommended for the inserts)
https://www.mcmaster.com/2926A115/

Black-Oxide Alloy Steel Hex Drive Flat Head Screw 90 Degree Countersink, M4 x 0.70 mm Thread, 40 mm Long
https://www.mcmaster.com/91294A204/

The washers I ended up using the ones Warmoth has, because I couldn't find ones at McMasterCarr that were small enough. The closest ones I found were these ones, but they were larger in diameter than the Warmoth ones:
Black-Oxide Steel Finishing Countersunk Washer for M4 Screw Size, 4.3 mm ID, 90 Degree Countersink Angle

So instead I used these:
https://www.warmoth.com/Gecko-Neck-Washers-Black-P1053C843.aspx

I started with the body. First I made a template with paper to locate the points where I wanted the holes. To be honest, I should probably have asked Warmoth to do this, I am not sure why I chose the option of index hole only.

uc


After a few templates and readjustments, I made sure everything was lining up correctly and started drilling from the inside with a drill press. By the way, I used blue tape on both sides of the wood. Roasted alder is extremely brittle.

uc


Then I flipped the body and made the recess holes for the washers. I believe I used a 14mm Forstner bit for this which seemed to fit the washers perfectly:

uc

uc

uc


Moving on to the neck, in order to transfer the location of the holes I fitted the neck in the body (it is quite a snug fit) and then used the same brad-point bit I used for the holes to mark the neck.

uc

uc


To account for wood splitting, I countersunk the holes first.

uc

uc


And then proceeded with the 17/64 bit which is the one recommended for the M4 inserts. Up to that point, everything was going perfectly. But when installing the actual inserts in the wood, that is when it all started to go south.

uc


By the way, I put a bit of glue in the holes and covered the tip of the thread inserts with blue tape so the glue would not spill over the inside of the inserts and mess with the threads. That actually was a tip I got from a luthier.

But my first mistake was using brass inserts on hard maple, I should have probably used Stainless Steel. Even tho I had already an insert tool for installing these type of inserts, the brass tips of the inserts kept breaking. I did tests on separate spare pieces of maple I had and it worked just fine. Those must have been a softer maple.

The second mistake is that I should have made the holes a bit larger than the recommended 17/64 size. I actually did enlarge the holes at some point and it helped. But still, the tip of the inserts kept breaking while tightening them.

And another thing that I should have accounted for is the countersink holes, the ones I did were not large enough. So when installing the inserts, the wood lifted or split in some instances. I tried to enlarge them and that was another mistake. It made a mess. I already knew that countersink holes work better when done first, and when trying to make them over an existing hole even if using a drill press, just doesn't work. Oh well, this will not be seen anyways. A lesson learned.

So here are the ugly pictures. I did remove some of the splits afterward to make sure everything was flush tho:

uc

uc


The important thing is that in the end the installation is done and everything is flush and tight in place. And all the visible flaws are on the inside anyways.

uc


.
 
This next post will be about the custom wooden knobs. I have to disclose in advance that I am not a luthier or a carpenter, just a DIY’er with years of experience in tinkering. This is my very first time attempting to make custom knobs so if anything I am doing seems wrong or if you have any suggestions on how to improve certain things, please let me know! That is the main reason I am posting my work here, to learn  :icon_thumright:.

The first thing I did is research some sort of metal sleeves or nut inserts that could go inside the knobs to which I could thread headless screws to hold everything in place. I couldn't find anything already made so I decided to make my own. Since the regular pots have 6mm shafts and the stacked ones have 6mm for the upper and 8mm for the lower, I researched at McMasterCarr for aluminum tubes that could work and I found these:

Tube for 6mm shafts:
High-Strength 2024 Aluminum Tube 0.065" Wall Thickness, 3/8" OD
https://www.mcmaster.com/1968T69/

Tube for 8mm shafts:
High-Strength 2024 Aluminum Tube 0.083" Wall Thickness, 1/2" OD
https://www.mcmaster.com/1968T75-1968T753/

Those aluminum tubes have slightly larger ID holes than the 6mm and 8mm but they should work perfectly.

And these are the M3 headless screws to hold the knobs in place. I did order two sizes, a longer one for the lower fatter knobs:

Stainless Steel Flat-Tip Set Screw Black-Oxide 18-8, M3 x 0.50 mm Thread, 6 mm Long
https://www.mcmaster.com/92605A652/

And a shorter one for the regular and upper knobs:

Stainless Steel Flat-Tip Set Screw Black-Oxide 18-8, M3 x 0.50 mm Thread, 3 mm Long
https://www.mcmaster.com/92605A649/

I already had an M3 tap for making the threads, but if you are interested here is a link to one:

https://www.mcmaster.com/26475A65/

Now that I had figured out the locking system for the knobs, I just needed to sort out the dimensions. I found a few examples online but I ended up making my own so I could place a dot to mark the position of the knob using 2mm luminlay dots (the same I will be using for the neck side dots).

uc


Based on the electronics I purchased from Trickfish I figured out I needed 2 stacked knobs and 3 regular ones. So then I ordered a couple of Ziricote blocks from bellforestproducts.com. They were pretty inexpensive, I imagine these small blocks are often used for pen turning with a lathe and you can easily find them at Rockler and other specialized wood supply stores, definitively not at a regular hardware store. As a matter of fact, I ended up buying a small block op maple at Rockler as well to do some tests.

I decided to go with Ziricote as the main wood for the knobs so I would have matching woods with the headstock, pickguard, truss rod cover and back cover. But since one of the knobs (the main Volume one actually) would go over the pickguard which is going to be made with ziricote, I made a couple of lighter wood alternatives for that one, in case I wanted it to pop more on top of the ziricote. I made one with the maple I got at Rockler and one with a spare piece of roasted alder that Warmoth kindly sent to me along with the body.

Once I had all the blocks, I proceeded to cut them all at the correct height according to my dimensions. I placed blue tape a the top and bottom so my marks would be more visible. I marked the center as best as I could on all of them. Looking at the pictures I realize there is one in there that the grain is going horizontally instead of vertically, I ended up redoing that one by the way so the grain would go vertically like the others.

uc

uc


Then I started with the regular knobs, making a recessed hole first with a 14mm Forstner Bit 4mm deep.

uc


After that, I made the hole for the 3/8” aluminum rod with a 3/8 Forstner Bit 14.5 mm deep. I made 3 in Ziricote, one in Maple and one in Roasted Alder.

Next were the stacked knobs. For the upper smaller ones I decided to use a countersink bit first and then make the hole for the 3/8 aluminum rod, these time 10.5mm deep.

uc

uc


The lower ones were easier, just a 1/2in Forstner bit going all the way through.

I apologize that I do not have pictures of each of the steps but here is when I had all the holes ready for the aluminum inserts.

uc


Then I cut all the aluminum tubes to the correct lengths, inserted them all on each wooden block and secured them with epoxy glue. Always putting some tape at the end of each aluminum piece to prevent the glue from spilling inside the tube.

I cut them by hand with a small jig
uc


And checked measurements with a caliper, I had to do quite a few until I got the measurements right
uc


Everything ready to get glue
uc

uc


And glue in place
uc


Waited enough for the glue to cure and then I proceeded to tap the M3 threads on each of them. It's a pretty straightforward process. I pre-drilled the holes with a 2.5mm bit on my drill press and then and used the tap. Sorry, I don't have many pictures of the process.

uc


Time for turning these on my drill press. By the way, I had never worked with ziricote before, it is quite hard! and since I do not have a lathe trying to do this on a drill press (which is the only thing I have) was quite challenging. No matter how close and tight I put the wood pieces to the drill press chuck there was always a bit of play and also the fact that I didn't have a perfect system to hold my files and sanding paper at a consistent distance. I attached a long bolt to my drill press to help, but again this would be so much more precise with a lathe.

I used spare aluminum shafts and secured them with the M3 screws and then I secured that onto the drill press. As the drill press was spinning I proceeded to create the cylindrical shape first with a rasp, then a lighter wood file and ultimately with 80, 150, 220 and 320 sandpaper glued to a flat piece of wood.
uc


It took quite some time to get them all done. And they are not perfect. Some are slightly off-centered, others came out great. But they all look really nice and I think the imperfections won’t interfere much with the usability, I hope! Time will tell.

uc

uc

uc


Test fitting, it works perfectly!
uc


And final product with the Luminlay 2mm dots
uc

uc


Let me know what you think! Thanks!
 
Wow, just WOW!!!!!

Really really nice work.  That neck and body are beautiful, and your custom work rocks!

 
stratamania said:
That is a lot of work to get a set of knobs but looks like the effort was well worth it.

Thank you! I think that in my effort of trying to be detailed I might have made it sound more complicated than what it actually is. In essence, it is just a few blocks of wood and being able to make precise holes with a drill press. The trick part is the turning, but it's really not too hard.
 
rauchman said:
Wow, just WOW!!!!!

Really really nice work.  That neck and body are beautiful, and your custom work rocks!

I appreciate the words thank you!
 
Just a quick update on the progress. I am using a Neutrik NJ3FP6C-B Jack connector which has a locking mechanism. I have seen this type on jack on some high-end basses and I thought the concept was pretty cool. I am not sure how practical this will be in reality, but I thought I would give it a try.

I had a couple, although one of them seemed to be a cheaper version made of plastic. I will be using the metal one with gold contacts.
uc


Since this is a panel mount version, it was a bit challenging to mount flat on the side of the bass. I decided to recess a hole so it would sit flat and not stick out so much. I made a jig with some spare MDF and used a router to do this. Unfortunately, I calculated a bit wrong and I feel I might have gonne deeper than I actually wanted to. But in the end, it looks very nice and professional.

uc

uc

uc


The body is at a paint shop now and unfortunately I won't get it back until the end of the month. I prefered sending it to a professional rather than me doing it for a couple of reasons: I live in an apartment which makes it very hard to do any type of paint job and I wanted this done professionally because I am not very good with paint and finishes to be honest.

Now it's a waiting game! I still have some work to do on the neck so hopefully I will be posting about this in the meantime. Happy Sunday!

.
 
Back
Top