Bloodwood Strat - WIP - Finally getting it done

Steve_Karl

Hero Member
Messages
1,676
Hey there,
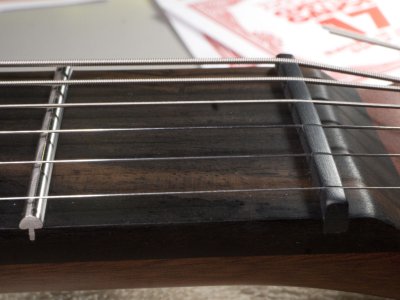
I got the tuners installed a few days ago, and did a first string-up test this morning.
Played it for a while and all is good.

Nut is very tolerable right out of the box!

All hi-rez photos here: https://photos.app.goo.gl/YfpGMD71n1SHPSXQA

I'll just add to this thread as work progresses. It will be slow for me. I've got other things that have deadlines so I'll just work on this during the winter.

One smaller pic attached.
 

Attachments

  • P1011853.jpg
    P1011853.jpg
    165.7 KB · Views: 37
Last edited:
ragamuffin said:
Looks great! What do you have planned for the body finish?

Thanks.
Body finish will be:
Burchwood-Casey sealer.
Then grain filling with LMI filler that looks like melted Hershey's chocolate once water is added.
Not sure what the official product name is but when I get into it and have the bottle in my hand I'll try to remember to post the title.

Probably 3 or more passes grain filling, sanding, sealer, - grain filling, sanding, sealer - grain filling etc.
Sanding with 220 on the early passes, and moving up to 320 and 400 in the later passes.

Quick squeegy off with credit cards in the early passes and latex gloves and finger tips on the later passes.
One the grain filling seems to be done - higher grits for a final light sanding. 400 - 600.
Then a final detailed inspection with my Optivisor and most likely filling some missed tiny spots.

Actually, will probably have the optivisor on the bench and on my head off and on during the whole process. It's nice to be able to inspect very closely.

Then Minwax Wipe-on Clear Satin Poly.
Probably 8 or more thin coats. I'll most likely be waiting a day or more between coats and sometimes going over it with a Scotch-brite White pad which I believe is about 1200 grit.

When I think the Minwax is done I'll probably let it sit for about a month and then evaluate if it's really done.

During that month waiting time is when I'll tape off the fretboard and bevel the fret ends and then polish the frets.
No burnishing. The back of the bloodwood neck is great as it is.
This is my second bloodwood shaft and the first one is really slick also.
 
I wish there was more bloodwood offerings but it seems to be very seasonal, unlike rosewood and maple.
 
rick2 said:
I wish there was more bloodwood offerings but it seems to be very seasonal, unlike rosewood and maple.

Yes. It might be that it's not listed on the site now because of limited availability.
 
Next on the to-do list is drill control holes.

I'm using a template that was sent to me by Kevin from W. in 2018.
I copied it about 10 times using my scanner and cut out a few of them yesterday.

One to use to copy the locations of pot holes (ha haaa) in my last build.
I took the control harness out, inserted the template and marked it from the outer top side.

I'll cut out those holes soon using an X-Acto knife or maybe a hole punch.
I'll then be able to transfer that pattern to the new blank template,
but lightly in pencil,
because I want to make a few slight changes in location and the controls are slightly different on the new build.

Once I have my new template correct, I'll drop it in the back of the new body and mark the locations for my pilot holes
which I'll do with a Dremel and small drill bit, drilling from the inside of the cavity out to the front.
I'll then move to the drill press with the correct size bits, drilling from the front to the inside of the cavity.

Might be a few days or even weeks before I get to the drill press.
 

Attachments

  • Control_Cavity_Template.jpg
    Control_Cavity_Template.jpg
    49.2 KB · Views: 15
Here's the full control cavity template - as a .tif - in a .zip  - on my website.
(Too large to attach in this thread)

This link might automatically open a download dialog box,

http://www.sightsea.com/renders/rrcc.zip

... but you might have to copy the link and then open it in a new browser window.
 
I'm finally getting the work done on this build.
Body is finished.
P1022505_Small.jpg


Fret ends are dressed and frets polished.
P1022556_Small.jpg

After dressing fret ends and polishing the tops, then unmasking the neck,
I discovered that I hadn't gotten the little tang edges that were slightly annoying to touch.
I experimented with a '3 different grit' emery board - ehhh - too time consuming and was scuffing up the edge of the fretboard,
a 1,500 Grit micromesh cloth on it's usual hard rubber block - nooo - too rough and too hard to keep from scuffing the edge of the fretboard - Norton Emery Paper A621 3/0 on the rubber block - ehhh - too fine - not really doing anything -

<-> and then back to my usual 3M polishing papers - Green 400 grit - but not the 1/2" x 6" strips I use to 'strop' polish
the fret end dressings.
This time I cut some 4.5" x 3.5" pieces of the 400 Grit, used the hard rubber sanding block,
and did the whole sides, up and down in long strokes, usually covering 1/2 of the length at a time, fast and hard - paying more attention from 12th fret to the top, going for a smoother feeling to the touch.
It didn't take long. I used three 4.5" x 3.5" pieces to do both sides of the neck.
Then I went over both sides with a 12,000 Grit Micromesh cloth on the hard rubber block.
Looks good and feels a lot better than before.

I wish I would have thought of this method earlier - instead of individually stropping each fret end with 4 ascending grits.
It would probably have saved me a lot of time and pain in the fingers.

All images are posted here:
https://photos.app.goo.gl/YRgHoHPLUjPDYbug7
 
Back
Top