crosstie
Newbie
- Messages
- 10
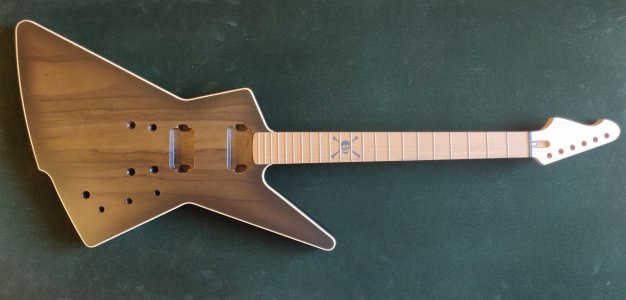
Started my Nomad build (dubbed the "War Moth" by my brothers :laughing7: ) this past week.
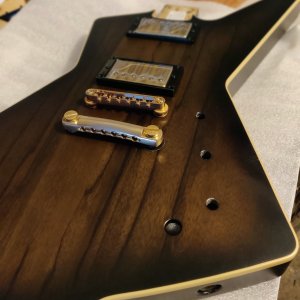
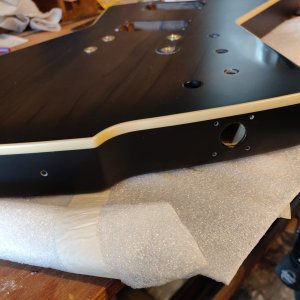
Black Korina Nomad body, satin black burst finish w/ cream binding. Roasted maple neck & board, modern tiltback construction, reverse warhead headstock.
It's been... a bit of a rough start.
First, a few days after it arrived, the body got knocked off of a tabletop (not by me) :sad: Luckily it was still in the foam bag, and only suffered one small ding, next to the binding on the lower bout. So I spent the first week with wood filler, satin black spray paint, and micromesh pads, trying to get it to match. It's close enough that you'd have to look to see it, but it's still there. Funny, despite using really small gradations of micromesh it would still go from "too dull" to "too shiny" every time I tried to spray and polish (and then of course I'd polish through to the wood filler and have to start over with the paint)...
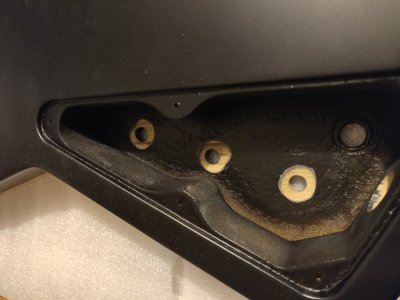
Finally decided it was as good as it was going to get, and moved on. Next were the holes for the pots. Even though they're nominally 3/8", they were too tight, due to the finish being sprayed in. I tried a trick I found online and used 3/8" drill bit, running in reverse, to grind down the finish a bit to lessen the chance of chipping. Then I taped a 3/8" washer over the hole as a guide, and used a fine rat-tail file to open the holes up until the pots fit smoothly. I had to do something similar with the hole for the jack; since it's bigger I just used a dremel with a barrel-sanding attachment.
Next I discovered that the shafts on my pots were too short for the holes -- not enough thread protruded to get a nut onto, let alone a nut and a washer. I guess this is because of the finish as well? The pots are a standard size, and it's not a carved-top guitar or anything -- I stuck a long-shaft pot in there just to see, and it was ridiculously oversized for the cavity, so I don't think it's a case of me using the wrong pots. Anyway, out came the dremel again, with a flat-bottomed grinding attachment to remove the finish from the inside of the cavity. I can now get the nut and washer onto the shaft of the pots, but there's not even enough extra to put the lock-washer on the underside.
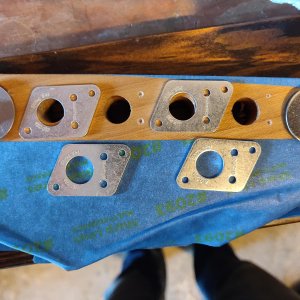
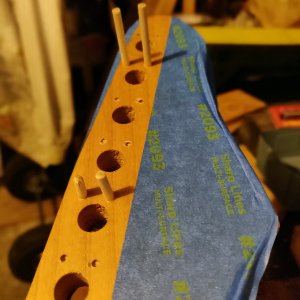
Ok, so far so good. Next up are the bushing for the tune-o-matic bridge and stoptail. I opted for a fancy one from Faber, and... wait for it... the bushings are too big. To be fair, I knew that would likely be the case, so I made sure I had the drill bits I needed on hand. I used a bit that just fit the holes to line everything up, and then used incrementally larger bits to very carefully open up the holes. Ended up going from 13/32" to 15/32", in 1/32" increments.
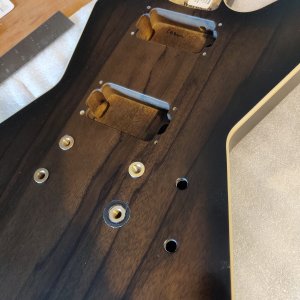
Here's where my second round of heartbreak comes in. Drilling out the holes went great. The sizing seemed ideal -- the smooth section of the bushing slid right in, but the knurled section did not. (I tried going up another 1/64" on a test hole, and the whole bushing dropped right in with no pressure.) So, I went to install the first bushing...
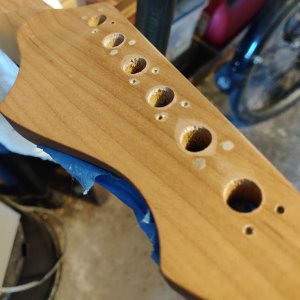
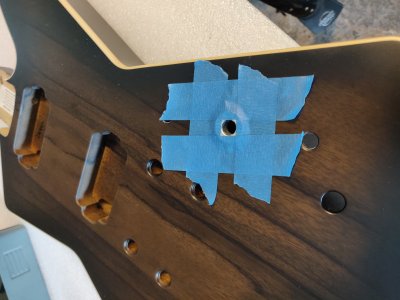
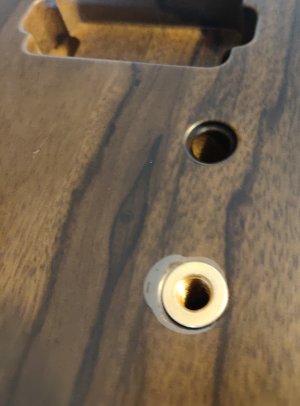
Now, maybe this is a rookie mistake, but every video I've watched on how to install bushings, people tap them into the hole with a mallet. I did the same. It was pretty tight, but it went. And then... well, see for yourself. A big ring of finish lifted off the body around the hole :sad:
I did *not* touch the top of the body with the mallet! I used a bolt threaded into the bushing as a striking surface. The body was clamped down while I hammered, so it shouldn't have been moving around a lot. I am a bit baffled (and disappointed) to be honest, have other folks seen this happen? Is it common knowledge that you don't use a mallet to put bushings into a satin-finish guitar?
Anyway, I used a c-clamp to push the other tail bushing in, that seemed to work ok so I'll try the same for the bridge bushings. Then pickup rings, strap pins, wiring, and on to the neck. Phew!
Black Korina Nomad body, satin black burst finish w/ cream binding. Roasted maple neck & board, modern tiltback construction, reverse warhead headstock.
It's been... a bit of a rough start.
First, a few days after it arrived, the body got knocked off of a tabletop (not by me) :sad: Luckily it was still in the foam bag, and only suffered one small ding, next to the binding on the lower bout. So I spent the first week with wood filler, satin black spray paint, and micromesh pads, trying to get it to match. It's close enough that you'd have to look to see it, but it's still there. Funny, despite using really small gradations of micromesh it would still go from "too dull" to "too shiny" every time I tried to spray and polish (and then of course I'd polish through to the wood filler and have to start over with the paint)...
Finally decided it was as good as it was going to get, and moved on. Next were the holes for the pots. Even though they're nominally 3/8", they were too tight, due to the finish being sprayed in. I tried a trick I found online and used 3/8" drill bit, running in reverse, to grind down the finish a bit to lessen the chance of chipping. Then I taped a 3/8" washer over the hole as a guide, and used a fine rat-tail file to open the holes up until the pots fit smoothly. I had to do something similar with the hole for the jack; since it's bigger I just used a dremel with a barrel-sanding attachment.
Next I discovered that the shafts on my pots were too short for the holes -- not enough thread protruded to get a nut onto, let alone a nut and a washer. I guess this is because of the finish as well? The pots are a standard size, and it's not a carved-top guitar or anything -- I stuck a long-shaft pot in there just to see, and it was ridiculously oversized for the cavity, so I don't think it's a case of me using the wrong pots. Anyway, out came the dremel again, with a flat-bottomed grinding attachment to remove the finish from the inside of the cavity. I can now get the nut and washer onto the shaft of the pots, but there's not even enough extra to put the lock-washer on the underside.
Ok, so far so good. Next up are the bushing for the tune-o-matic bridge and stoptail. I opted for a fancy one from Faber, and... wait for it... the bushings are too big. To be fair, I knew that would likely be the case, so I made sure I had the drill bits I needed on hand. I used a bit that just fit the holes to line everything up, and then used incrementally larger bits to very carefully open up the holes. Ended up going from 13/32" to 15/32", in 1/32" increments.
Here's where my second round of heartbreak comes in. Drilling out the holes went great. The sizing seemed ideal -- the smooth section of the bushing slid right in, but the knurled section did not. (I tried going up another 1/64" on a test hole, and the whole bushing dropped right in with no pressure.) So, I went to install the first bushing...
Now, maybe this is a rookie mistake, but every video I've watched on how to install bushings, people tap them into the hole with a mallet. I did the same. It was pretty tight, but it went. And then... well, see for yourself. A big ring of finish lifted off the body around the hole :sad:
I did *not* touch the top of the body with the mallet! I used a bolt threaded into the bushing as a striking surface. The body was clamped down while I hammered, so it shouldn't have been moving around a lot. I am a bit baffled (and disappointed) to be honest, have other folks seen this happen? Is it common knowledge that you don't use a mallet to put bushings into a satin-finish guitar?
Anyway, I used a c-clamp to push the other tail bushing in, that seemed to work ok so I'll try the same for the bridge bushings. Then pickup rings, strap pins, wiring, and on to the neck. Phew!
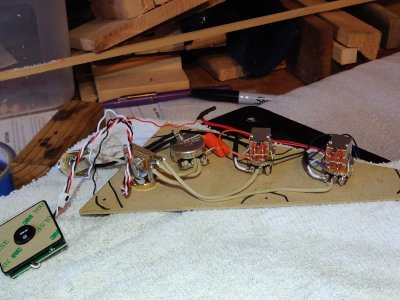
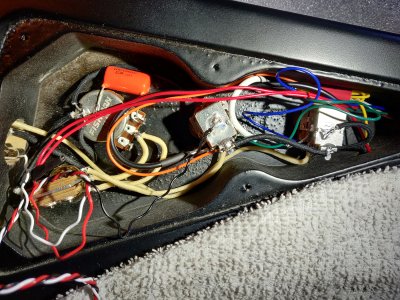
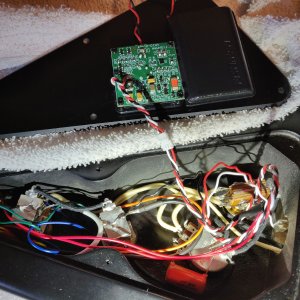
 I marked the pot & switch positions on a bit of chip board, mounted everything, and very carefully followed the wiring diagrams. Once I got as much done as I could there, I mounted them into the actual cavity and did the last bits. Three-way toggle switch, two volume pots, one tone with a .22 orange drop capacitor. I'm installing active pickups, a first for me -- Fishman Fluence "Will Adler" signatures, which means a batter pack and a pretty nifty usb charging adaptor that mounts to the cavity cover, so I can charge the battery without removing it! The Fishman's also have multiple voicing/splitting options, I ended up wiring two push-pull pots -- one toggles both pups between two voicing, while the other does a coil split on the neck only. If you do both at the same time, I think they connect to a rogue satellite and drain your entire bank account, or something...