Anybody Make Waterslide decals?

federal-hog

Newbie
Messages
4
Looking for some Tele ones. The guys I've talked to and the internet sites want $20 for 1 of them.

I'm looking for 3 as I'm an idiot and I know I'll screw them up. But I'm not paying $60
 
I'd post some links but apparently its illegal.

:binkybaby:
 
Does anyone make their own custom decals? I'm not not interested in a counterfeit Fender, but I'm not crazy about Warmoth's font/logo either. The raised metallic logo's look cool (but only on other people's guitars ha ha ha ha).

I'd love a Warmoth logo done up in the "spaghetti font" (gold with black outline). Anyone do anything similar? Hopefully I have not violated a rule by asking...    :doh:
 
You can buy the transfer paper and print your own, if you can find an image you like.  All kinds of sellers on eBay, dunno what else you might find with a little googling...


http://lmgtfy.com/?q=waterslide+decal+transfer+paper

 
Yeah, lmgtfy.com can be a lot of fun, but I worry sometimes that on those occasions when I use it, I come across as passive-aggressive and/or snarky.  Unless I specifically WANT to be those things...


Seriously, though, I think it'd be awesome to be able to crank out your own waterslide decals using that paper - I resist it really because I'm not nuts about my own facility at applying the decals once they're printed.


Bagman
 
I bought some waterslide decal paper a couple years ago, but have yet to use it. I think 25 sheets of 8.5" x 11" cost me about $25, which would make one helluva lotta decals.

In the process of digging that stuff up, one thing I learned is you want to be careful about what you use to print them with. Generally speaking, there are two types of paper. One is for inkjets, and the other for lasers. The inkjet type would seem to be the most useful because of your ability to make colors, but most inkjet-type printers use a dye-based ink. It has almost no service life to it at all, and responds very badly to moisture of any type. If you use a pigment-based ink, it's better, but it's even more expensive than the already expensive dye-based stuff and you don't see it very often.

The laser-ready paper is better and doesn't suffer the drawbacks the inkjet stuff does, but not everybody has access to a color laser if you need color. If you can live with monochrome, those lasers are as common as dirt any more.
 
Well, I myself have a inkjet. But a Color laser at work. However the printer is configured so that only executive slime can print color  :sad:

I don't really care about color. Just want a black logo. However I'd rather do it at home so I can properly size the thing. I know I'll have to print a few.

As far as service life, I've read that you have to coat the decal (if using inkjet) with 3 coats of clear acrylic spray, then all is good. Of course if I did that, I'd clear coat the headstock a bunch of times as well. But I really can't stand sanding / buffing. I have to heavy of a hand and always seem to screw up when sanding / wet sanding. I don't want to screw up a $400 Warmoth neck.
 
federal-hog said:
I'd rather do it at home so I can properly size the thing. I know I'll have to print a few.

As far as service life, I've read that you have to coat the decal (if using inkjet) with 3 coats of clear acrylic spray, then all is good. Of course if I did that, I'd clear coat the headstock a bunch of times as well. But I really can't stand sanding / buffing. I have to heavy of a hand and always seem to screw up when sanding / wet sanding. I don't want to screw up a $400 Warmoth neck.


A couple things -


1.  Print on plain white paper to get the size right - that's a lot cheaper than burning through expensive transfer paper.


2.  For guitar applications, good ol' Zinsser spray shellac is your friend for sealing the decal before applying it to the guitar (assuming you're using an inkjet printer - may not be necessary with laser printed decals).  The shellac dries damn quick, and is compatible with virtually all common topcoat finishes.


Bagman
 
Yeah, that's what's held me back, too. Only two of my necks are finished, and one's too dark to put a decal on. But, I've been pretty pleased with the metal Warmoth logos, so it hasn't been a hardship. For me, the only downside to the Warmoth logos is the "Made in USA" part is far too flimsy to transfer. I've only got it to work once out of about 10 tries. I think maybe they're getting old and the glue is getting too viscous to let go of the facing release paper.
 
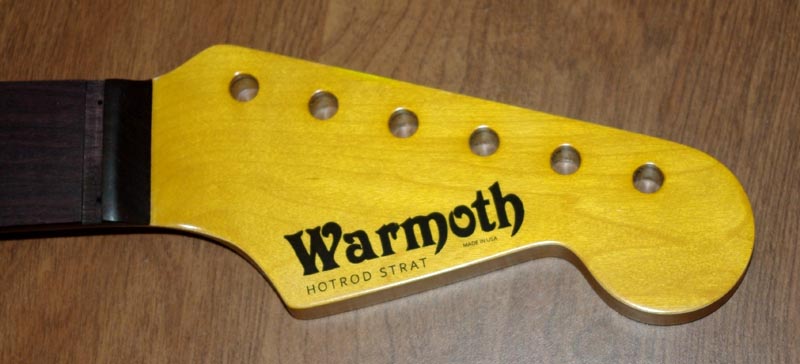
I printed my own waterslide decal on my laser printer using decal paper from http://www.water-decals.com/decal_paper.html .  This neck is finished in Warmoth's satin vintage tint nitro.  Here's a picture of it:

warmothdecal.jpg


In my case I designed the decal in photoshop and then printed it on my laser printer with decal paper from DecalPaper.com - Decals - Waterslide decal paper or inkjet,laser printers Alps & copiers .  Then I followed these directions that I got off of here (I modified them slightly so this is my modified version):

First thing is to level the existing finish in the decal area with some fine 800 grit sandpaper - VERY LIGHTLY. 
Clean it well, no dust, no nothin' - used a tack cloth
Clean it again with naphtha to degrease it
Apply the decal (waterslide).
Use solvaset decal setting solution to melt the decal into the finish
Let the decal dry at least an hour, if not more.
Mask off the fingerboard and just under the face of the headstock
Apply very sparingly CLEAR shellac over the decal area.  Its ok to get the shellac on the lacquered areas. I used Zinnser Bullseye Sealcoat because it is completely wax free.  I sprayed it out of a disposable aerosal bottle
Apply another coat of clear shellac over the decal area.  The shellac will be a barrier between the lacquer and decal, and also, its alcohol solvent will take any remaining water out of the decal membrane - VERY important to do, or you can cloud/lift/bubble the decal.
Apply a light coat of lacquer, let it dry an hour or more (I used ColorTone clear satin nitro from Stewmac.com for this and all subsequent steps).
Apply another, let it dry an hour or more
Apply a medium wet coat of lacquer, dry an hour or more.
Apply a medium wet coat of lacquer, dry a day.
Use 600 or 800 grit paper to level out the finish over the decal only.  Do not level (yet) over the other areas.
Two more medium wet coats, dry a day.... level again, just over the decal area.
One more medium wet coat - and inspect to see that the decal has "leveled" into the finish, after that coat is allowed to dry for an hour.
If it has sunk in, one more wet coat, let dry two days or more.

Between coats I would wipe it down with a tack cloth and after sanding I'd wipe down with the naptha.

By doing this the decal is completely flush with the face of the headstock - it looks just like a factory fender job.  It took a couple weeks to get it done but IMO it was worth it - it looks sooo much better than a sticker like they include with the neck.  Obviously this would only work if you have a finish on your neck.  The solvaset solution does a very good job of "melting" the decal into the wood though even if you have a raw neck.  It's used commonly in the model building community - http://www.houseofhobbies.com/sodeseso.html . 

If you wanted to do color many larger copy shops have color lasers available that you could print from.  Only problem is that you need to start with the printer cold so that it doesn't the transfer paper so you'd want to arrange it with them and show up first thing in the morning to run your print job.  Keep in mind that printers don't PRINT white - white is a lack of color so you don't want white in your design.
 
GMGM said:
Does anyone make their own custom decals? I'm not not interested in a counterfeit Fender, but I'm not crazy about Warmoth's font/logo either. The raised metallic logo's look cool (but only on other people's guitars ha ha ha ha).

I'd love a Warmoth logo done up in the "spaghetti font" (gold with black outline). Anyone do anything similar? Hopefully I have not violated a rule by asking...    :doh:

Done that! + erotic body

IMG_7547.jpg
 
Back
Top