Angled pocket to straight

ravenhaller

Junior Member
Messages
39
I have a pair of all-Warmoth superstrats.  One guitar has a floating Floyd Rose tremolo setup, the other has an angled neck pocket and a flush-to-body Floyd Rose tremolo.  I much prefer the floating setup, so I would like to modify the other to the same layout.

Taking measurements is proving tricky as both guitars also have a heel contour.  But otherwise, I have all the tools for tackling the job - routers, roller-bearing router bits, and best of all - an X-Carve CNC for guaranteed accuracy when attempting the tremolo route. 


Firstly - is this a mod worth attempting?
Secondly - any tips to guarantee success?

I'm all ears :)
 
X-Carve CNC is it only for 2D cut? but there is some workaround for simply 3D cut, just try on some scraps wood first.  to guarantee success .

is this a mod worth = your time & efforts > or < you really need it floating ?
 
The X-Carve can do 3D no problems - it just depends on the software you use.  That said - there's nothing about routing a tremolo cavity that you couldn't do with the basic/no-frills X-Carve software (Easel)... unless you're shooting for an Ibanez Jem/claw type cavity.


And no - I don't need it floating.  But it would be my preference.  And not really that difficult a job when you have the right tools on hand.
 
so just go try on some scraps wood first. Because you only have one shot to nail it on CNC. 

when you doing it on the real guitar body, made sure the cutting head is new and with very sharp edges, otherwise can crack the paint finish edge.

also made sure the CNC path is moving from inside to the most outside edges. so there is less impact on paint finish edge so it not easy to crack. Urethane finishing they using is very hard, but also crispy, so easy to crack on cutting edge.
 
I could be wrong, but I think doing it with a CNC would be more error-prone and risky than it's worth unless you were going to do this repeatedly.

I've done what you want to do a few times, and found it fairly easy to do with router, a mortising bit, and a neck pocket cutout template. You buy or fabricate one of these templates...

acrylic-neck-joint-fender-templates2-1000x1000.jpg


DSC02495.jpg

...attach it to the guitar in such a way that it won't move, set your router's bit depth, and drive around on there until you have a new pocket floor.

An even faster/easier way is to use one of these shims StewMac has recently started making available...

StewMac_Neck_Shim_Shop_Set_of_12.jpg

They're made of Maple, so they're pretty hard and uncompressible, they fill the whole pocket floor so there's no risk to your fretboard's planar integrity, and they come in 3 different degrees of wedge (.25°, .50°, 1.0°) to suit your situation. They're a bit pricey for what they are (~$8/ea), but when you consider how much time they'll save you and how well they work, they're actually a bargain.

I think most people use them to add angle rather than remove it, but that's just semantics. At it's root, you're just changing the neck pocket floor angle.
 
Incidentally, for measuring angles where your reference isn't so good, limited access, etc. these little modern day widgets are pretty handy and a lot less expensive than their mechanical counterparts ($16)...

61C4Vqt-FAL._SL1500_.jpg

They're only 2" on a side and a half inch thick, so they fit a lotta places.

Set your guitar body on something stable, set this thingy on your guitar top, zero it, then set it in the pocket. Viola! You know your neck angle.
 
Cagey said:
I could be wrong, but I think doing it with a CNC would be more error-prone and risky than it's worth unless you were going to do this repeatedly.

I've done what you want to do a few times, and found it fairly easy to do with router, a mortising bit, and a neck pocket cutout template. You buy or fabricate one of these templates...

acrylic-neck-joint-fender-templates2-1000x1000.jpg


DSC02495.jpg

...attach it to the guitar in such a way that it won't move, set your router's bit depth, and drive around on there until you have a new pocket floor.

An even faster/easier way is to use one of these shims StewMac has recently started making available...

StewMac_Neck_Shim_Shop_Set_of_12.jpg

They're made of Maple, so they're pretty hard and uncompressible, they fill the whole pocket floor so there's no risk to your fretboard's planar integrity, and they come in 3 different degrees of wedge (.25°, .50°, 1.0°) to suit your situation. They're a bit pricey for what they are (~$8/ea), but when you consider how much time they'll save you and how well they work, they're actually a bargain.

I think most people use them to add angle rather than remove it, but that's just semantics. At it's root, you're just changing the neck pocket floor angle.
I'd have to disagree, on the machine the center of the pocket can be more accurately obtained than with a router template and a tape measure... :toothy12:
 
No doubt. But, for a one-off cut, how much time are you going to spend in setup and test before you let the machine chew on your precious guitar body? With a template and router, the entire job is going to be maybe 15 minutes, with very little measurement needed other than bit depth. Plus, he's looking to flatten rather than add angle.
 
Cagey said:
No doubt. But, for a one-off cut, how much time are you going to spend in setup and test before you let the machine chew on your precious guitar body? With a template and router, the entire job is going to be maybe 15 minutes, with very little measurement needed other than bit depth. Plus, he's looking to flatten rather than add angle.
True, but set up time is really irrelevant, if the guitar is that important. But advantage to your point, this stuff was being done long before CNC.
 
on other hand, if dong by milling ,  as everything is simply straight lines to cut, can just use CNC as a milling machine, no need to made template too, just drawing the line on masking tape to follow.
 
Hendrix said:
on other hand, if dong by milling ,  as everything is simply straight lines to cut, can just use CNC as a milling machine, no need to made template too, just drawing the line on masking tape to follow.
Yes, but there's still the issue of the radius at the end of the pocket, that's very tricky on a manual mill...
 
DangerousR6 said:
Yes, but there's still the issue of the radius at the end of the pocket, that's very tricky on a manual mill...
Can buy a milling drill head same or near radius as the one you want to cut
 
Hendrix said:
DangerousR6 said:
Yes, but there's still the issue of the radius at the end of the pocket, that's very tricky on a manual mill...
Can buy a milling drill head same or near radius as the one you want to cut
You mean an end mill, yes for sure you can, but more than likely it'll cost more than the guitar body...(Sorry, I'm a machinist, this is my wheelhouse)
 
it not for high-speed steel end mill, just cutting wood, and X-Carve CNC can't cut metal.

and only need around 10mm and 6.5mm diameter is not some kind of big diameter tool can't find in the wood cutting head.

361859.floydroseroute.jpg
 
The guitars in question:

00O5TRt.jpg


Thanks for the replies guys.  The template method is probably the best way to do it, and easy enough to DIY a template with the X-carve.  I'm also tempted to preset the X-Carve height (Z-axis is adjustable to 1/10th of a mm) and push the body around underneath.  I'll still have the protection of a roller bearing to stop me from diving into the body, and I should have a better visual on the stock underneath.

I guess the most important question to ask at this stage is in regard to overall geometry - am I needing to remove material from the heel or am I wanting to build up the heel to eliminate the 6º relief?  I guess if I pull apart both guitars I will soon find my answer.

And another question - can I still use the same tremolo post sleeves?


On the body without a pickguard, you can probably afford to drop the floor of the neck pocket as much as .090" or so without issue. On the other, you may run into clearance problems between the fretboard overhang and the pickguard if you remove too much material from the floor. For that one, you might want to use the wedge shims to build it up to flat, rather cut it down to flat.

I'm not sure I'd want to move the body around under the CNC's bit spinning from the top. I can envision an uneven result, or worse - the bit may get pinched due to a feed speed thing, grab the body and so something you won't appreciate. The router is the tool to use.
 
using CNC as milling is opposite as milling machine, the body is fixed, and tool head is moving, just like how CNC working.

just it is not auto follow a sending digital XYZ data.

you can use a controller like in this video to move the tool head as slow as 0.02mm a step, or faster.

my CNC  controller even  has a turning wheel to move the tool head on one of select axial XYZ just like operate a  milling machine

[youtube]BTi0W4Fez8s[/youtube]

I did not sure do X-Carve CNC has this  controller or not, but a last it should have set up software to do this
 
Hendrix said:
using CNC as milling is opposite as milling machine, the body is fixed, and tool head is moving, just like how CNC working.

just it is not auto follow a sending digital XYZ data.

you can use a controller like in this video to move the tool head as slow as 0.02mm a step, or faster.

my CNC  controller even  has a turning wheel to move the tool head on one of select axial XYZ just like operate a  milling machine

[youtube]BTi0W4Fez8s[/youtube]

I did not sure do X-Carve CNC has this  controller or not, but a last it should have set up software to do this
That machine in the video is a CNC router, not a mill. There are gantry style cnc mills like that router. But they are usually really large.

This is a cnc machining center. Head is stationary and table moves..
3c43e724623022a158278233be58f6aeea52b4e7-2.jpg
 
My discussion is focused on what thread starter has on how to solve his problem.
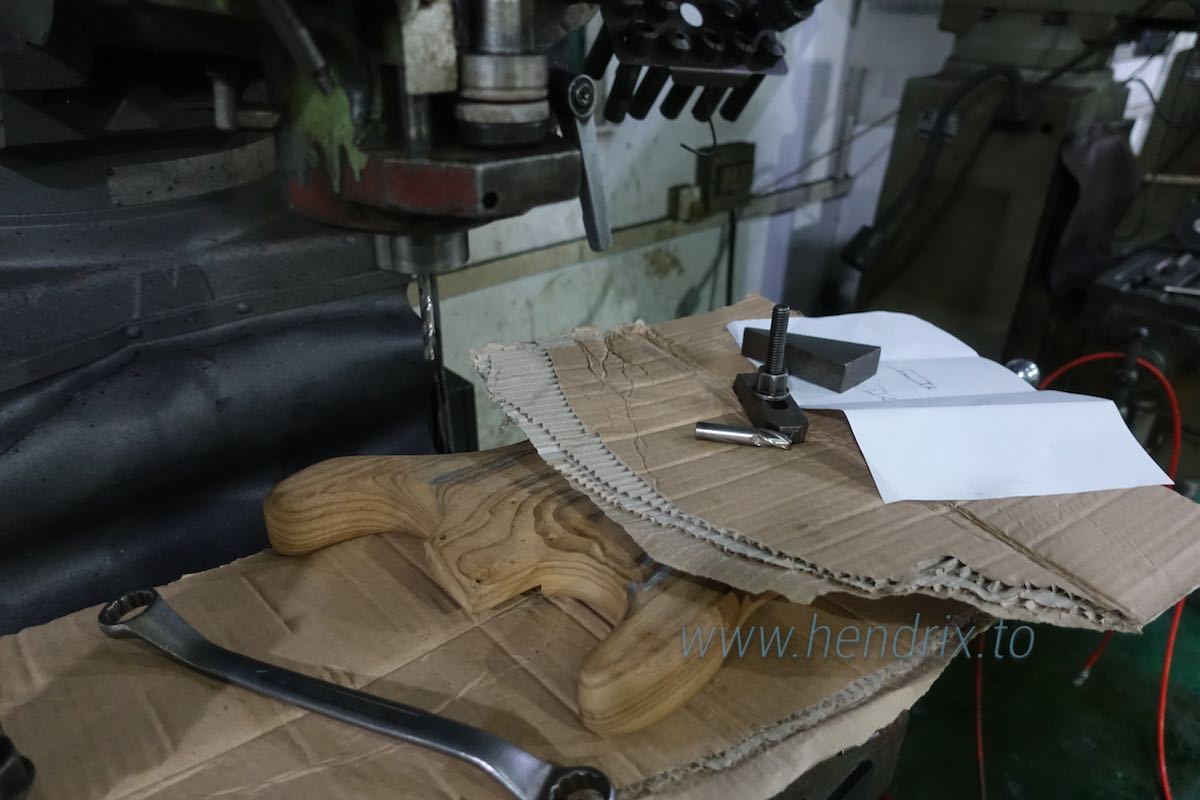
What his X-Carve CNC can do to made tremolo cavity.
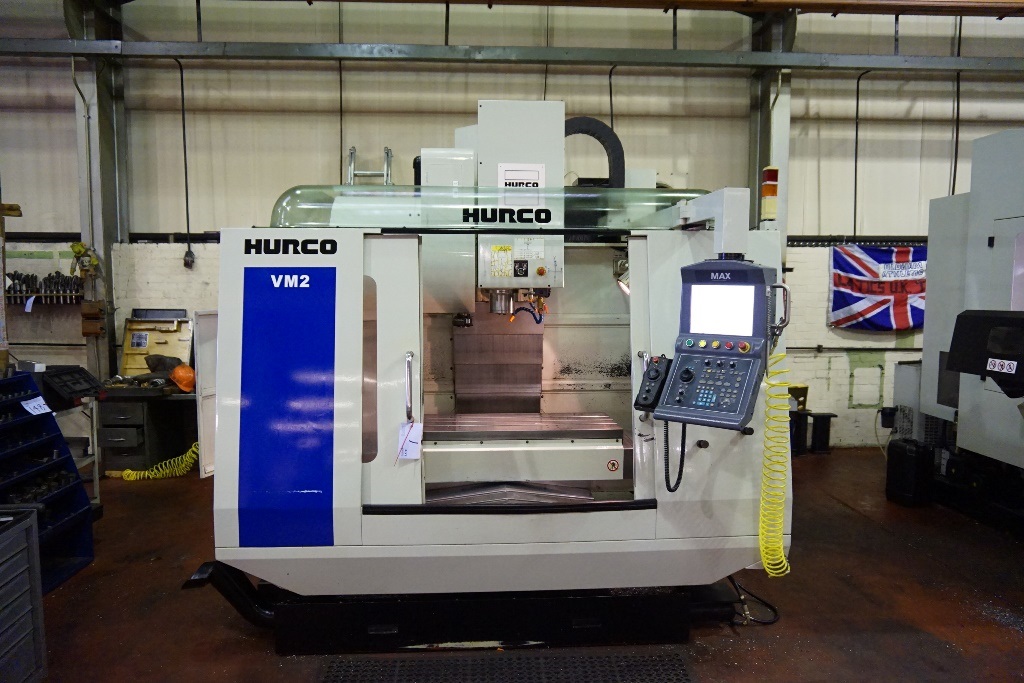
  the CNC I talk about here is something similar to X-Carve. The “mill” I talk about is how to use that CNC like operate a Manual milling machine.

Anything beyond that has the unlimited possibility, like what I have done 20 years ago, I working for a company made first “ Shape CD“, all the “ Shape CD “ sell in the Asia Pacific area is set up by me. so how did we made CD shape like this

cardsnowman.jpg


We developed a CNC that both Head and table moves, the cutting head move like ‘ CNC router ‘ to cut a stack of 6 CD , and 6 stack of CD keep rotating on a table like revolving pistol, on one side it is cut to shape, on another side regular circular CD is loading on waiting to be cut, a semi-automatic system can non stop keep cutting, so for different applications, there can be endless possibility on how a CNC system can be made to fulfill different job requirement.

CNC means Computer numerical control

The discussion here is: if for a one-off job, it not worth to use a lot of time to make the G code and testing, for Computer to do the control of ‘ CNC router ‘ to made tremolo cavity.

the second option is if use a free hand router, but it needs something to control it, so need either made or buy a template, is this easier than CNC ? is up to how skillfully you on software G code vs making a template.

Then the third option I try to make is: if you have a handheld controller like in the video, you don’t need Computer or template, you can using ‘ CNC router ‘ as a Manual numerical control milling machine.
Most people overlook and think that CNC without a Computer control is useless, but actually, the quintessence of CNC is numerical control, it much quicker even on old school Manual milling machine like I use in this build post. http://www.unofficialwarmoth.com/index.php?topic=28323.msg404909#msg404909

body4.jpg


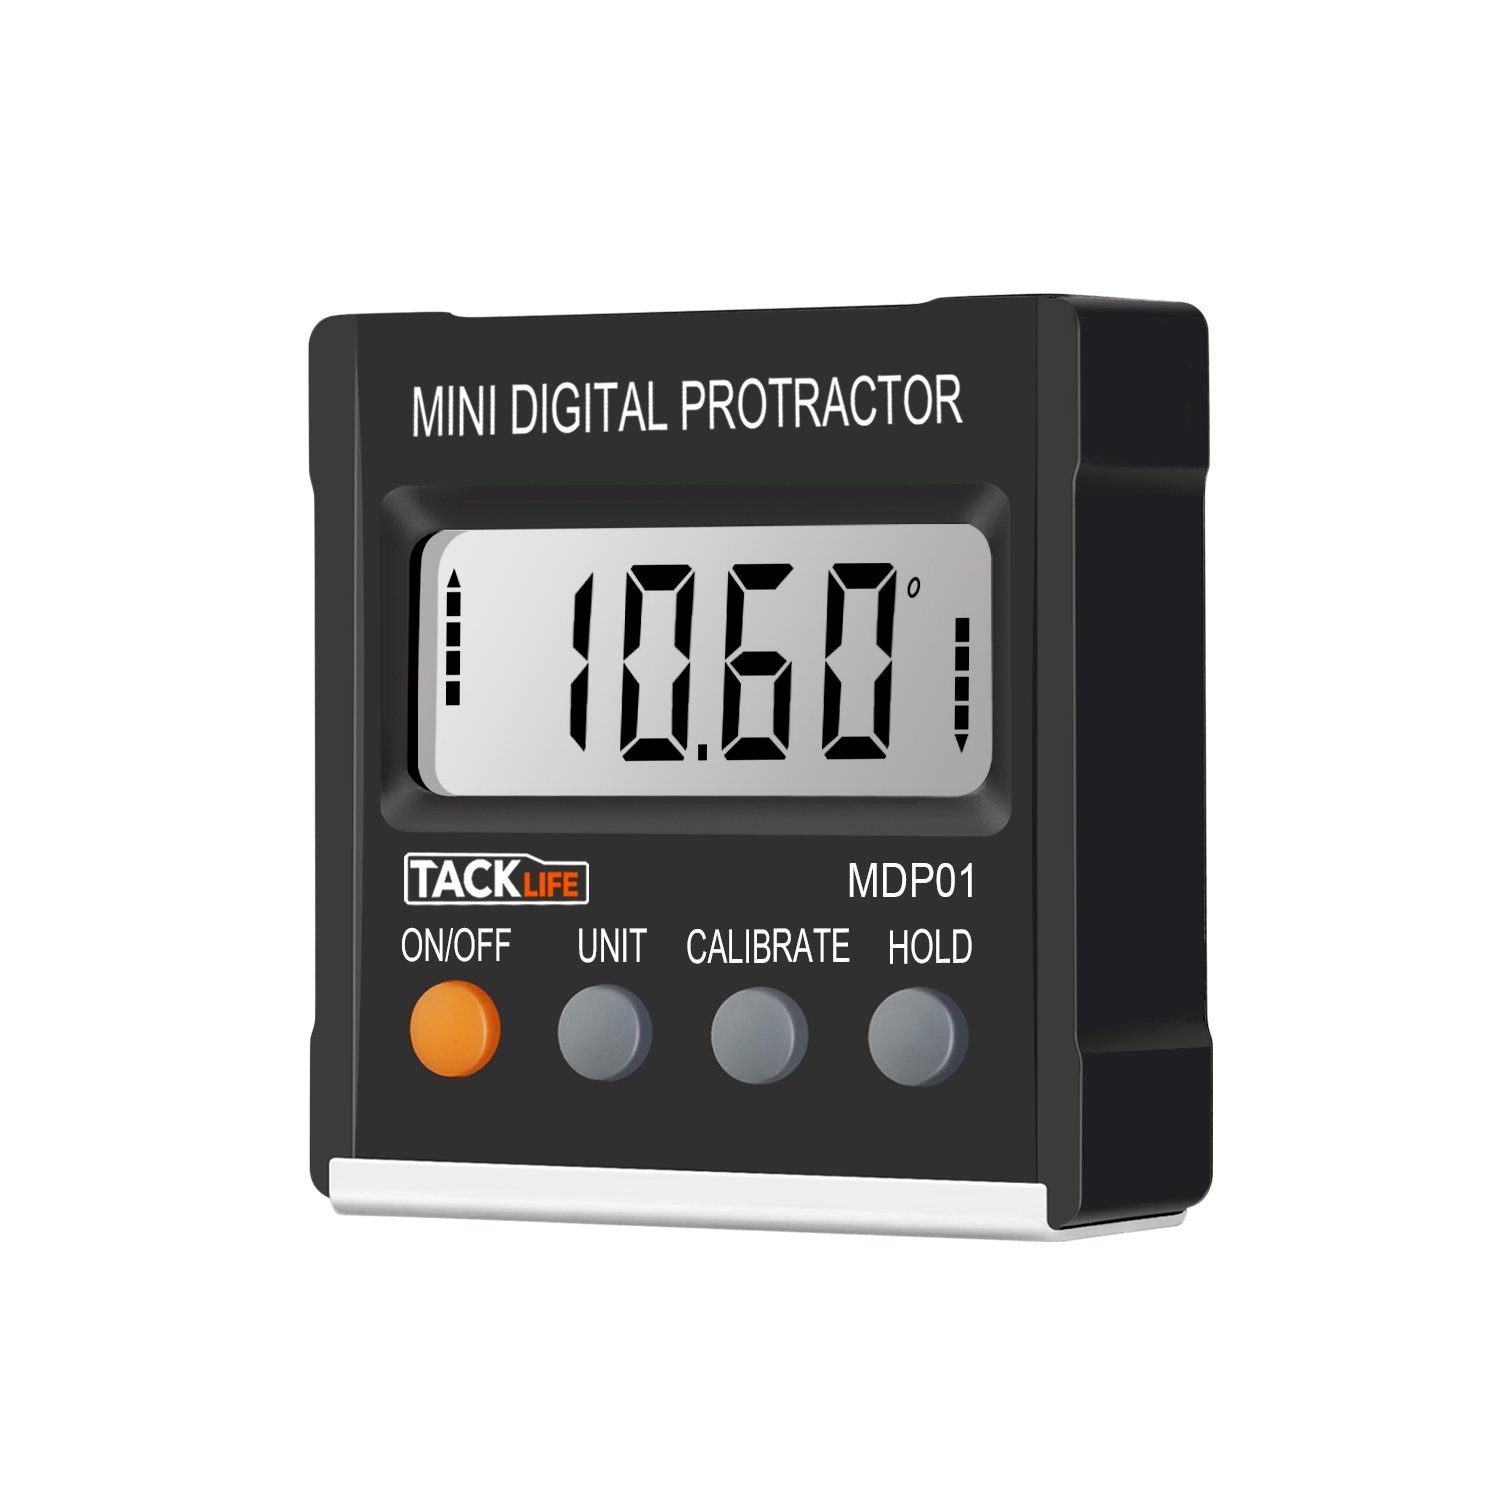
as it got numerical Digital Readout POSITION INDICATOR, save a lot of measurements and alignment time.

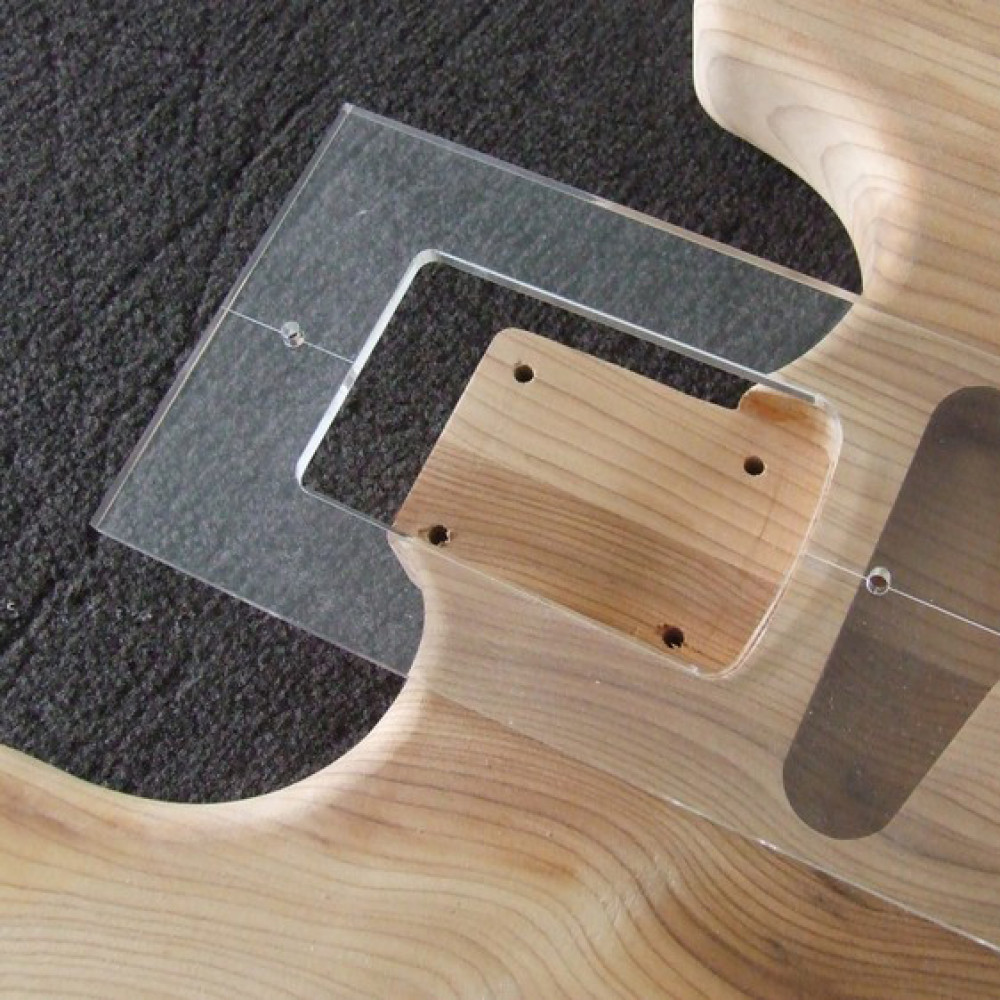
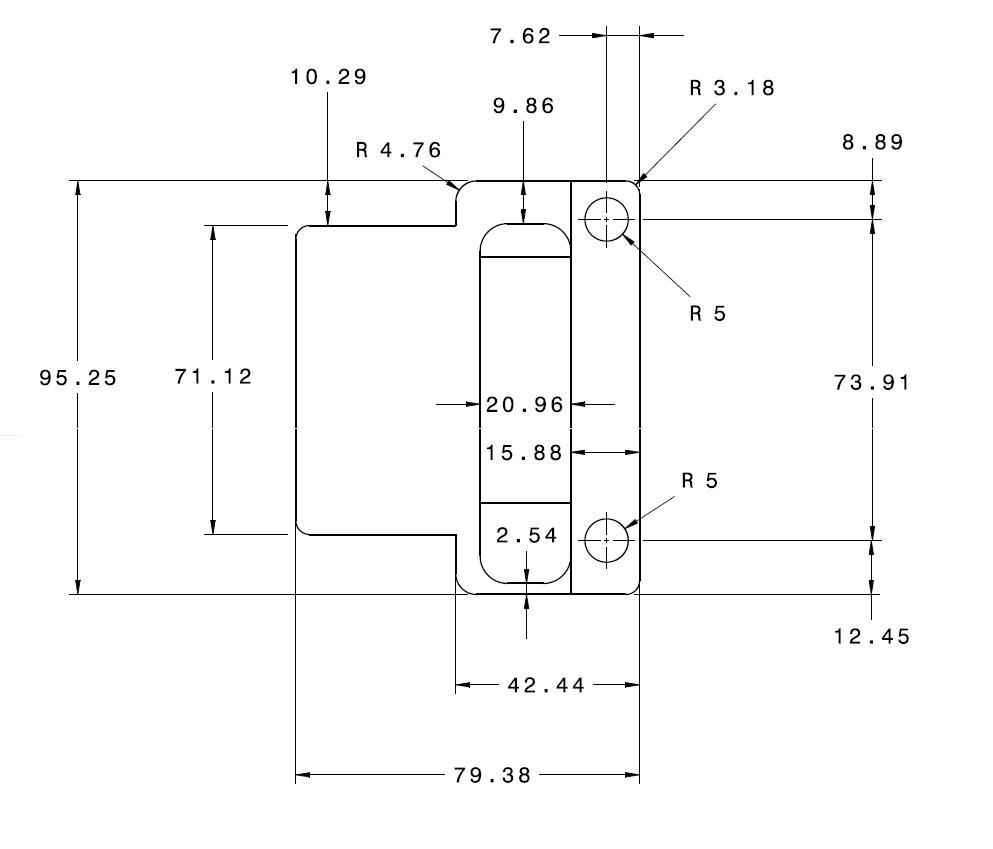
As all you need to cut in this discussion is some rectangle, it very easy for you just control it by CNC handheld controller.

And work like the Manual milling machine in this video with Digital Readout POSITION INDICATOR .

[youtube]jeCYSLuwktU[/youtube]
 
So back to the OP's original problem, just take Cagey's advice, get the templates and borrow a router... :icon_thumright:
 
Back
Top