Leaderboard

Warmoth Noob - First Build

bobsessed

Junior Member
Messages
60
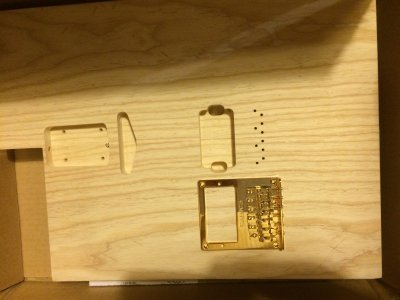
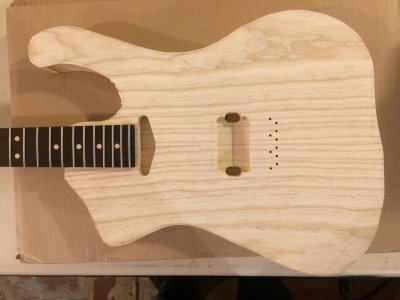
Here's the most boring "out-of-the-box" picture ever. I ordered this last month. I got swamp ash, reversed, with rout for a humbucker at the bridge, and a single at the neck. I bought a ready-made neck from Warmoth stock and had stainless 6150 frets installed. I'm using the 24 3/4" scale neck, with Tele-like components. I've found out so far that the Babicz BFG bridge doesn't exactly fit with the drill holes that came in the body, but I can adjust and make it work. So, before I ordered, I talked with 2 different sales people about using the BFG bridge. They both said that the BFG "should" work, and be a retrofit for most Tele bodies.....maybe not. I ordered the body to be made specially for me, so, no returning that. I want to use this full-contact bridge and bought it online at a special price so I'm kinda stuck with it unless I go through the devil to return it. To make it work will require additional routing and drilling. I'm just saying all this because when I went online to do the research, there was next to nothing on this subject, so I wanted other people to know what's involved. So.... I cut the body to it's rough shape and I'm getting started. Some fine forum members have already given me some pointers which I'm very grateful for, so if any of you can help I'd sure welcome your input.
 

Attachments

  • IMG_0445.JPG
    IMG_0445.JPG
    1 MB · Views: 400
  • IMG_0448.JPG
    IMG_0448.JPG
    948.1 KB · Views: 397
I've also looked online at the BFG and other diagrams to see if things might line up in the past and fell short of finding anything definitive.

Would you be able to take the saddles off the bridge so that it is clearer what is lining up and what is not?

If it really does not fit, and you wanted to use another bridge, there may be someone on the forum who may be interested in buying the BFG bridge from you.

Are you planning to rout the side of the body or are you hand sanding?
 
bobsessed said:
I want to use this full-contact bridge and bought it online at a special price so I'm kinda stuck with it unless I go through the devil to return it. To make it work will require additional routing and drilling. I'm just saying all this because when I went online to do the research, there was next to nothing on this subject, so I wanted other people to know what's involved.

As you're finding out, there's a little more to putting a guitar together than just buying the parts and putting them together. This is more often a problem when you get to bridge issues because the "standard" isn't standard. In the case of Fender designs, what's "standard" depends on where it's made, when it was made, whether it was made to a design or a price point, whether it was made to be new but appear old, a special edition, a mistake, on and on. Then, people refer to things with ambiguous names like "vintage" and "modern" and "vintage modern" and "reissue" and "vintage made in Mexico" and the list is long.

It's difficult to keep track of even if you've lived through it all, so the thing to do is find out how things are supposed to work, then checking the specifications of the parts you're interested in to make sure they will fit that scheme before you buy them. It's not always easy because some distributors aren't as forthcoming with specifications as you might like. But, relying on marketing weenies for facts about suitability to purpose will lead you down the rosy path to ruin because their motivation isn't your happiness, it's to get your money out of your pocket and into theirs.

Anyway, enough preaching. Stratamania is right - you may be able to sell that bridge rather jump through hoops to force it to work. Especially if you got it at a good price, since you won't lose as much, if anything.
 
Well....After studying this thing more closely this evening, I'm feeling a little foolish. I took off a couple of the saddles and found that there is more adjustment to the bridge than I thought. It looks like the bridge will work, without any routing or major work. Lining up the six drilled string holes (bridge and body), I adjusted the D-string saddle and the high A all the way forward, then measured 12 1/4" from the 12th fret to the saddle "peak". The neck measures 12 3/8" from the nut to the 12th fret. It looks like then, that once bolted on, there will be just a tiny amount of forward travel for the saddles, but more travel to the rear. I believe I can live with that and have a well-intonated guitar. I'm gonna get some better pics to post tomorrow and see what you guys think, if that's okay....I'd sure appreciate you all looking and weighing in.  As for the body...I have a nice wood shop here at home, with pretty much everything I need to get this done. I have an oscillating spindle sander to get the body sides into shape, then comes the hand sanding.
 
Yes, keep posting the pics because we are interested and it all helps to build the knowledge available on the forum.

A spindle sander is going to save a lot of time on the sides versus totally by hand.
 
Interesting shape..... :icon_thumright:

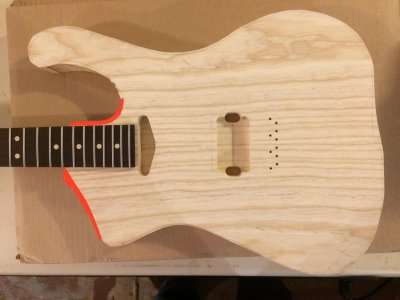
How as I do like your design, if it were me I'd finish out the cuts as I've marked in red. It's a smoother transition from the neck to the body, but this is just my opinion...
 

Attachments

  • bobsessed.JPG
    bobsessed.JPG
    490.7 KB · Views: 454
DangerousR6 said:
Interesting shape..... :icon_thumright:

How as I do like your design, if it were me I'd finish out the cuts as I've marked in red. It's a smoother transition from the neck to the body, but this is just my opinion...
This is a pic of the rough cuts.....there will be some tweaks......
 
bobsessed said:
DangerousR6 said:
Interesting shape..... :icon_thumright:

How as I do like your design, if it were me I'd finish out the cuts as I've marked in red. It's a smoother transition from the neck to the body, but this is just my opinion...
This is a pic of the rough cuts.....there will be some tweaks......
:icon_thumright:
 
Back
Top