Leaderboard

The Telecaster Deluxe Project (Black Korina)

harry

Junior Member
Messages
37
Hi

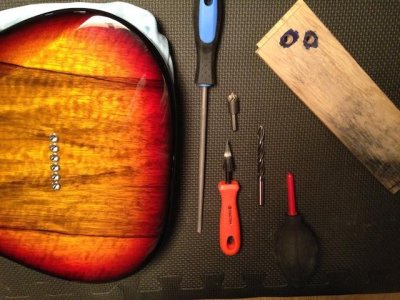
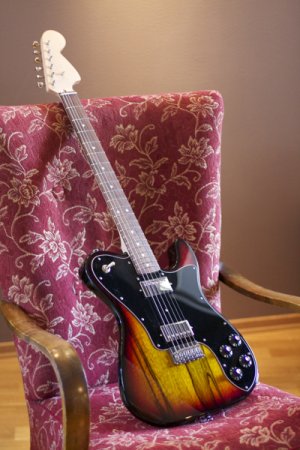
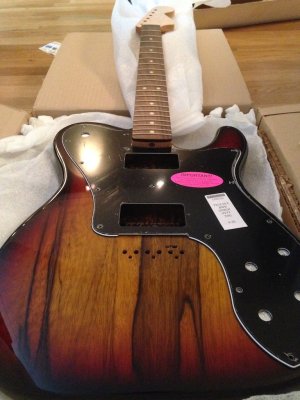
I have got all my parts to my new Telecaster Deluxe, and I have started the project to put it together.

Pictures can be found in this thread: http://unofficialwarmoth.com/index.php?topic=23654.0

This is my first build so I have bought these books to learn:

Guitar Player Repair Guide
http://www.stewmac.com/shop/Books,_plans/Building_and_repair:_Guitar,_electric/Guitar_Player_Repair_Guide.html?actn=100101&xst=3&xsr=1937

Build Your Own Electric Guitar
http://www.stewmac.com/shop/Books,_plans/Building_and_repair:_Guitar,_electric/Build_Your_Own_Electric_Guitar.html?actn=100101&xst=3&xsr=1937

They are great books, but I still have some questions. So I will use this thread to ask some question and post updates on the progress.

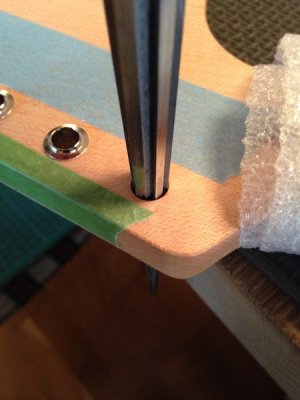
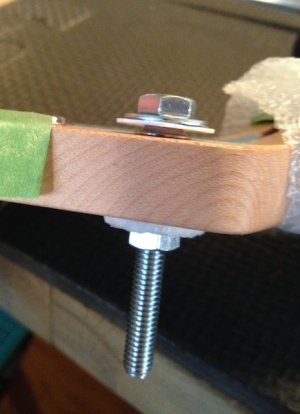
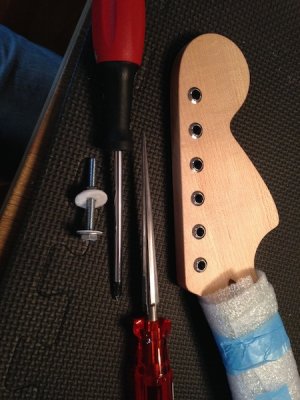
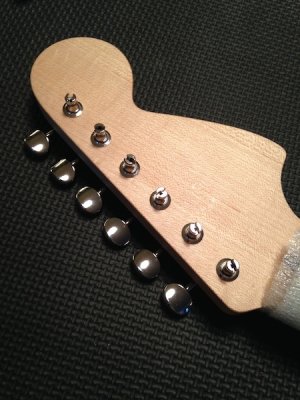
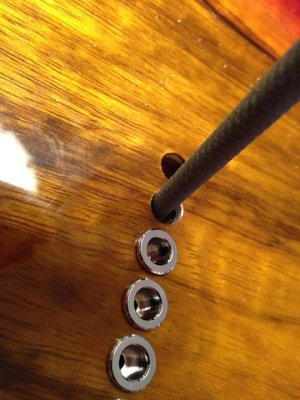
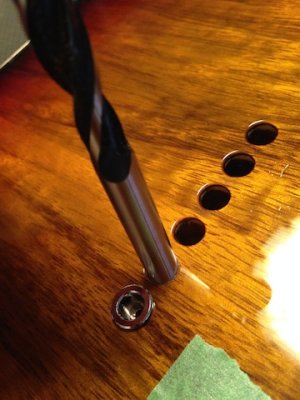
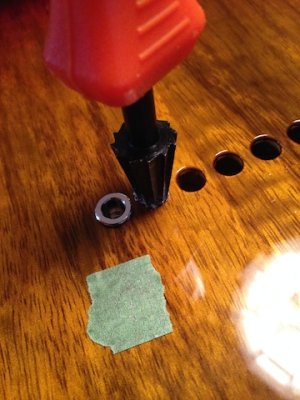
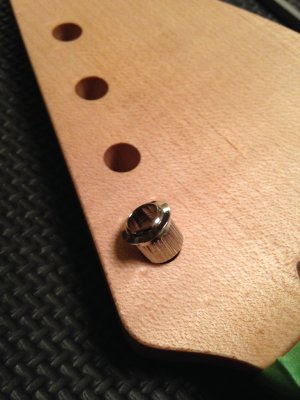
My first question is about the tuner holes. I have Gotoh vintage tuners with ferrules that are going to fit into the hole. It seems that the hole is slightly undersized so it may need to be adjusted with a reamer. But how tight is it supposed to be? I see some uses a rubber hammer to knock them down and others uses only their thumb and have a larger hole. What is recommended here?  Is there any other descent ways to adjust the hole size other than using a reamer?


Attachments

  • 2014-06-04 23.26.48.jpg
    2014-06-04 23.26.48.jpg
    249 KB · Views: 6
  • 2014-06-02 19.34.24.jpg
    2014-06-02 19.34.24.jpg
    294.6 KB · Views: 12
I don't know about 'other ways'--there must be, but I've always used a reamer. Go slowly and carefully and it works out just fine.
 
+1 on the reamer.  The point of using a hand tool is that you have fine control over how aggressively you attack the wood, so you don't wind up with the "throwing a hot dog down the hallway" effect in your tuner holes.  The fit should be snug, but not necessarily so tight that you need to pound it in.  If you need to use a hammer, consider the potential for marring and/or splitting the wood - eek! - and then ream it out just a tiny bit at a time.  If you have access to a drill press, you can use the drill chuck and a piece of scrap board to press the ferrules in. 


But don't try to use the drill press to enlarge the holes - way too much potential to cheese the job up royally there.  You will, as Cagey puts it, invent whole new swear words.
 
It's difficult to say without fondling them in person, but those holes are supposed to be tight. The ferrules are a press-fit. I use a drill press to get the little buggers in. But, if they're too tight, you run the risk of splitting the headstock. Thing is, if you ream the holes out and they didn't need to be, you end up with loose ferrules and you could lose some sustain from having a sloppy string termination.

If your neck is finished, it's possible there's a bit of finish overhang in the holes that will make them seem smaller than they are. Rather than ream the things and risk chipping the finish, you might want to wrap a pencil with some 220 grit and see if just giving them a little kiss with that gets you where you need to be.
 
Cagey said:
It's difficult to say without fondling them in person, but those holes are supposed to be tight.

They are really tight, I can't even enter the ferrules in the hole.

Cagey said:
If your neck is finished, it's possible there's a bit of finish overhang in the holes that will make them seem smaller than they are. Rather than ream the things and risk chipping the finish, you might want to wrap a pencil with some 220 grit and see if just giving them a little kiss with that gets you where you need to be.

This is a great input. The neck is finished with the "satin nitro finish", so I need to do this carefully.

Bagman67 said:
The fit should be snug, but not necessarily so tight that you need to pound it in.  If you need to use a hammer, consider the potential for marring and/or splitting the wood - eek! - and then ream it out just a tiny bit at a time.  If you have access to a drill press, you can use the drill chuck and a piece of scrap board to press the ferrules in.

Ok, so stay away from the hammer... It should be tight but not "hammer tight", like hammering in nails...


Great Ape said:
I don't know about 'other ways'--there must be, but I've always used a reamer. Go slowly and carefully and it works out just fine.

I have ordered a reamer so I can do this carefully. I have also a trashy spare neck that I can practice on so I can get used to how much pressure I need.


I have also found this video https://www.youtube.com/watch?v=DzIyItNZ6Ic that shows how to do it. My holes is even smaller than he starts with in this video... So the reamer is needed.


Question #2
I thought the "Gotoh Vintage Tuners" from Warmoth was staggered tuners.  http://www.warmoth.com/Vintage-Tuners-Set-of-6-Left-Side-Chrome-P966C728.aspx. But they are not.

I was hoping to make this guitar without string trees, but since the tuners are not staggered I probably need it...
But I'm setting up this guitar with a hard tail bridge, is it so that when you don't have a tremolo, string trees will not cause so much "trouble"?


harry said:
I was hoping to make this guitar without string trees, but since the tuners are not staggered I probably need it...
But I'm setting up this guitar with a hard tail bridge, is it so that when you don't have a tremolo, string trees will not cause so much "trouble"?

String trees always cause trouble eventually, if not sooner. They were a quick-fix Leo came up with back in the early days of the Telecaster/Stratocaster because cutting nut slots by hand in a production environment was too time-consuming and inconsistent. You often ended up with strings popping out of the slots because there's no tilt-back on those headstocks. Put a tree on there to force some angle to the strings over the nut, and they'd stay in place better.

These days, nuts are often cut on some sort of machine or by somebody who knows what they're doing, so you don't have that problem. No need for trees that cause tuning issues. But, you still see them because they're traditional and expected.
 
Cagey said:
These days, nuts are often cut on some sort of machine or by somebody who knows what they're doing, so you don't have that problem. No need for trees that cause tuning issues. But, you still see them because they're traditional and expected.

So I with a correct shaped nut I can expect to not use string trees even when the tuners are not staggered? I'm considering to get staggered tuners... but think it may be a waste of money when I already have some nice tuners...
 
I haven't put a string tree on a headstock in years unless a customer specifically ordered it for vintage appearance's sake, and staggered tuners are getting a bit thin on the ground these days, too. That could be because more and more users are specifying locking tuners that don't need a lotta wraps, so they just make them with shorter pegs across the board.
 
I hope harry checks the board about how to drill pilot holes (and use lube) for his tuner screws before he breaks one off in the wood.
 
AutoBat said:
I hope harry checks the board about how to drill pilot holes (and use lube) for his tuner screws before he breaks one off in the wood.

I have already read it :-)
 
A little update on my project.

I have now successfully installed the Gotoh Vintage Tuners and it turned out realy great! Here is some experiences on the process.

index.php


Tips for installing gotoh vintage tuners (from a newbie to other newbies out there):

#1 Enlarging the headstock holes - Buy a reamer
If the holes in the headstock is to small, buy a reamer. Don't do any thing "smart" with drill bit etc. Stewmac.com has some nice (and expensive) ones. You will find a lot cheap ones on ebay (with variable quality I think). I bought a Swiss quality reamer from the scandinavian company ELFA https://www.elfaelectronics.com/elfa3~ex_en/elfa/init.do?item=80-589-87&toc=0&q=reamer and it worked great. The wood in a maple quarter sawn headstock is hard, so you need a sharp reamer.

I did a lot of practice on an old neck . So, find an old crappy neck on ebay and do your practice on that headstock. Remember: "If you have done it once before, you have 100% more experience the second time". So practice practice practice! If you don't have an old neck, drill a hole in a pice of wood and practice there. You always learn something when you do thinks the first time.

Take a look at these videos for instructions. Do it exactly as this guy do it :-)  https://www.youtube.com/watch?v=DzIyItNZ6Ic

index.php


#3 Get the bushings in - Make the cheap brilliant little tool
This tip is from =CB= here at the forum. http://www.unofficialwarmoth.com/index.php?topic=1065.0

[quote author==CB=]What I've done.... is take a nice rubber washer (Home Depot, faucet fix section) and a metal washer with 1/4-20 bolt, nut.. washer (Home Depot, hardware section) and made a sandwich and just screwed em on down.

Never one to pass up some generous screwing down action, here's the trick -

Get the the ol' bush started by finger pressure - if its really tight, you can chamfer the hole just a little to get it started.  Then put a flat washer on the bolt (I use stainless steel, dunno why) and slip the bolt trough the bushing.  Put the rubber over the shank, put a flat washer on that, and finally... apply the the nut.  Begin screwing.  Keep screwing till ya hit bottom, then take it out.  Repeat for the rest of 'em.  Done.[/quote]

If you don't manage to get the bushings all the way in with your thumb, you may think that a hammer may do the trick. I tried to give the bushings some very gentle taps with a rubber mallet, but this is not the way to go. So, don't pickup the hammer! You can very quickly end up with a cracked headstock.  The trick is to make the tool =CB= suggest. I made it, I did not find any rubber washer so I used felt and plastic from an old business card to protect the lacquer and the top of the bushing.

I made the tool with a M6 bolt and nut, and then used it to gently get the bushing in. Don't overdo it, you may crack the lacquer if you have it on your headstock.

index.php


index.php


#4 Mounting the tuners - Drill the hole in the correct size and get no broken screws
Again a followed the instructions on this video: https://www.youtube.com/watch?v=Ha71or0MuXE

The trick is to drill the correct size of the hole. If you drill the hole to small you will get a broken screw, and you will join the "broken-screw-gang" here on the forum.  The screws should go in like butter, not be forced in.

Since I live in Europe I have  to use drill bits in millimetres. In this thread I found a tip to use 2mm for the Gotoh vintage tuners screws. http://unofficialwarmoth.com/index.php?topic=11078.25

Since I hade a neck to practice on I did some testing on that neck, and 2mm was a perfect match! Use a piece of tape on the drill bit so you get the right depth of the hole.

Then after drilling the holes you need to lube the screws. I used beewax  and screwed the screw in and out one time before I finally mounted the tuning machines. The screw went in like butter. I did not use any force the get the screw in. The screw had a nice fit not too tight not too loose.

index.php


Thats all for now, to be continued...
 

Attachments

  • 2014-06-11 19.41.02.jpg
    2014-06-11 19.41.02.jpg
    95.8 KB · Views: 197
  • 2014-06-11 19.54.08.jpg
    2014-06-11 19.54.08.jpg
    87 KB · Views: 198
  • 2014-06-11 19.56.17.jpg
    2014-06-11 19.56.17.jpg
    126 KB · Views: 198
  • 2014-06-11 21.17.52.jpg
    2014-06-11 21.17.52.jpg
    136.6 KB · Views: 197
  • 2014-06-11 21.23.13.jpg
    2014-06-11 21.23.13.jpg
    131.5 KB · Views: 197
Excellent post Harry, it might be worth taking just that section and posting it in the Tips & Tricks section, called installing vintage Gotoh tuners or similar.
 
This is awesome.  I have a set of Tone Pros Kluson clones I'm going to install on a Warmoth bari neck soon, and I'll come back for this one for sure.


I hadn't seen the post of the Gentle Persuader (tm) ferrule insertion doodad, but having seen a photo, I know I have the hardware around the house to make one of my own - great idea, that.


Bagman
 
I have now installed the ferrules, and here is a little update on my experience (still from a newbie to a newbie).

I have a body that Warmoth lacquered for me. The lacquer is also inside the holes for the string ferrules. It was so much lacquer inside the hole that the ferrules did not even enter the hole. So I needed to figure out the best way to get my ferrules in.

My ferrules was bought from Warmoth and the holes is pre drilled from warmouth. This means that you will get ferrules that are not flush with the body. If you want the ferrules to be flush you will need to modify the hole. That is not easy if your body is already finished. I did find a solution by Cagey in post number 3 in this thread http://unofficialwarmoth.com/index.php?topic=17274.0 I don't have a drill press, so skipped this modification. I don't mind if the ferrules are not flush with the body.

If you think you can buy other ferrules that are build to be flush you may not find any one that fits or will work , because the hole is drilled to deep. Take a look at this picture from Callahamguitars.com

ferul_g1.jpg

http://www.callahamguitars.com/partsstr.htm

How to do it:
There are manly three different ways to install the string ferrules.  Cagey ( again :-) ) has described them here.
There's the brute force method, where you just hammer them in and pray you don't whack the finish in the process. Then, some like to use a soldering iron, heating the ferrule up and pressing it into the hole. Finally, there's the drill press method
http://unofficialwarmoth.com/index.php?topic=19645.0

I still don't have a drill press, so that's option is out. I checked out the solder iron trick, and did not get very convinced. The trick works, you heat up the ferrule so it melts the lacquer that's inside the hole and the ferrule can be pressed in.  But I think the risk to damage or boil the finish is to high. If you take a look at this video you will se that the lacquer is boiling on ferrule number 5 and destroys the finish around the hole.
https://www.youtube.com/watch?v=jkLZMdFnCOcv
The ferrules is also needed to enter the hole in the first place. Mine did not...

So I had to go for the "hammer" option, but I did not want to use a hammer and pray for not cracking the lacquer :-)

So here's my advices

#1
Find a properly shaped reamer/countersink for the hole. Gently remove the finish inside and on top of the hole, don't push it, let the sharp reamer do the work. The holes from warmoth is drilled correctly for the ferrules they sell 0.323" or 8,20mm. Its the laquer that is filling up the hole.  I drillede a 8mm hole in a wood piece so I could practice with my tools.  If you live in Scandinavia you may consider to buy this reamer/countersink: http://www.clasohlson.com/uk/Countersink/40-8466

index.php


#2
Use  the end of a 8mm drill bit to check the size of the hole. Since 8mm is smaller than 8,2mm you will not go to far and make the hole too big. The ferule is supposed to sit tight. When the 8mm bit is entering you can turn it around and use it by hand and remove some lacquer inside the hole.

index.php


#3
Test with the ferrule many times during the process so you know how it's going. Also keep the ferrule straight in the hole.

#4
Use a regular bit countersink by hand to touch and remove the hard lacquer edges, this will reduce the risk for breaking the lacquer.

index.php


#5
If necessary use the tip of a rounded file to very very gently remove the finish deeper inside the hole. Remember the you must not change the shape of the hole, just remove the finish. Don't let the file touch the lacquer edges of the hole.

index.php


#6
Keep the hole clean, you don't want any lacquer parts to block the hole. I used a "camera blower" to keep the hole clean for small lacquer parts.

#7
When the ferrule enters the hole and you can push it further with your thumb, but it not going all the way, you may consider to give it some small taps with a hammer with a rubber head or use a wood stick between the hammer and the ferrule. You want a snug fit.

Here's are all my ferrules mounted without any lacquer problems and in a straight line.
index.php
 

Attachments

  • 2014-06-16 22.36.21.jpg
    2014-06-16 22.36.21.jpg
    59.7 KB · Views: 139
  • 2014-06-16 21.59.18.jpg
    2014-06-16 21.59.18.jpg
    89.7 KB · Views: 141
  • 2014-06-16 21.11.58.jpg
    2014-06-16 21.11.58.jpg
    118.7 KB · Views: 143
  • 2014-06-16 21.11.43.jpg
    2014-06-16 21.11.43.jpg
    85.7 KB · Views: 142
  • 2014-06-16 21.11.25.jpg
    2014-06-16 21.11.25.jpg
    88.4 KB · Views: 143
On the ferrules interestingly the Warmoth vintage tele body will allow the Warmoth ferrules to be flush.

http://www.warmoth.com/Guitar/Body/Telecaster/Vintage/

http://unofficialwarmoth.com/index.php?topic=22445.msg332875#msg332875

On point 7 above a punch just slightly below the diameter of the ferrule could be used between it and a rubber mallet if you don't have a drill press. You can see one being used for bushings above.
 
stratamania said:
On the ferrules interestingly the Warmoth vintage tele body will allow the Warmoth ferrules to be flush.
http://www.warmoth.com/Guitar/Body/Telecaster/Vintage/

Interesting, I did not know that. Strange why this is not an option on the other bodies. Maybe it possible to do a custom order?

stratamania said:
http://unofficialwarmoth.com/index.php?topic=22445.msg332875#msg332875

On point 7 above a punch just slightly below the diameter of the ferrule could be used between it and a rubber mallet if you don't have a drill press. You can see one being used for bushings above.

A punch seems like a great idea. I was thinking about using a philip screwdriver but I was afraid for damaging the finish on the ferrule.

 
I don't know if the recessed ferrule is available as an option or not. It's only something I saw the other day when I wondered what's the difference with a vintage body apart from the flat bit near the jack.
 
I'm now finish with the build and here is some pictures of the beauty with a "vintage" matching chair :-)

Thanks for all the input and help from all the people on this forum.
 

Attachments

  • IMG_7832_2.jpg
    IMG_7832_2.jpg
    299.2 KB · Views: 13
  • IMG_7803_2.jpg
    IMG_7803_2.jpg
    264.3 KB · Views: 12
  • IMG_7828_2.jpg
    IMG_7828_2.jpg
    235.1 KB · Views: 8
  • IMG_7796_2.jpg
    IMG_7796_2.jpg
    333.2 KB · Views: 12
  • IMG_7790.jpg
    IMG_7790.jpg
    254 KB · Views: 6
  • IMG_7784_2.jpg
    IMG_7784_2.jpg
    221.6 KB · Views: 7
Back
Top