Leaderboard

Quilt Maple Burst

Schmitty

Junior Member
Messages
43
I will be attmepting my first finish starting some time early next year but i'm going to purchase a piece of quilt maple from my local specialty wood store to practice.

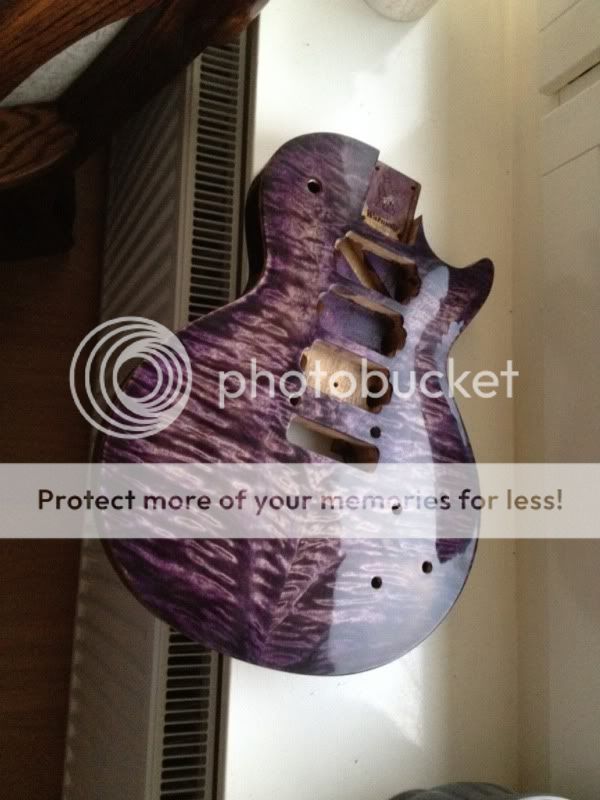
I am looking for a burst finish that would be a dark blue/ purple [almost black] center out to a black edge and pearloid binding. What i'm looking for is the guitar to look blue/black unless you hit the light the right way and see the blueish purple. Obviously i still want the figuring to pop so I think the hardest part will be to get the low grain filled with the right color. Is this even possible?

When i'm looking at the black dyed flame maple tops the low grain almost looks white/grey even though black dye was applied first. [i think] I want that to still be the case but the main rest of the grain to have the effect above.

 
I'm thinking about switching to lacewood but i'm still hopeing someone might have some advise as to which color to start with on the initial dye.
 
I would still start with the black.  Also...with maple..it is not really a fill, but rather a black dye and sandback.
 
I would advise against buying a plank of quilted Maple to practice on. For one thing, it's an expensive wood to start with and you're going to waste it. For another, unless you have a well-equipped woodshop you're probably going to have to pour some money into it to get it machined up to where you can see the quilt properly and get the response from your finishing efforts that you're looking for.

You can practice on Pine all day long for next to nothing. Get your finishing chops down that way. Once you think you've got that happening, buy some quilted Maple veneer and glue it to a piece of pine. Save you a helluva lotta money and still get you the results you're looking for.

As for what you're trying to accomplish, it's definitely doable, and you're going the right route to practice first.
 
I think it would be pretty sexy if you dyed the maple black, handed back and did a black burst and then covered the whole thing in trans purple. :headbang1:
 
pabloman said:
I think it would be pretty sexy if you dyed the maple black, handed back and did a black burst and then covered the whole thing in trans purple. :headbang1:
...
This is probably what I will do! Any suggestions on dyes? I'll do this a few times and post pics

I'm not planning in buying a plank...I can buy small pieces of scrap cheap...at least last time I was in there I could...

 
Cagey said:
I would advise against buying a plank of quilted Maple to practice on. For one thing, it's an expensive wood to start with and you're going to waste it. For another, unless you have a well-equipped woodshop you're probably going to have to pour some money into it to get it machined up to where you can see the quilt properly and get the response from your finishing efforts that you're looking for.

You can practice on Pine all day long for next to nothing. Get your finishing chops down that way. Once you think you've got that happening, buy some quilted Maple veneer and glue it to a piece of pine. Save you a helluva lotta money and still get you the results you're looking for.

As for what you're trying to accomplish, it's definitely doable, and you're going the right route to practice first.

Does pine have a similar response to dye as maple?
 
Schmitty said:
Does pine have a similar response to dye as maple?

No, not at all.

Really, Maple doesn't like dyes or stains. It's a closed-cell wood, and doesn't absorb things well. I was thinking more along the lines of perfecting your spray technique. Making bursts isn't terribly tough, but it's also not as straightforward as it looks.

Usually when you're dying Maple, you're sanding most of it off and just leaving a bit in the grain. If you left it all on, it would be splotchy and mottled-looking. Once you get to where you have a foundation to spray over, you use clear, tinted or solid finishes to achieve any kind of color effect. That's normally done within a coat or 3, then you spend the rest of your time putting clear coats over it.
 
That's what I've seen on most of the videos...my biggest concern is the spray and sanding steps..final coats...il see how it goes and hopefully if I have problems someone can advise how to correct it next time..thanks a bunch for allof the tips

Plan is to do a base of black and sand back...then do a black burst to the edges...sand back then final coat of burst..cover with purple/blue coat sand back lightly and then spray...see how that goes on pine or scraps if the still have them...once I heave it figured out and now the pigment mix I'll order the vip and give it a shot
 
In my experience, there's no sand-back of the burst. The fade is very thin and won't take it. So, once you have the base you want, you may want to put on a coat or two of sealer, fill if needed, more sealer, then you shoot the burst. Half-dozen or so sealer coats later, you start leveling between the last couple/few coats, then start with clearcoats. 2 years later...

But, everybody has their own way of doing things. It would be worth it to let a few others chime in before you start down any particular path.
 
It's real easy. Just dye the top black. Sand it back. Shoot some clear. Build it up, sand it down nice and level. Shoot your burst, for some added protection you could shoot some more clear and sand it down making sure its level then shoot the transparent purple. Final clear and good to go. The clear after every step is insurance. If you mess up you can sand away your mistakes and not hurt what's underneath, plus it adds depth. It's very straightforward. Been done a billion times and will be done a billion more. IME quilt and flame maple love dye. I've only used transtint with alcohol though.
 
a0eb75ac.jpg


I did the color of this one all by hand. I didn't spray the burst, I sanded it down, which is hard to do if you want to maintain the other colours. But it's doable and fun.
 
Orpheo said:
a0eb75ac.jpg


I did the color of this one all by hand. I didn't spray the burst, I sanded it down, which is hard to do if you want to maintain the other colours. But it's doable and fun.

Love that!!! All black hardware and you got a winner on your hands.  :hello2:
 
Orpheo said:
a0eb75ac.jpg


I did the color of this one all by hand. I didn't spray the burst, I sanded it down, which is hard to do if you want to maintain the other colours. But it's doable and fun.

I'm probably going to go a bit darker on the purple...almost a blue purple closer to black but that is a sweet paint job.  I plan on doing everything by hand because i don't have the best workshop...well none at all really just my garage. That is why i am planning on practicing a bunch on small pieces before I work on my VIP
 
No man, all gold! As usual.

Death by Uberschall said:
Orpheo said:
a0eb75ac.jpg


I did the color of this one all by hand. I didn't spray the burst, I sanded it down, which is hard to do if you want to maintain the other colours. But it's doable and fun.

Love that!!! All black hardware and you got a winner on your hands.  :hello2:
 
I have to disagree with Cagey on this one.  The quilt you can get is cheap enough to figure out what you are doing.  Quilt and flame maple take dye just fine.  I did numerous tests on a set of pieces I got off of eBay.  I did my entire bursted guitar that won one of those guit of the month things with dyes as well.

I used alcohol dyes.  For what you are talking about doing, I would dye the thing black, and sand it back to make the hard or lighter colored areas exposed.  It will look like the black and white look here.  Then dye the edge with purple.  Following with the middle with blue.  This will keep the purple very dark.  If you use alcohol dyes acetone will allow you to blend the transition.  Finally,  would use a q-tip and make a 1/4 inch border of black.  Not much dye needed here.  Use the acetone to blend that a bit.  I would be very careful with the blending.  When you think one more blend might make it look good, don't do it.

It will change quite a bit as you add a clear coat to the top.  Use a quality sanding sealer to lock the dye in the top.  Zinsser Wax Free shellac is a good one.  Then go ahead with the clear.

I would definitely go with the sample piece and figure out how the dyes behave.  There is very little on how much or how wide or any of those details out there for guitar dying.  So test it on a piece of wood first.  I got a bunch from eBay for quite cheap.  If the price at the store makes you wonder, check around.  Also you can cut up the test pieces and they make great coasters later on.
Patrick

 
I just don't like black hardware. I have black on 2 guitars and that's just because that was cheaper than anything else.
 
Where would everyone suggest spraying or hand dying if you don't have a proper vent system?

I'm planning on doing it in my garage but I'm concerned with the vapors and over spray if I go that route
 
Back
Top