NovasScootYa
Senior Member
- Messages
- 231
Click Photo Below...Prior to assembling guitars I built match grade M1As which required epoxy bedding the receiver to the rifle stock so the first time I experienced a loose fitting Fender neck pocket the solution to the problem was a no-brainer. I'm a stickler for not disturbing neck pocket inspector stampings and because of that I use an almost clear drying epoxy Acraglas Gel Kit from Brownells.
First setup the instrument and determine neck angle, alignment, bridge saddle settings, truss rod adjustments, playability, etc. If shimming the neck angle is necessary use two 1/4” diameter shims made from clear .012” thick plastic packaging or use whatever thickness material or shape works. A half drop of Superglue Gel holds each shim in the neck pocket corners.
Once setup has stabilized dismantle the instrument so to work only with the neck, neck plate, screws, body, bridge and strings. Since this is a wood on wood fix use a single layer of Glad-Wrap to wrap the neck heel tight and smooth. Twist and tie the Glad-Wrap above the frets. If possible the neck pocket should be mostly free of finish and the surface slightly roughened. Use the included release agent to thoroughly coat the mounting screw threads and plastic wrapped heel. To prevent any ooze-out from sticking to the body apply a line of release agent to the surface surrounding the neck pocket.
Allow the Acraglas Gel time to thicken very slightly before applying. Use enough Acraglas to cover shims gradually thinning towards the pocket front and if necessary coat the pocket walls. Apply sparingly, leave a very small area around each pocket screw bore uncoated. The epoxy will compress and too much like too little can be a problem.
Install neck by starting the screws before the heel makes contact with the epoxy. Tighten neck down lightly and secure, trim away excess plastic wrap at fret level, install the two E strings and align neck so the outer strings are equal distance from the neck edges; two used high E strings can be used for precise alignment. Tighten neck more checking action periodically, do not over tighten or fully tune. Everything should be set, checked and aligned as it was prior to dismantling. Let cure overnight.
Remove neck, peel away plastic wrap, trim and file excess epoxy. When using a Warmoth neck a molded impression of the turtle logo shows up on the pocket floor and can be left alone, sanded or scraped away. Prior to reinstalling the neck use wax or a soap bar to lightly coat the neck heel. Do not use the procedure on necks with inserts, practice on something expendable first. Molding method also works for building holding jigs, etc.
Note: For an original Micro Tilt Adjustment Screw to prevent the neck heel from bottoming out early 3-Bolt Fender neck pockets can have a slightly deeper end. The deeper pocket end allowed the adjustment screw to be tensioned and hold the neck level. Without the Micro Tilt hardware most early neck pockets with deeper ends require shims and epoxy bedding to level the pocket floor.
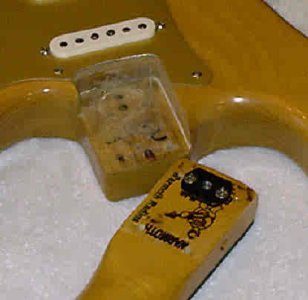
Photo below shows the workings of a ProAttach Kit and an Acraglas Gel epoxy bedded 3-Bolt neck pocket. Faint circles in the neck pocket corners are submerged shims.

http://www.brownells.com/.aspx/pid=1038/Product/ACRAGLAS_GEL_reg_
http://www.brownells.com/.aspx/pid=1048/Product/STEEL_BED_KIT
http://www.brownells.com/.aspx/pid=1033/Product/ACRAGLAS_reg_
First setup the instrument and determine neck angle, alignment, bridge saddle settings, truss rod adjustments, playability, etc. If shimming the neck angle is necessary use two 1/4” diameter shims made from clear .012” thick plastic packaging or use whatever thickness material or shape works. A half drop of Superglue Gel holds each shim in the neck pocket corners.
Once setup has stabilized dismantle the instrument so to work only with the neck, neck plate, screws, body, bridge and strings. Since this is a wood on wood fix use a single layer of Glad-Wrap to wrap the neck heel tight and smooth. Twist and tie the Glad-Wrap above the frets. If possible the neck pocket should be mostly free of finish and the surface slightly roughened. Use the included release agent to thoroughly coat the mounting screw threads and plastic wrapped heel. To prevent any ooze-out from sticking to the body apply a line of release agent to the surface surrounding the neck pocket.
Allow the Acraglas Gel time to thicken very slightly before applying. Use enough Acraglas to cover shims gradually thinning towards the pocket front and if necessary coat the pocket walls. Apply sparingly, leave a very small area around each pocket screw bore uncoated. The epoxy will compress and too much like too little can be a problem.
Install neck by starting the screws before the heel makes contact with the epoxy. Tighten neck down lightly and secure, trim away excess plastic wrap at fret level, install the two E strings and align neck so the outer strings are equal distance from the neck edges; two used high E strings can be used for precise alignment. Tighten neck more checking action periodically, do not over tighten or fully tune. Everything should be set, checked and aligned as it was prior to dismantling. Let cure overnight.
Remove neck, peel away plastic wrap, trim and file excess epoxy. When using a Warmoth neck a molded impression of the turtle logo shows up on the pocket floor and can be left alone, sanded or scraped away. Prior to reinstalling the neck use wax or a soap bar to lightly coat the neck heel. Do not use the procedure on necks with inserts, practice on something expendable first. Molding method also works for building holding jigs, etc.
Note: For an original Micro Tilt Adjustment Screw to prevent the neck heel from bottoming out early 3-Bolt Fender neck pockets can have a slightly deeper end. The deeper pocket end allowed the adjustment screw to be tensioned and hold the neck level. Without the Micro Tilt hardware most early neck pockets with deeper ends require shims and epoxy bedding to level the pocket floor.
Photo below shows the workings of a ProAttach Kit and an Acraglas Gel epoxy bedded 3-Bolt neck pocket. Faint circles in the neck pocket corners are submerged shims.
http://www.brownells.com/.aspx/pid=1038/Product/ACRAGLAS_GEL_reg_
http://www.brownells.com/.aspx/pid=1048/Product/STEEL_BED_KIT
http://www.brownells.com/.aspx/pid=1033/Product/ACRAGLAS_reg_