Leaderboard

First Build; Mostly Wires

Trotyl

Newbie
Messages
7
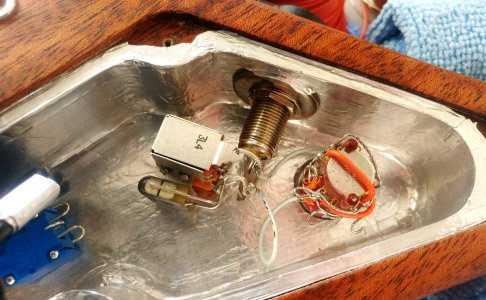
I build amplifiers for funsies and decided to try building a guitar for my wife, who's the real musician. Not having much experience with woodworking, I decided to have all the rough work cut by Warmoth. Very happy with the results, but you're all likely familiar with Warmoth work so I won't bore you with more. My wiring, on the other hand, might be unusual. This is mostly new to me but it sure is fun! Photo attached.
 

Attachments

  • some_wiring.jpg
    some_wiring.jpg
    803.6 KB · Views: 62
Welcome to the forum, Trotyl!


Can you explain what you've done here? It looks like a rotary switch on the right....and then I get dizzy. Some kind of push/pull pot in the middle?
 
Thanks, sure, and yes!  in that order.

The silver hooks on the rotary are where the pickup wires will be soldered. It's a 5-position rotary switch. I wanted to try an odd combo and couldn't figure out how to adapt a guitar switch, so I fell back on the industrial hardware I do know. The positions are:
-Bridge (humbucker)
-Neck (P90)
-Both parallel
-P90+Bridge "north" bobbin as a single coil
-Same as 4 but in series

Also yes for the push/pull potentiometer. It's 250k for tone (0.033uf paper foil capacitor) with the push taking the whole thing out of the circuit for when no treble roll-off is desired. The threaded cylinder is a is a 1/4" jack. It has the big washer because the nut is far too small alone.
 
Fine looking wiring, has “amp builder” written all over it  :icon_biggrin: Any chance of pictures of the wooden bits?

Welcome to the forum!
 
Welcome, anybody who uses a Grayhill rotary switch in his guitar is a friend of mine! Keep us posted on your progress.  :icon_thumright:
 
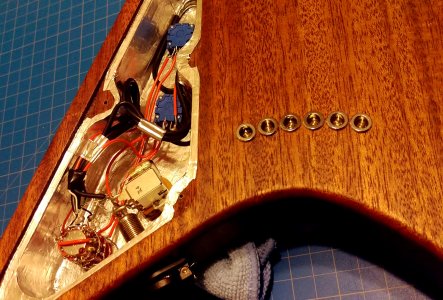
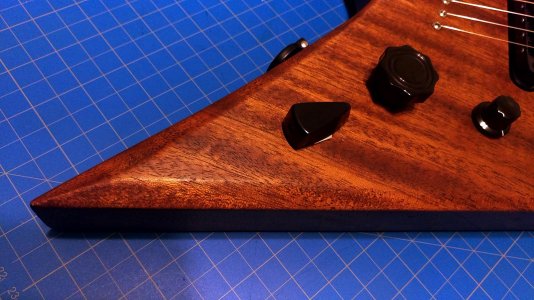
As requested, there're more of the woodybits in these photos. The wiring is complete, though I will need to tinker a bit more. By "a bit more," I actually mean "endlessly." 

The white balance is off in the photos. Actual appearance is much darker, more like a stained walnut color with the orange hues coming out in direct sunlight. Warmoth did all the routing and drilling, then I hand sanded to 400 grit. The finish is three coats of tung oil with a few weeks and light sanding between iterations. The tung oil was thinned with pine oil. Next time I'll use un-thinned tung; the mahogany soaked up the oil like a sponge!
 

Attachments

  • backside.jpg
    backside.jpg
    1.5 MB · Views: 35
  • short_corner.jpg
    short_corner.jpg
    212.4 KB · Views: 27
Looks fantastic!

I know what you mean about the Mahogany soaking things up. It's a pretty open-grained wood, so it's thirsty stuff. Unless you want the open-grain look, you usually have to do at least one pass of grain fill before you apply any finish, if not two or three.
 
Many thanks for the encouragements!

Cagey said:
I know what you mean about the Mahogany soaking things up...
The open grain was deliberate (trying to keep the wood texture while still stabilizing against weather) but I grossly underestimated the end-grain absorbency. It took weeks for the pine oil to evaporate out of the first coat. Just tung oil would have been a better option. I'm eager to refine the technique since the results surpassed expectations even with the miscalculation.
 
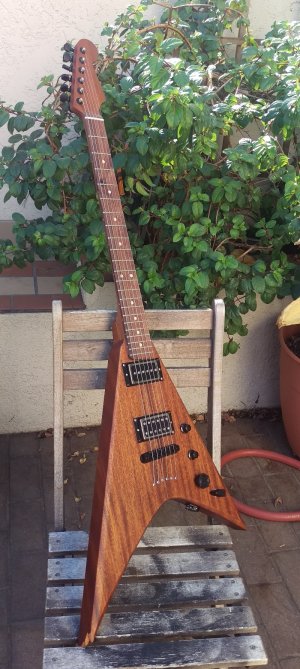
Assemblage complete!
Well, plenty of details to finish, and most of the setup. Not looking forward to setting intonation with the recessed TOM bridge. The long corner of the Vee suffered when the board it'd been screwed onto for handling split dramatically and unexpectedly. At least the electronics work as intended.
 

Attachments

  • gheetaur.jpg
    gheetaur.jpg
    534.3 KB · Views: 34
Awesome looking axe! Sucks about the broken tip, do you still have the piece so it can be repaired?
 
Quick addendum; the neck is actually  goncalo alves! The Warmoth showcase had an unusually dark goncalo neck that matched  what I was expecting from the mahogany body. The fretboard is pao ferro. Couldn't resist, and very happy with the fit and finish. I might have picked different inlays if it was an option (it already had the cream clay) but am pleased by how well they fit the otherwise black & nickel hardware.

BigSteve22 said:
Sucks about the broken tip, do you still have the piece so it can be repaired?
I do have the damaged corner piece but instead rubbed clear/raw tung oil into the break. It took on a gemstone quality lustre that I feel suits the aesthetic, and serves as a reminder to handle future builds more carefully. I was bummed at the time but it turned out well. A good learning experience.
 
Trotyl said:
BigSteve22 said:
Sucks about the broken tip, do you still have the piece so it can be repaired?
I do have the damaged corner piece but instead rubbed clear/raw tung oil into the break. It took on a gemstone quality lustre that I feel suits the aesthetic, and serves as a reminder to handle future builds more carefully. I was bummed at the time but it turned out well. A good learning experience.
If you're happy, that's all that counts. Again, congrats on a great build!  :icon_thumright:
 
Back
Top